TL;DR
- FlatList renders long, scrollable lists efficiently by virtualizing only visible items.
- Requires data and renderItem; supports ItemSeparatorComponent, header/footer, keyExtractor.
- Add pull-to-refresh with refreshing/onRefresh and infinite scroll via onEndReached settings.
- initialNumToRender speeds first paint; use SectionList for grouped lists with headers.
Fact Box
- FlatList requires data and renderItem props to render a list. Source
- Pull to refresh is implemented with refreshing and onRefresh props. Source
- Infinite scroll uses onEndReached and onEndReachedThreshold props. Source
- Facebook has 2.7 billion monthly active users. Source
- Instagram has 1.2 billion monthly active users. Source
How many apps have you seen that come with lists in them? These may be To-Do Apps, Apps with notes, Email Apps, Social Apps with lists of contacts, users, news, some highly specialized apps for the financial sphere with stock prices and real estate worth value, and so on.
The ubiquity of lists in applications, from shopping lists in note apps to more complex data displays in business software, underscores their fundamental role in organizing and presenting information in a clear, accessible manner, essential for user experience and functionality.
JavaScript offers a map function to build a list, since React.js is JavaScript-based the way to work with lists is similar. On the other hand, React Native is supposed to render native elements both for Android and iOS, so it has a different way of building lists. The most generic option to display a scrolling list of data in React Native was using ScrollView. Today two options are available to represent lists of data: FlatList and SectionList.
React Native accelerates the process of building apps across different platforms, thanks to the possibility of reusing most of the code between them. FlatList is a component that looks great both on iOS and Android. Let’s get to know it better.
Basics of React Native Flatlist
FlatList is a component responsible for the display of a list with similar data objects. The display of every element has an identical format and uses a common stylesheet. The data goes in a structured and scrollable manner.
FlatList uses ScrollView component to render elements, however, it comes without pure performance issues of ScrollView and with some additional features out of the box that allow us to build a better UI and make the development process easier.
The FlatList component comes into play when you need to display a long scrollable list of items.

There are two required props for React Native FlatList component – data and renderItem.
The data prop is the data that is displayed in the FlatList component. The type of data can be any from starting an array of numbers to an array filled with JSON objects that you fetched through API.
The renderItem prop is a function that takes every item object from the data prop and renders them into the list component. If you want your data to display with special styling, you can do this within the renderItem or refer to the method through the renderItem the prop that creates styling for you (an example: renderItem={this.RenderStyling}).
There are a bunch of optional props that can be helpful in development. You can find a full list of them in the official documentation, we mention some of them we are going to use further in the article.
The list of props :
ItemSeparatorComopnentrenders an element between each item and serves for visual separation of items in the list. It isn’t rendered at the top and the bottom of the list.KeyExtractoris a function that uses unique keys of items from the data to track updates and only re-render the items that have been changed. This keyExtractor is a custom implementation of the filed named key in a data item. It is also used to track the reordering of the items.- ListHeaderComponent is an element that renders at the top of the list. It is mostly used to add a search line at the beginning of the list.
- ListFooterComponent is a component that is rendered at the bottom of the list.
- Pull to refresh is implemented by using onRefresh and refreshing props.
- Infinite Scroll is implemented by using onEndReached and onEndReachedThreshold props. They allow to rendering of items from the next page in the list and implement lazy loading.
initialNumToRenderprop sets the initial amount of items to render. It’s used to boost the speed of the first render.
The alternative FlatList is a SectionList component. SectionList has recently appeared and is used to add a list of sections with headings for every group of items in the list. It may be useful only if need headings and items in the list are divided into logical groups, otherwise use FlatList.
Why React Native Flatlist is great?
There are some benefits FlatList has:
- The function renders native blocks exactly for mobile platforms.
FlatListdoesn’t require a lot of code. It needs only two props to start and you don’t have to make a fancy style to render the list of items – just userenderItemprops and you are good to go.FlatListis great for performance especially when you deal with a large array and you don’t know the exact number of the items that will render in one list. Displaying large data sets during one render is bad for performance, and React NativeFlatListonly renders elements that are visible on the screen and only updates items that have been changed.
How to implement React Native FlatList
The full code with the final result you can find here:
Let’s look at how we get that result step by step.
Start with importing all the necessary staff we have mentioned in the previous chapter. We need React and some methods from react–native.
import React from 'react';
import { StyleSheet, Text, View, SafeAreaView, FlatList, Platform, SafeAreaProvider} from "react-native";
Consider that you have a data array with Marvel heroes, where every hero has its unique serial id (these numbers are just serial keys and don’t imply the ranking of heroes).
const MarvelList = [
  {id: 1, name: 'Black Panter'},
  {id: 2, name: 'Black Widow'},
  {id: 3, name: 'Captain America'},
  {id: 4, name: 'The Collector'},
  {id: 5, name: 'Doctor Strange'},
  {id: 6, name: 'Hawkeye'},
  {id: 7, name: 'Heimdall'},
  {id: 8, name: 'Hela'},
  {id: 9, name: 'Hulk'},
  {id: 10, name: 'Iron Man'},
  {id: 11, name: 'Loki'},
  {id: 12, name: 'Nick Fury'},
  {id: 13, name: 'Falcon'},
  {id: 14, name: 'Wanda Maximoff'},
  {id: 15, name: 'Shocker'},
  {id: 16, name: 'Spider-Man'},
  {id: 17, name: 'Thanos'},
  {id: 18, name: 'Thor'},
  {id: 19, name: 'Valkyrie'},
  {id: 20, name: 'Vision'},
  {id: 21, name: 'Vulture'},
  {id: 22, name: 'War Machine'},
  {id: 23, name: 'Winter Solder'},
  ];
That array will become the first required props of the React Native FlatList.
Now, to render the list, we create a component called Marvel and declare a style for our future list so the scroll would not intersect with the future header:
const Marvel = () => {
      return (
        <SafeAreaView style={styles.separateHero}>
        </SafeAreaView>
        )
    }
const styles = StyleSheet.create({
  separateHero: {
    height: '100vh'
},
});
export default Marvel
Use FlatList
Then useFlatList component from react-native to display the list of Marvel Heroes. We pass the array of data with Marvel heroes via the data prop. And then use renderItem prop to render the content. The renderItem function gets heroes’ names from the array and renders a list component with all names from our array. To turn that into life we need to declare a renderItem function that would be passed as the second required prop to FlatList.
Import...
const renderItem = ({item}) => {
  return <View><Text>{item.name}</Text></View>
}

const Marvel = () => {
      return (
        <SafeAreaView style={styles.separateHero}>
          <FlatList
            data={MarvelList}
            renderItem={renderItem}
            />
        </SafeAreaView>
        )
}

export default Marvel
ItemSeparatorComponent
Add a line between list items to separate them. Use ItemSeparatorComponent prop to add a line between list items that is a view component with a special ‘separator’ class in the stylesheet. We also include a new prop in the Flatlist component called ItemSeparatorComponent.
Import...
const Marvel = () => {
      return (
        <SafeAreaView style={styles.separateHero}>
          <FlatList
...
            ItemSeparatorComponent={
              Platform.OS !== 'android' &&
               (({ highlighted }) => (
                 <View
                    style={
                       styles.separator
             }
...
 />

const styles = StyleSheet.create({
  separator: {
    height: 1,
    width: "100%",
    backgroundColor: '#ff0000',
  }
});
KeyExtractor
There are unique identifiers for every hero within FlatList. The IDs must be string type, not number.
To use them we create a function MyKeyExtractor that extracts a unique key of every element from the MarvelList array, by which FlatList can update these elements most effectively, for example, when you delete one element somewhere in the middle of the list.
In the Flatlist component we write an additional line of code that calls keyExtractor props.
Import...
const myKeyExtractor = (item) => {
  return item.id
}

const Marvel = () => {
      return (
        <SafeAreaView style={styles.separateHero}>
          <FlatList
...
            keyExtractor={myKeyExtractor}
...
 />

export default Marvel
Header
It is a component at the top of the list. The sequence of steps to add a header is the same as adding the separator.
We define a function renderHeader that renders the interface of the header we need. And then pass the function for rendering to React Native FlatList component as a Header. Besides this way, you can header by using ListHeaderComponent prop and with the help of the state. Additionally, in the stylesheet we define two new styles for the whole header and text inside it.
Import...
const Header = () => {
  return (
    <View style={styles.header}>
      <Text style={styles.headerText}>
        Marvel list
      </Text>
    </View>
  )
}

const Marvel = () => {
      return (
        <SafeAreaView style={styles.separateHero}>
 <Header />
          <FlatList
...
 />

const styles = StyleSheet.create({

    header: {
      backgroundColor: 'red',
      width: '100vw',
      height: 45,
      justifyContent: 'center',
      alignItems: 'center',
      marginBottom: 20
    },
    headerText: {
      color: '#fff',
      fontSize: 18
    },
});

export default Marvel
Footer
To add a footer you need to do the same steps that you made with the header. We add a footer component, write two more classes in the stylesheet for the footer and the text for it, then add our Footer to the Marvel component. An alternative to adding the footer is to use listFooterComponent.
Import...
const Footer = () => {
  return (
    <View style={styles.footer}>
      <Text style={styles.footerText}>
        Thanks for reading!
      </Text>
    </View>
  )
}

const Marvel = () => {
      return (
        <SafeAreaView style={styles.separateHero}>
          <FlatList
...
 />
          <Footer />
const styles = StyleSheet.create({
    footer: {
      backgroundColor: 'white',
      width: '100vw',
      height: 45,
      justifyContent: 'center',
      alignItems: 'center',
      bottom: 0
    },
    footerText: {
      color: '#000',
      fontSize: 18
    }
});

export default Marvel
Pull to refresh
To add pull to refresh two props are required – refreshing and onRefresh. The first prop is an indicator of the type of boolean that tracks whether the view should be updated or not. onRefresh is a function responsible for loading new data and updating the items in FlatList. onRefresh comes into play when the refreshing prop is set to true.
To implement the pull to refresh option we need to use the useState hook and declare the handleRefresh function that updates the state of the component. Then add handleRefresh function in FlatList component.
Import...
const Marvel = () => {
const [refreshing, setRefreshing] = React.useState(false)

    const handleRefresh = () => {
      setRefreshing(prevState => !prevState)
    }

      return (
        <SafeAreaView style={styles.separateHero}>
          <FlatList
...
            onRefresh={handleRefresh}
/>

export default Marvel
Examples of React Native FlatLists
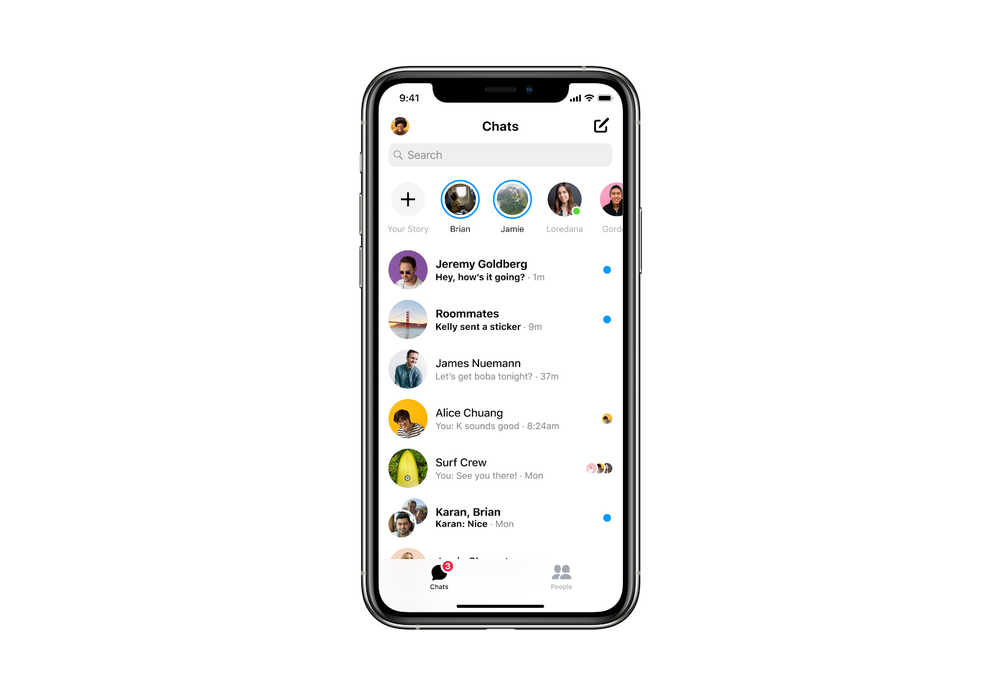
Facebook team has developed the React Native, so there is nothing strange they have used this technology in Facebook app development. Facebook is the most popular social network worldwide with 2,7 billion monthly active users. Social networks belong to that type of app where lists are extremely demanded. Since the number of users is very high and the app generates millions of gigabytes of data every month, the app has to perform great to provide fast rendering. And if you are a user of Facebook app you may have noticed that your list of contacts works fast.

Instagram is the most popular photo and video-sharing app with 1,2 billion monthly active users. The app was released on market on April 3, 2012, and then Facebook acquired it on April 9 the same year. All further development was carried out by the Facebook team. React Native technology showed its strengths again, so today Instagram has grown to the fifth-biggest social media platform worldwide. It unites people from all over the world from small businesses to big ones, news organizations to cultural institutions, celebrities, photographers, and musicians.
Facebook Ads Manager
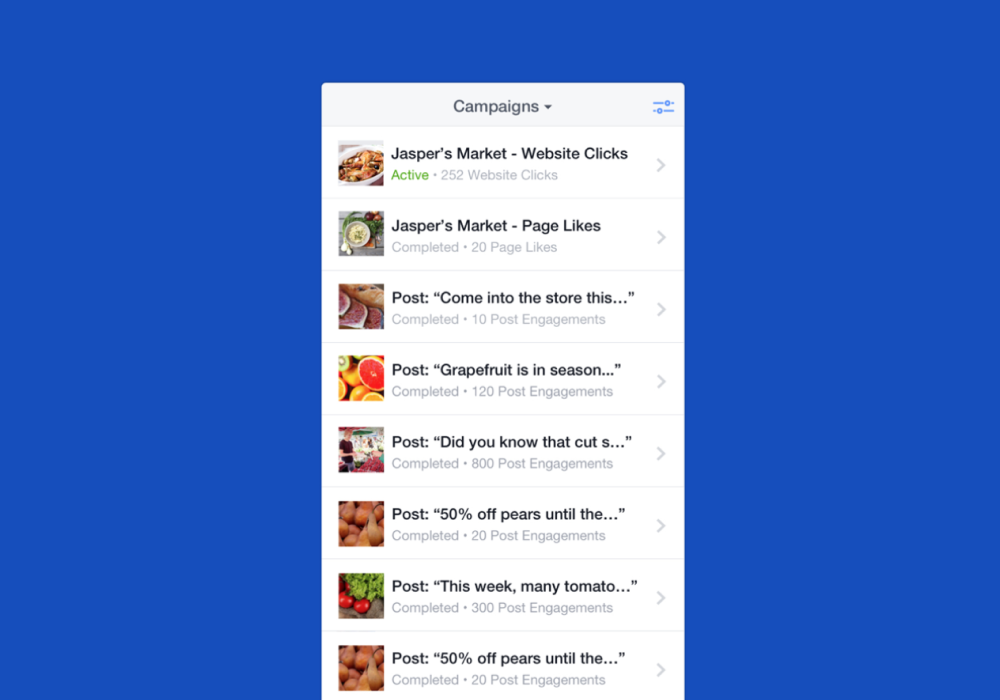
Facebook Ads Manager is a business tool to create Facebook ads and manage them. Since Facebook is the most popular social media platform, it became a very huge digital advertising platform. Here Facebook Ads manager comes to play, it allows to manage Facebook and Instagram ads: upload them, set budgets, monitor results. All these opportunities are collected inside a small React Native-based app.
Shopify
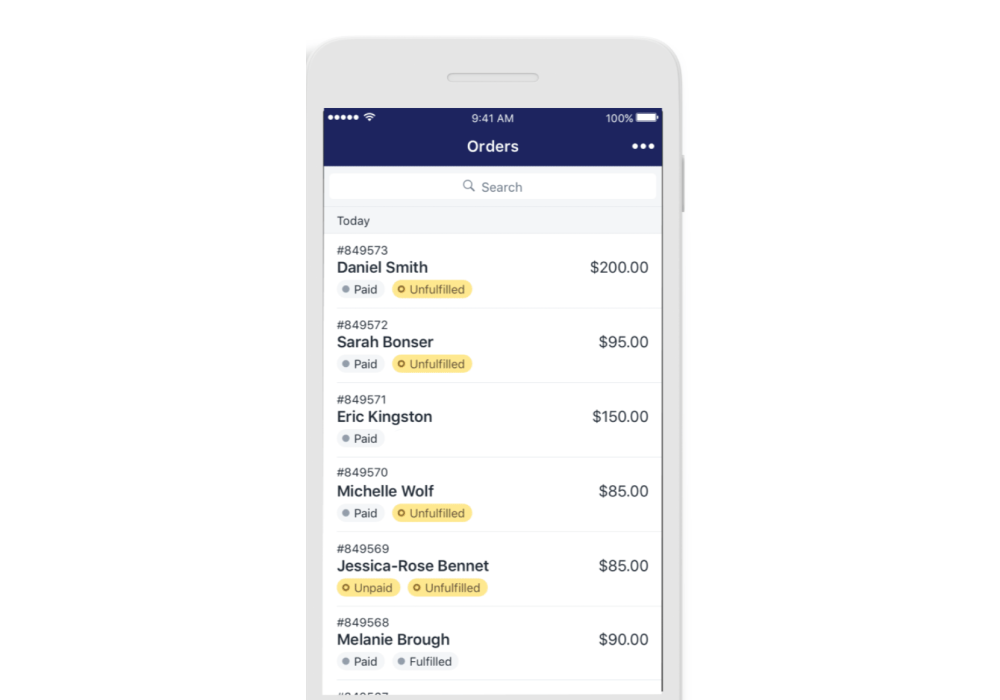
Shopify is a subscription-based software that allows anyone to set up an online store and sell their products. Shopify is just a store builder or a tool to sell your products with over 1 million Shopify users. The team of developers chose to work with React far away in 2018 when they rewrite their app Arrive and developed Shop App. They continued that acquaintance with React Native and are consistently embedding React Native in their apps.
Conclusion
We have built a list of Marvel heroes in this article using React Native Flatlist. If you want to learn more about that component we highly recommend referring to the official documentation and real examples like the one we made. Hope the article was helpful, thanks for reading.