TL;DR
- Hooks (v16.8) enable state and lifecycle in functional components, making them viable for full apps.
- Syntax differs: functions use props and hooks; classes use this, state, and lifecycles.
- Performance is comparable; tests show no significant render-time difference.
- Choose by team style and needs; both test well with Jest/Enzyme; hoisting and value capture differ.
Fact Box
- React first released in 2013 with version 0.3.0. Source
- At writing, the current React version was 17.0.1. Source
- React v16.8 (2019) introduced Hooks for functional components. Source
- React docs: Hooks aim to cover class use cases; some lifecycles lack equivalents yet. Source
- A test rendering 10,000 class vs functional components showed no render-time difference. Source
When deciding between Functional Components and Class Components in React.js, developers often find themselves asking questions such as: What is the difference between Functional Components and Class Components? What are the pros and cons of each? Which one should I use for my project?
The debate between Functional Components and Class Components has been a hot topic in the React.js community. With the emergence of React Hooks, developers have had to re-evaluate their decision and decide which one is better for their project. By exploring both options, developers can make an informed decision on which one is best for them.
In this article, we will provide a comprehensive understanding of the differences between Functional Components and Class Components in React.js, and you will be able to decide which one is best for your project.
The history of React.js components
We should jump into the history of React first to understand how React components evolved. React, created by Facebook software engineer Jordan Walke, is an open-source front-end JS library for building interactive user interfaces. The first release was in 2013, with 0.3.0 version. React has got further development and updated several times every year. The React team added more and more new features to the library to give developers more tools for coding. Among the most famous and loved features are the virtual DOM, one-way data-binding, JSX, reusable components, declarative programming, stable code, fast rendering of UI elements, great performance optimization opportunities. The current version at the time of writing this article is 17.0.1.
Along with all these benefits React offered it also gave developers two types of components they could use to create UI components. It can be supposed that both types of components provide the same opportunities for writing UI elements, and the choice depends only on the developer’s preferences. Well, it wasn’t true. The real situation was that class components were the only viable option to develop complex apps with React. The reason was that using class components you get a large number of capabilities, for example, state, while functional components didn’t provide such an option. However, the situation changed when React v.16.8 was released in 2019. A new version contained an update that was meant to take the development with functional components to the next level. React offered Hooks for functional components. The introduction of Hooks made it possible to write the entire complex application using only functions as React components. This is a deeply significant event that changed the way of React apps development. Keeping that in mind, we are going back to the present time and find out what is happening now and what functional and class components are.

Functional components in React
Functional components in React are just JavaScript functions like this:
function Foo(props) {
 return <h1>Who is living young, wild, and free? - {props.name}</h1>;
}
const element = <Foo name="Me!" />;
ReactDOM.render(element, document.getElementById('home'));
In our case, we render an element that represents the user-defined component called Foo. The element passes JSX attribute name=” Me” as a prop to our function component Foo, which returns a <h1>Who is living young, wild, and free? – Me!</h1> element as the result.
Props are inputs for both types of components. One of the main tasks of props is to pass information from component to component. It’s especially necessary if you want to build a dynamic user interface. However, there is one important rule that you shouldn’t forget: props are read-only. That means that all React components shouldn’t change their inputs and the same props must return the same result. Components that respect their props are called “pure”. That rule works both for class and function components.
JSX is a special extension that allows us to place HTML elements right inside JavaScript code without using additional methods like createElement(). All your HTML tags will be converted into React elements after compilation. JSX may be convenient, however, it is an optional instrument for development. To see how the same blocks of code look like with/without using JSX try the online Babel compiler.
Another way of writing function components is by using an arrow function.
An example of an arrow function:
const App = () => { //that is an arrow function
 const greeting = 'Hello Function Component!';

 return <Headline value={greeting} />;
};

const Headline = ({ value }) =>
 <h1>{value}</h1>;

export default App;
Arrow functions have some benefits:
- The code written with arrow functions looks compact. Functions are easier to write and read. One of the reasons is an implicit return by simply omitting the curly braces (see video with an example).
- Arrow syntax doesn’t contain its context and automatically bind
thisto the surrounding code’s context
But since arrow functions give one more way to write code (along with standard functions and classes) you need to set rules when we use any of them. As an example you can stick to the following rules:
- If you work with global scope and Object.prototype properties use
function. - If you work with object constructors use
class. - If you face any other situation use
arrow function.
The examples above are called stateless function components because they just take props as an argument and return a react element. They don’t manage state and don’t have a lifecycle, while class components do. However, you can use Hooks with them that allow you to work with state and lifecycle and add even more features. We will speak about that in the comparison below.
Class components in React.js
Let’s start with an example:
class Foo extends React.Component {
render() {
 return <h1>Who is living young, wild, and free? - {this.props.name}</h1>;
}
}
It is a regular ES6 class that extends the component class from the react library. To return HTML you have to use render() method in it.
Class components work fine with props as well as functional components do. To pass the props to a component you can use a syntax similar to HTML attributes. In our sample case we need to replace props.name with this.props.name in the render() body to use props.
Additional benefits class components offer by default are state and lifecycle. That is why class components are also known as “stateful” components.
The state of a component is an observable object that holds some information and controls the behavior of the component. The difference between props and state is that props don’t change over time during the lifetime of a component. The state holds the data that can be changed over time and changes the component rendering as a result.
The state of a component is supposed to have the initial this.state that can be assigned with a class constructor. The class constructor is a special JavaScript method that allows to bind event handlers to the component or to initialize the local state of the component.
If you don’t need to handle any of both cases above the implementation of a constructor is unnecessary. Example of a constructor:
constructor(props) {
 super(props);
 this.state = {};
}
Constructor() function inside a React component requires super(props) before any other statement. Super(props) is a reference to parents constructor() function, that React.Component base class has. When we define a new constructor() inside a class component, we replace the base constructor() function. However, it has some code inside of it we still need. So to get access to that code we call super(props) – that is why we have to add super(props) every time we define a constructor() inside a class component. The constructor() is called before the React component is mounted. To use state in a class component we must define the initial state of it in the constructor. Instead of calling setState(), we need to assign the initial state with this.state command in the constructor. It’s the only case when we are allowed to change the state directly by assigning its value, otherwise use setState() instead. Constructor() has other rules you should be aware of, you can read about them on the link.
Differentiating Functional vs Class components
1.State and lifecycle
Well, the standard answer to the question about the difference between functional and class components was that class components provide developers with such features as setState() and lifecycle methods componentDidMount(), componentWillUnmoun(), etc., while functional components don’t. That was true because functional components are plain JavaScript functions that accept props and return React elements, while class components are JavaScript classes that extend React.Component which has a render method. Both state and lifecycle methods come from React.Component, so they were available only for class components. The widespread advice was something like that: “Go with functional if your component doesn’t do much more than take in some props and render”. You had no options on how to build complex UI and class components dominated in React development for a while.
However, that has changed with the introduction of Hooks. To replace setState method to work with the state in class components React offers useState Hook.
To work with components lifecycle classes have such methods like componentDidMount, componentWillUnmount, componentWillUpdate, componentDidUpdate, shouldComponentUpdate. Functional components have got a tool to work with the same methods using only one Hook useEffect. You can think of useEffect Hook as componentDidMount, componentDidUpdate, and componentWillUnmount combined.
Standard class methods work well but do look not very elegant. Functional components offer an elegant and simple decision: instead of using multiple lifecycle methods, we can replace them with one Hook useEffect. What React developers write about Hooks:
“Our goal is for Hooks to cover all use cases for classes as soon as possible. There are no Hook equivalents to the uncommon getSnapshotBeforeUpdate, getDerivedStateFromError and componentDidCatch lifecycles yet, but we plan to add them soon. It is an early time for Hooks, and some third-party libraries might not be compatible with Hooks at the moment.”
an official React documentation
So Hooks are more addition to functional components rather than a replacement of class components.
2. Syntax
The obvious difference is the syntax. Let’s examine several examples.
How we declare components.
Functional components are JavaScript functions:
function FunctionalComponent() {
 return <h1>Hello, world</h1>;
}
Class components are classes that extend React.Component:
class ClassComponent extends React.Component {
 render() {
 return <h1>Hello, world</h1>;
 }
}
To return our h1 we need the render() method inside a class component.
The way we pass props.
Let’s say we have props with the name “First”.
<Component name = “First” />
Working with functional components, we pass the props as an argument of our function using the construction “props.name”.
function FunctionalComponent(props) {
 return <h1>Hello, {props.name}</h1>;
}
With class components, we need to add this. to refer to props.
class ClassComponent extends React.Component {
render() {
 return <h1>Hello, {this.props.name}</h1>;
}
Handling state.
To handle state functional components in React offer useState()Hook. We assign the initial state of count equal to 0 and set the method setCount() that increases it by one every time we click a button. The component returns the number of times we clicked the button and the button itself. The initial state is used only during the first render. The type of argument can be a number, string, object, or null. To learn more about that useState() Hook see the official documentation.
const FunctionalComponent = () => {
const [count, setCount] = React.useState(0);
return (
 <div>
 <p>count: {count}</p>
 <button onClick={() => setCount(count + 1)}>Click</button>
 </div>
 );
};
Class components work a bit differently. They use setState() function, require a constructor, and this keyword.
class ClassComponent extends React.Component {
 constructor(props) {
 super(props);
 this.state = {
 count: 0
 };
 }

 render() {
 return (
 <div>
 <p>count: {this.state.count} times</p>
 <button onClick={() => this.setState({ count: this.state.count + 1 })}>
 Click
 </button>
 </div>
 );
 }
}
The underlying logic is similar to the logic in functional components. In constructor() we declare a state object, state key “count” and the initial value equal to 0. In render() method we use setState() function to update the value of our count using this.state.count and the app renders the number of times the button was clicked and displays the button itself. The result is the same, but the same functionality requires more lines of code for class components. However, it doesn’t mean that the code written with class components will be more cumbersome than the code made with functional components, but the code definitely will be bigger.
Lifecycle methods.
With version 16.8 React allows working with lifecycle methods of components. That means that developers have better control over functional components and can manipulate their life phases (initialization or setting the initial state, mount, update, unmount). The initialization is explained in the paragraph above, let’s look at the next stage.
Mounting.
The useEffect Hook for functional components:
const FunctionalComponent = () => {
 React.useEffect(() => {
 console.log("Hello");
 }, []);
 return <h1>Hello, World</h1>;
};
The componentDidMount method for class components:
class ClassComponent extends React.Component {
 componentDidMount() {
 console.log("Hello");
 }

 render() {
 return <h1>Hello, World</h1>;
 }
}
The useEffect Hook possesses two parameters: the first is the “effect” itself that is going to be called once after every render of the component. The second parameter is an array of observable state or states (or so-called a dependency list). useEffect Hook only runs if one of these states changes. Leaving the second parameter empty useEffect Hooks runs once after render.
Updating.
The useEffect Hook for functional components:
function BooksList () {
 const [books, updateBooks] = React.useState([]);
 const [counter, updateCounter] = React.useState(0);

 React.useEffect(function effectFunction() {
 if (books) {
 updateBooks([...books, { name: 'A new Book', id: '...'}]);
 }
 }, [counter]);

 const incrementCounter = () => {
 updateCounter(counter + 1);
 }
 ...
}
The componentDidUpdate method for class components:
componentDidUpdate(prevProps) {
 // Typical usage (don't forget to compare props):
 if (this.props.userID !== prevProps.userID) {
 this.fetchData(this.props.userID);
 }
}
As we have mentioned the second parameter in the useEffect hook is an array of observable states, once a counter changes it triggers the effectFunction hook.
Unmounting.
The useEffect Hook for functional components (yes, again):
const FunctionalComponent = () => {
 React.useEffect(() => {
 return () => {
 console.log("Bye");
 };
 }, []);
 return <h1>Bye, World</h1>;
};
The componentDidUnmount method for class components:
class ClassComponent extends React.Component {
 componentDidMount() {
 console.log("Hello");
 }

 render() {
 return <h1>Hello, World</h1>;
 }
}
3. Hoisting works only for functional components
Hoisting is a concept that appeared in ECMAScript® 2015 Language Specification. According to that concept, JavaScript moves variable and function declarations to the top that allows you to access a variable or a function first and only then declare it. Actually, JS doesn’t move the code, it puts declarations in memory during the compile phase that allows calling a function before you declare it. That is not true to classes, trying to get access to a class before the declaration throws a ReferenceError exception.
An example of the code where we call function before its declaration:
catName("Tiger");
function catName(name) {
 console.log("My cat's name is " + name);
}
// The result of the code above is: "My cat's name is Tiger"
Even though we call the function before we write it, the code works great. The following code with class declaration will throw an error:
const p = new MyName(); // ReferenceError
class MyName {}
That is not all. JavaScript only hoists declarations, not initialization. If we declare a variable and call it before the initialization it returns undefined. See example:
console.log(myName); // Returns undefined, as only declaration was hoisted
var myName; // Declaration
myName = "John"; // Initialization
Initializations with keywords let and const are also hoisted, but not initialized. That means that your app is aware of the variable existence. However, it can’t use it until variable initialization. The example below will throw a ReferenceError:
myName = "John";
let myName;
That example will not run at all:
myName = "John";
const myName;
Why does it matter? Let’s get back to React and create a simple React app in index.js file with one component in a separate file Component.js:
import React from 'react';
import {render} from 'react-dom';
import App from '.Component';render(
 <App/>,
 document.getElementById("root")
);
And the component itself:
const Component = () => {
return (
<div>Hello, React</div>
);
}
export default Component;
The app renders a text: “Hello, React”. Since the component is small, there is a sense not to separate it and merge it into index.js file like this:
import React from 'react';
import {render} from 'react-dom';
render(
<Component/>,
document.getElementById("root")
);
const Component = () => {
return (
<div>Hello, React</div>
);
}
And we get an undefined error because we try to render a component that was declared with an arrow function before we initialize it.To repair the code just re-order the declaration and put it before calling render().
4. The way they capture values (props)
One interesting experiment (the original article with full analysis can be found here) that took place on the Internet is the following React app.
It’s a simple app that simulates a social network request to follow someone. The app displays a drop-down list with three profiles to follow, static greetings text, and two buttons that call the confirmation alert to start following a chosen person. The confirmation alert appears 3 seconds later after you clicked the button. The delay is set with setTimeout() method.
The list of the experiment is the following:
- Choose a profile to follow
- Click a follow button with “function” text in brackets near it
- Change a profile to follow in the drop-down list before the confirmation alert appears
- Check the name in the confirmation alert
- Repeat the same four steps above for the follow button with “class” text in brackets
In the first case with the functional button switching the name doesn’t affect the confirmation alert. With the class button switching the name changes the alert message, even though you clicked to follow Dan but switched to Sophie, the alert message will be “Followed Sophie”. The correct behavior is the first, of course. No one likes to follow a wrong profile on social media.
The reason for such a behavior lies in the essence of functional and class components. Let’s examine these lines of code:
class ProfilePage extends React.Component {
 showMessage = () => {
 alert('Followed ' + this.props.user); };

And:
function ProfilePage(props) {
 const showMessage = () => {
 alert('Followed ' + props.user);
 };
As we have said props are read-only, they are immutable. So once you pass the props to a functional component ProfilePage(props), the only remaining task for React is to render it after the time is up.
On the other hand, this is mutable. And it’s okay because it allows us to use states and lifecycle methods correctly. So if we pass other props while the alert message doesn’t appear, this.props.name. changes and showMessage method displays the last version of props. Our showMessage method is not tied to any particular render and that may become a problem.
There are several potential solutions that actually work. One of them is to catch props at the time of render like this:
class ProfilePage extends React.Component {
 render() {
 // Capture the props!
const props = this.props;
 // Note: we are *inside render*.
 // These aren't class methods.
 const showMessage = () => {
 alert('Followed ' + props.user); };

 const handleClick = () => {
 setTimeout(showMessage, 3000);
 };

 return <button onClick={handleClick}>Follow</button>;
 }
}
So we stuck our certain props to a particular render().
5. Running tests
There are two most popular instruments for running tests: Enzyme and Jest. Enzyme is a JavaScript testing utility for React that allows testing React components’ display. Jest is a JavaScript testing framework for writing tests, in other words, for creating, running, and structuring tests.
These two instruments do a great job on both types of components. There are some specificities in running tests for functional components, like the fact, that state hooks are internal to the component and can’t be tested by calling them. However, instruments and methods are similar.
6. Performance difference
There is an opinion that functional components show a greater performance compared to class components. The point is that the React functional element is a simple object with 2 properties: type(string) and props(object). To render such a component React needs to call the function and pass props – that is all.
Class components are more complex: they are instances of React.Component with the constructor in it and complicated system of methods for manipulating state and lifecycle.
Theoretically, calling a function should take less time than creating an instance of a class. Well, one developer held a test: he rendered 10000 elements of stateless components and class components. You can see the result here. As we see from the 3 experiments there is no difference in render time between rendering class and functional components.
To sum up everything above:
- Сlass components were the only option to add states to components and manipulate lifecycle. However, it has changed since the introduction of Hooks, which gave the same opportunities to functional components as classes had.
- The major difference is the syntax. It relates to the way we declare components, pass props, handling states, manage lifecycle.
- Function components capture the props and state by default. It is not a bug, but a feature of functional components.
- Functional components require less code to write an equal component. However, that doesn’t mean that functional components more readable and convenient to use. If a developer is used to work with object-oriented programming, he finds using class components much more comfortable. Those who are used to functional programming like functional components more than class components.
- There are two most popular tools to test functional and class components: Enzyme and Jest. They work great for both types of components.
- There is no big difference in render time between class and functional components.
Today you can build a whole app using only functional components. It was impossible till 2019. That became possible thanks to Hooks. Does Hooks replace class components in the coming years? We don’t think so, because there are still some features that functional components can’t reproduce. And there will always be developers, who are used to working with objects rather than with functions. However, we await the growth in functional component popularity and an increase in the number of features for Hooks. And it’s likely that the functionality Hooks will provide goes beyond class components possibilities.
Bonus: Building an App with Flatlogic Platform
Understanding Functional and Class components is an important stepping stone in React development. Crafting Apps by hand requires a thorough understanding of all the intricacies of the library. However, there’s a quicker way for those who aren’t technically adept or lack time to write the whole thing from the ground up. Some people need a unique App with functions not seen elsewhere, but most apps are different combinations of the same parts and features. We used that insight when developing the Flatlogic Platform.
Flatlogic Platform is a constructor-style tool for combining pre-built parts into brand-new applications. It requires a few steps from you. Keep reading to know what those are!
#1: Name the Project

This step is what it sounds like. The only valuable advice we can think of is to pick a name that is easy enough to associate with the project.
#2: Choose stack
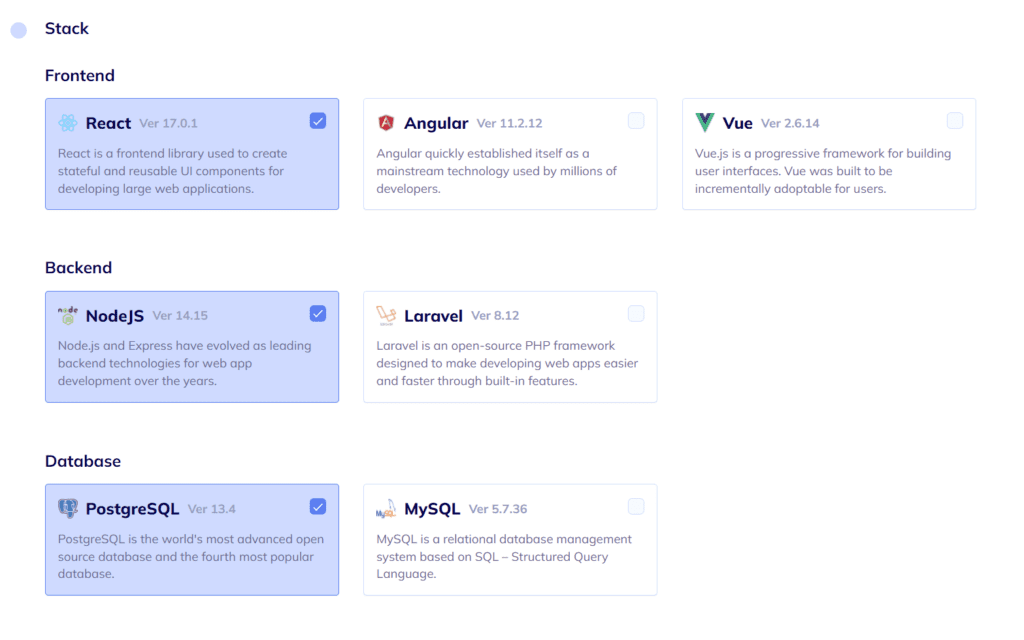
Next up, choose the technologies your App’s parts will run on. Those are underlying technologies for back-end, front-end, and database. In this example, we’re picking a combination of React, Node.js, and MySQL. But all other combinations are perfectly compatible, too.
#3: Choose Design

You’ll have several design schemes to choose from. Some are transparent and light, others with a heavier feel. Pick the one you like, this part is purely aesthetical.
#4: Create the schema
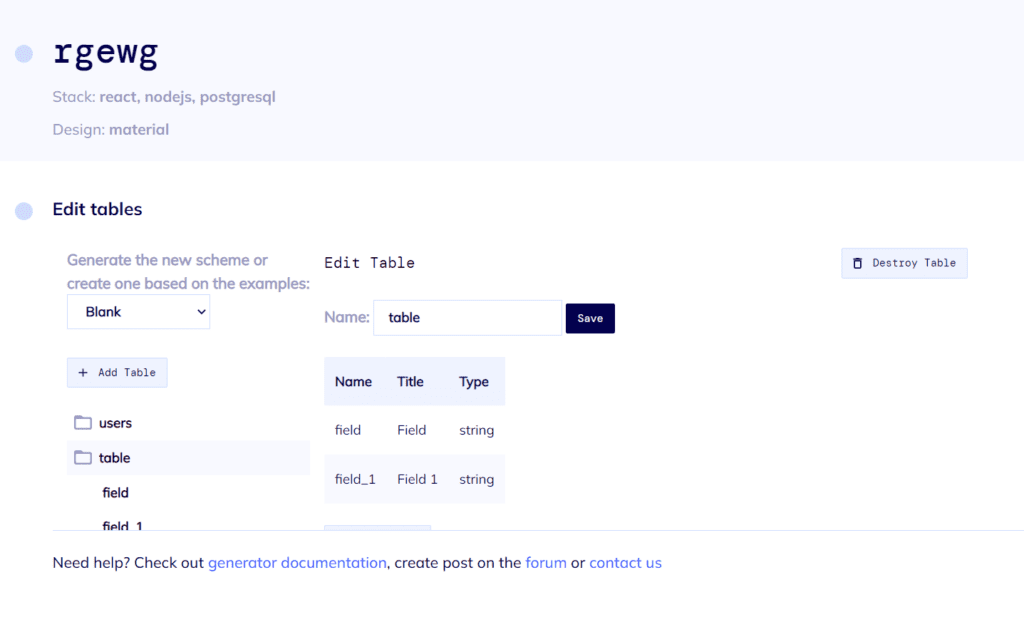
The schema is the structure of a database. Names of fields, types of data, the way the App processes said data… Every aspect that defines how the database works is a part of the schema. It might be tricky at first, but you’ll get the hang of it. A thorough review of what your App is supposed to do will be helpful. If you’re short on time or unsure, pick one of the pre-built schemas. One of them is bound to suit your needs.
#5: Review and generate
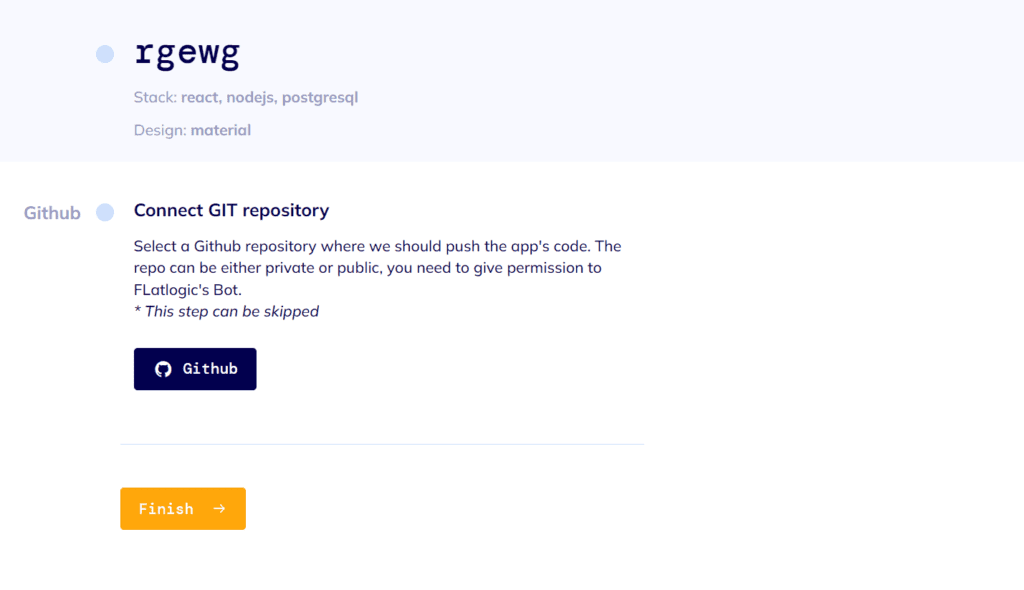
The heavy decision-making is over. It’s time to check if every choice you’ve made is the way you want it to be and (assuming everything’s fine) hit “Finish”.
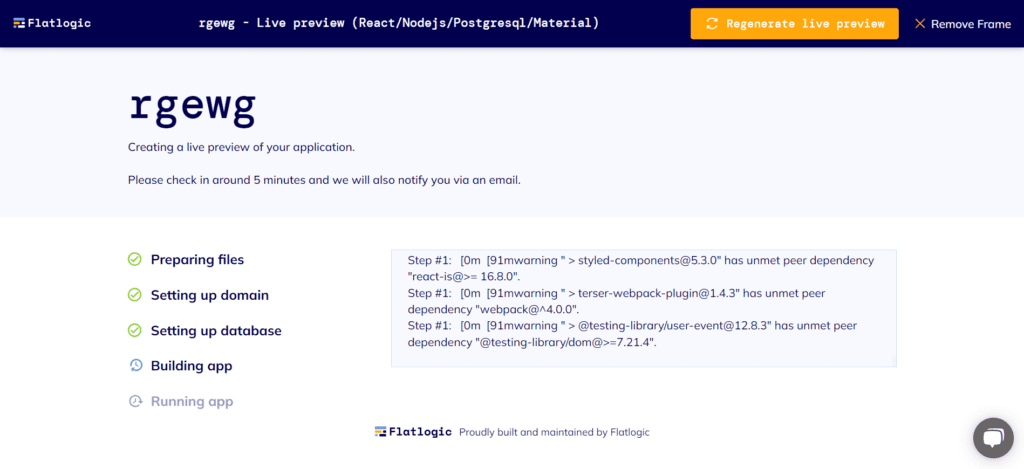
The compilation takes a couple of minutes on most devices. Upon completion, the Platform will offer you your very own App. Hit “Deploy”, host it locally in one click or push it to GitHub for further use or adjustment.
Flatlogic Platform helps create simple yet functional and smooth Apps for commercial and administrative purposes, make sure you give it a try! Happy developing and see you in the next articles!