TL;DR
- CRUD is Create, Read, Update, Delete—core to databases, APIs, and most web apps
- Maps to SQL (INSERT/SELECT/UPDATE/DELETE) and often REST (POST/GET/PUT/DELETE)
- Traditional builds span frontend, backend, DB, hosting, and CI/CD
- Flatlogic Generator scaffolds CRUD fast with code, API, live demo, and GitHub integration
Fact Box
- The tutorial builds a time-tracking CRUD app with Users, Projects, and Records entities.
- Flatlogic Generator lets you choose React/Angular/Vue, Node.js/Laravel, and MySQL/PostgreSQL.
- Flatlogic stack options yield 20+ combinations for your web app.
- Clicking Deploy builds a live demo in a few minutes.
- Example Swagger API for the tutorial app: https://fxxl42uhup-1970-lnm5nd2pia-uc.a.run.app/api-docs/ Source
Modern web development involves user interaction with databases. As a rule, the user needs to perform some actions with the database. Usually, there are 4 actions: create, view, update, and delete something. This is how we came to name them CRUD Operations – an abbreviation for these four actions.
If you have ever worked with databases, then for sure you’ve worked with CRUD – even if you didn’t know it. CRUD operations are often used with SQL. Since SQL is very popular in the developer community, developers need to understand how CRUD operations work.
The CRUD paradigm is beneficial in business software development, as it aids developers in constructing comprehensive applications by providing a clear framework for creating, reading, updating, and deleting data.
Let’s see how this works with a simple abstract object in any application: we’ll use something like pseudocode to describe this object. We will provide a system for registering students in a college. In this system there will be a “student” object that looks like this (carefully, pseudocode!):
"Student": {
 "id": <Integer>,
 "First_name": <String>,
 "Last_name": <String>,
 "Course": <String>
}
To manage this system, we must perform certain manipulations with the student object. So, let’s move on to the next section where we will describe each CRUD operation in more detail.
Most applications on the internet are CRUD applications. For instance, let’s take Facebook as one of the common examples – it’s just a CRUD application where users can create, delete, change information about themselves, and read information about other people. CRUD apps are used daily by various businesses and organizations to maintain their day-to-day workflows.
What are CRUD and CRUD operations examples?
The CRUD concept, foundational in database management, has evolved beyond its original scope, now underpinning the development of modern APIs, significantly impacting the architecture of business software for enhanced data handling and application functionality. Most modern web and mobile applications contain some form of CRUD functionality. In addition, most programmers have to deal with CRUD at some point. So, a CRUD application would utilize forms to retrieve and return data from a database.

A relational database consists of tables with rows and columns. In a relational database, each row in a table is called a record, and each column in the table represents a specific attribute or field. Users can call four CRUD operations to perform different action types on selected data in the database. This can be done through code or GUI. Now, let’s take a look at each function separately.
CREATE – this feature will add a new student to the app/database by some trigger, for example, by pressing the “Add” button in the application, which will call the corresponding function. The program calling the function would supply the values for “first_name”, “last_name”, and “course”. After the function is called, a new student record will appear in the database.
READ – this function allows you to see if there is a record about a specific student in the database. This function does not change the information about the student in any way but only allows you to get information about him. You can also see a certain attribute.
UPDATE is a function that changes information about a student. Let’s write his name. After the function is applied, the corresponding record in the database table will be changed.
DELETE – of course, everything should be clear here. This function either completely removes the object or removes its selected attribute.
By definition, CRUD is more of a cycle than an architectural concept. There are several CRUD loops in any web application. For example, in an online store, a customer can CREATE an account, UPDATE account information, and DELETE items from the cart. At the same time, a store admin using the same web application can CREATE shipping records, READ them as needed, and UPDATE supply lists.
CRUD Operations in REST Context
Let’s now take a look at the concept of CRUD in the context of using our favorite web applications. Most often, REST architecture is used to execute CRUD operations in web applications. REST is just a concept, a set of rules. It uses HTTP protocols like GET, PUT, and POST to link resources to actions within a client-server relationship. If we apply these rules to the application, then we are already talking about RESTFul.
So, for example, each letter in CRUD can also be mapped to an HTTP protocol method:
| OPERATIONS | HTTP PROTOCOL |
| Create | Post |
| Read | Get |
| Update | Put |
| Delete | Delete |
Thus CRUD is a cycle that can be mapped to REST, by design. In a REST environment, CRUD often corresponds to the HTTP methods POST, GET, PUT, and DELETE, respectively.
Parts of the CRUD app
Database
The database is where your data is stored. A database management system is used to manage the database. There are several types of database management systems, which are subdivided depending on how they store data: relational (SQL) and document (NoSQL). In this article, we talk about relational databases. SQL databases consist of tables. Tables consist of records. Records consist of fields. Fields consist of data.
User Interface or Front-end
The front-end, or User Interface, helps people interact with the application and database.
Back-end or APIs
Finally, the back-end informs your database of what functions to perform. These functions can be modeled in different ways, but they are still designed to perform four basic CRUD operations.

Creating CRUD applications traditional way
To develop a basic CRUD application from scratch, you will need a fairly good knowledge of javascript or front-end frameworks, one of the programming languages for the back-end, and knowledge of databases. You will also want to know one of the ORMs.
Let’s take a quick look at the steps you will have to go through to write a React + Node.js + PostgreSQL CRUD application.
Prerequisites
- Install React;
- Install Node.js;
- Install PostgreSQL.
Front-end part
- Use one of the React starter apps and learn it. For example, it may be created react app;
- Install all required modules (react-router, redux, etc.);
- Create Initial pages of your application;
- Create components that will help perform CRUD functions – buttons, forms, etc.;
- Connect the front-end part to the back-end;
- Setup form validation;
- Develop react pagination (optional);
- Develop react tables (optional);
- Setup fetching the data from created database;
- Create entire application styles;
- Develop UI/UX of the application (optional);
- You should do the client part responsive;
- Write tests (optional).
Back-end and database part
- Install Node Dependencies;
- Setting up PostgreSQL Database;
- Define Sequelize Schema;
- Create Routes Using ExpressJS (develop REST API).
Hosting
It is one of the hardest parts.
- Host the application;
- Set up CI/CD.
Almost all of the steps described above apply to other technologies, be it Vue or Angular, Laravel or Python, PostgreSQL, or MySQL.
Guides on how to incorporate CRUD operations in an App
We have also selected for you some of the valuable guides on how to create a custom CRUD app:
- CRUD app on Mongo DB and Express;
- React CRUD app using React context API;
- React + Node.js+ MongoDB CRUD app.
Thus, to build even a basic CRUD application, you will need knowledge of several technologies and will have to spend a lot of time studying and developing repetitive work – not to mention new requests for the development of additional features.
In the next section, we will look at an alternative way to develop a CRUD application that will save you a lot of time, not holding you back in the possibilities of customization and ownership of the source code.
Create a CRUD app with Flatlogic
In our example, we will build a small-time tracking application with several entities. The application will have a screen with users, projects, and records that will be linked to each other. These entities can be managed using CRUD operations.
Goals
- You should be able to build any CRUD application like a time tracking app after this tutorial using Flatlogic Generator;
- You should be able to understand the basic principles of the CRUD concept and database architecture;
- You should be able to create your entities with custom relationships and parameters.
1. Planning the application
Application development with Flatlogic Generator consists of several stages. The first is to sort out what kind of application you will make. After that, plan what entities the database will consist of and what this application will be used for.
We mentioned above that we will be developing a time-tracking application. Our application will consist of three entities (tables in the database):
Users
This table will contain users of our application with different roles. Flatlogic Generator creates this table by default and does not prompt to delete it.
Records
This table will store the time spent records associated with projects and users. We will look at the more detailed contents of this table in the next steps.
Projects
This table will store data about projects. We will also consider filling this table with columns in more detail in the next steps.
2. Register an account in Flatlogic Generator
So, for better interaction with Flatlogic Generator, firstly we advise you to create an account on the Flatlogic website before you develop an application.
To create an account on the Flatlogic website, simply click ‘Sign in‘ in the header (see screenshot below).

Next, you will be redirected to the account creation page, where you will have 2 options – create an account using email or do it using GitHub integration.
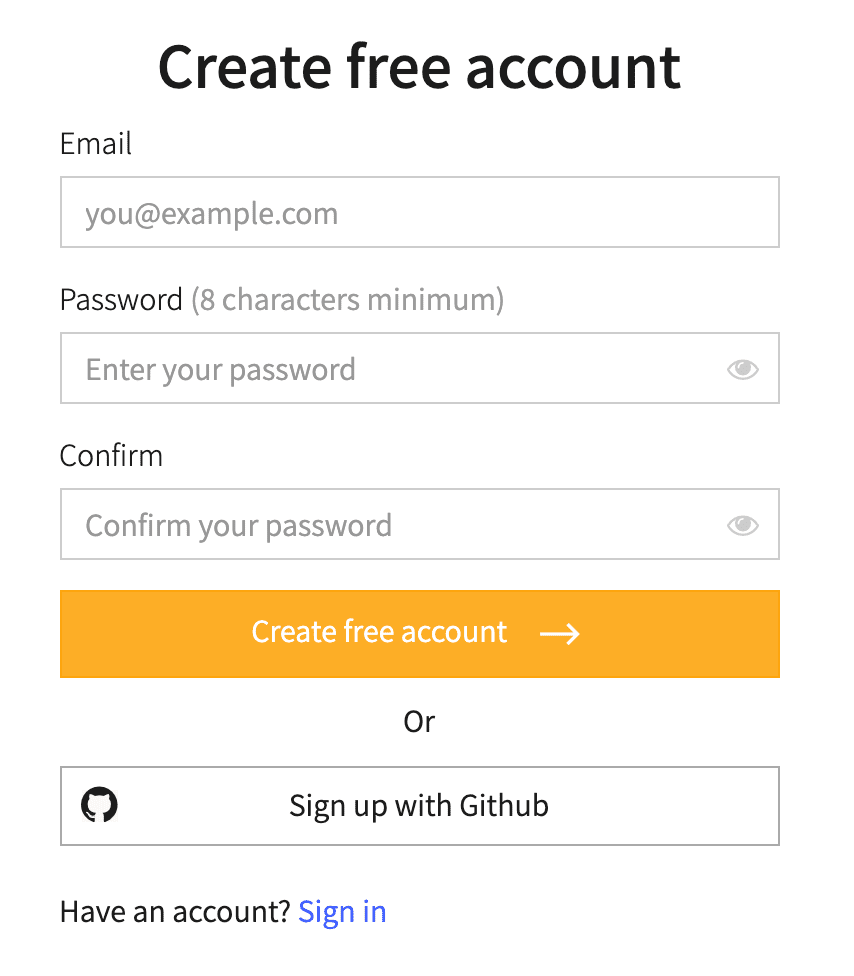
After that, simply confirm the email and begin work with a Flatlogic Generator website. For detailed info on how to interact with your account please refer to the documentation.
3. Choose the stack and project name of the CRUD app

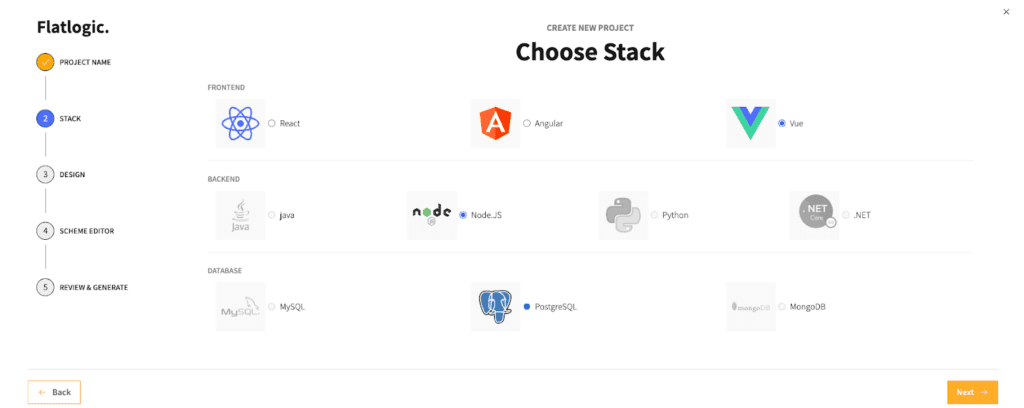
This step will allow you to choose your project stack and project name. The stack consists of three parts:
- Frontend;
- Backend;
- Database.
In each part you will have the following options to choose from:
- The front end has React, Angular, and Vue frameworks;
- Backend for now has only two options – Node.js and Laravel. We are planning to add Java, Python, and .NET options;
- There are two options for databases: MySQL and PostgreSQL. We are planning to add MongoDB shortly.
Thus, you have more than 20 options to choose from to create your web application
4. Choose the design
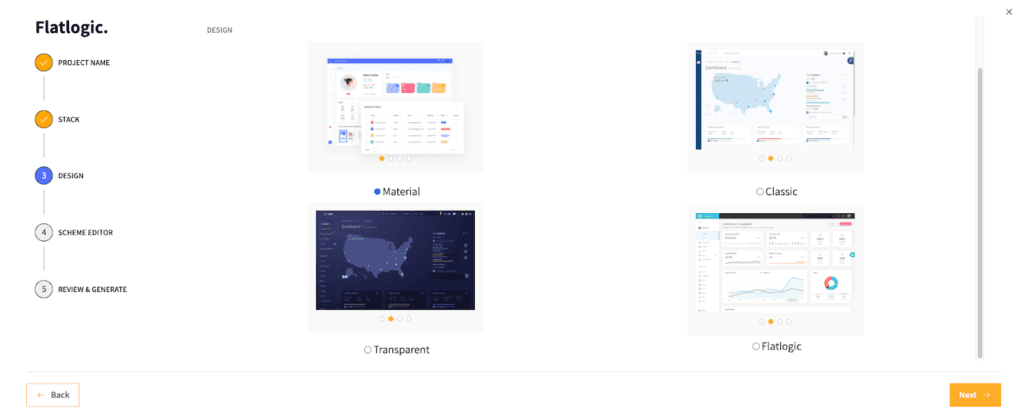
Considering the design, there are five options now: Material, Classic, Transparent, and two of our internal Flatlogic design systems. Please note that some stacks have fewer design options, for example, Angular has only three design options.
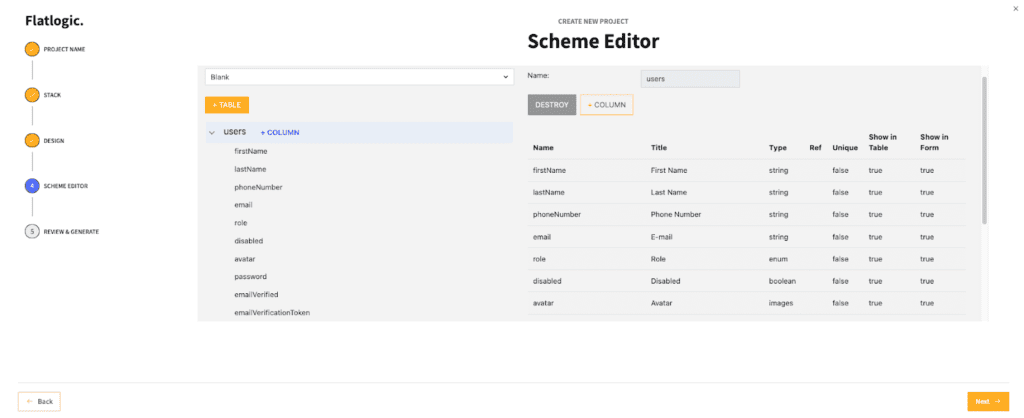
5. Define the database schema
To create, manage, and store the data related to the time-tracking app, we will use the Flatlogic Generator schema editor. Flatlogic generator allows you to create content types for the entities in your app. It exposes entities via generated API, which you can use to populate the front end.
The basic essence of the Scheme Editor is that it consists of tables and columns – in your work, you will deal with them.
If you choose to build an application from scratch, then you will see a button to add a table as well as a ready-made default table for Users (since we believe a user exists in any application).
By clicking on the ready-made Users tab, you will see in front of you all the columns created in the table with their properties. In our exemplary time tracking application, the Users entity stays default – we will not add new columns to it.
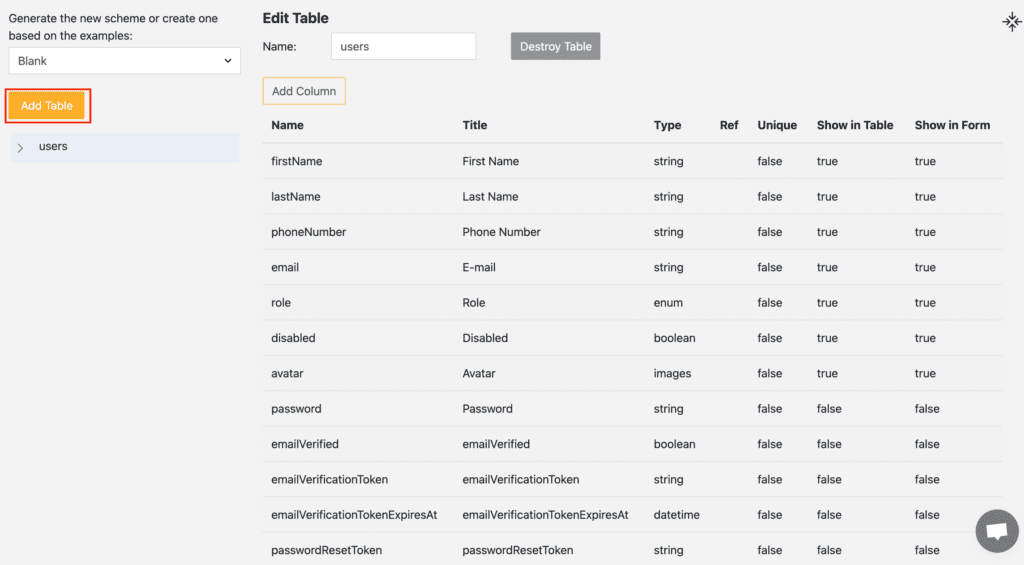
Working with tables, you have 2 options – add a new table or delete it. Now let’s take a look at each of these steps separately.
When working with columns, you have 3 options – add or remove a column, or change the properties of the column.
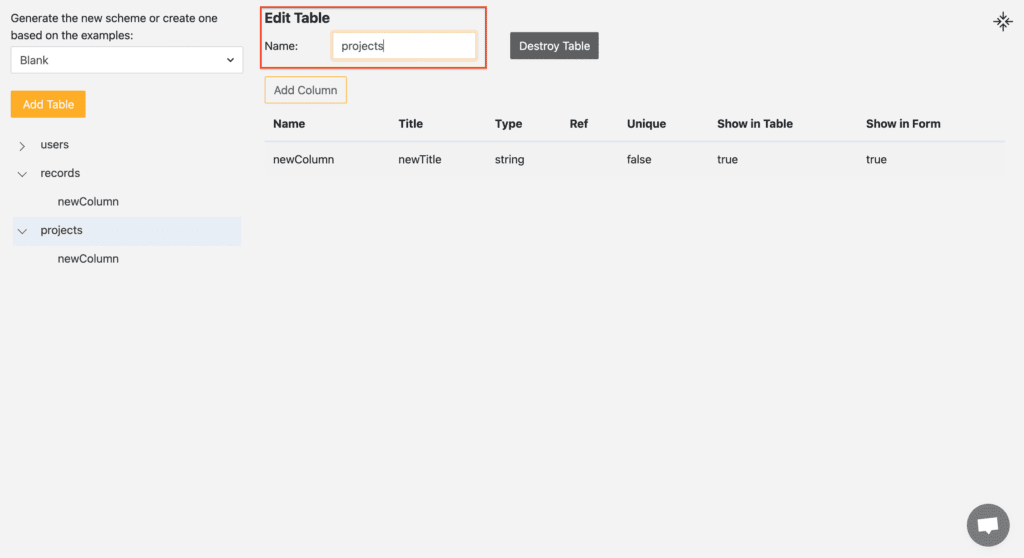
Adding Records and Projects tables
As mentioned above, our application should have Records and Projects tables.
So, to add a table, you need to press the ‘Add Table‘ button (see screenshot below).
After clicking the button, a new table will be added and you will be prompted to select a name for this table. Please choose the name in lowercase. In our case, we need to add two Records Projects tables.
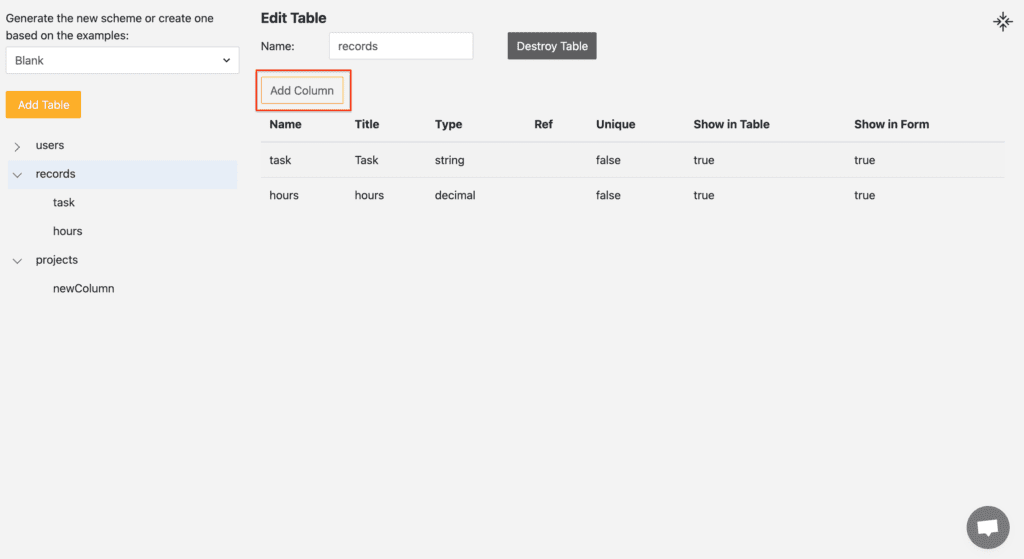
Adding column
To create a column, click on the table in which you want to create a column and then click on the ‘Add column‘ button.
When you click on the column, you can edit it. Edit column window with the following parameters will open on the right side (see the screenshot):

Name – here you specify the name of the column that you will see in your database. Please, use a camel case for column names.
Title – title of the column that you will see in your live application. Here you can use capital letters and any names, as this does not affect the generation and operation of the application.
Type – in this menu you can select the data type of the column.
The following types are offered to choose from:
- String – when you select this type, you have a unique Multiline option that adds multiple lines;
- Int;
- Decimal;
- Date;
- Boolean – when choosing this type, you need to set the value to True or False;
- Images;
- DateTime.
- Relation_one;
- Relation_many;
- Enum.
Unique – enables or disables the column uniqueness option;
Show in the list – option allows to show the column as a list;
Show in form – allows you to show the column in the form.
So let’s add the following columns according to their tables.
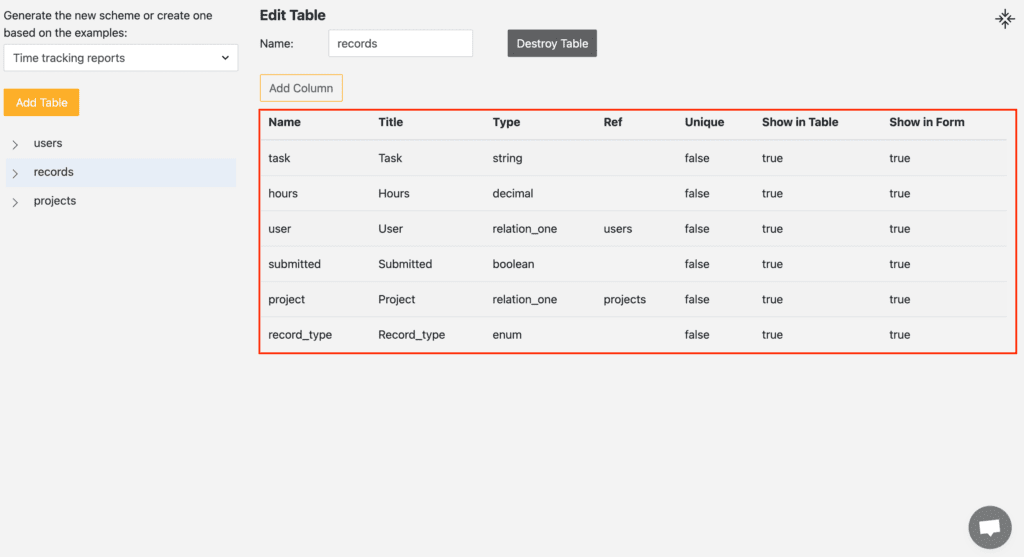
To the Records the table we add the following columns:
Task – this column will contain the names of the completed tasks
| Type | String |
| Ref | – |
| Unique | False |
| Show in Table | True |
| Show in Form | True |
Hours – a column with information on time spent on the task
| Type | Decimal |
| Ref | – |
| Unique | False |
| Show in Table | True |
| Show in Form | True |
User – a column with data about the user who created the job record. Please note that the type here is relation_one and a link to the users table
| Type | relation_one |
| Ref | users |
| Unique | False |
| Show in Table | True |
| Show in Form | True |
Submitted – this column will contain information about the status of the job
| Type | boolean |
| Ref | – |
| Unique | False |
| Show in Table | True |
| Show in Form | True |
Project – a column with information about the project to which the task belongs. The column will also be linked to the projects table
| Type | relation_one |
| Ref | projects |
| Unique | False |
| Show in Table | True |
| Show in Form | True |
In the Projects table we add the following columns (see the screenshot below):
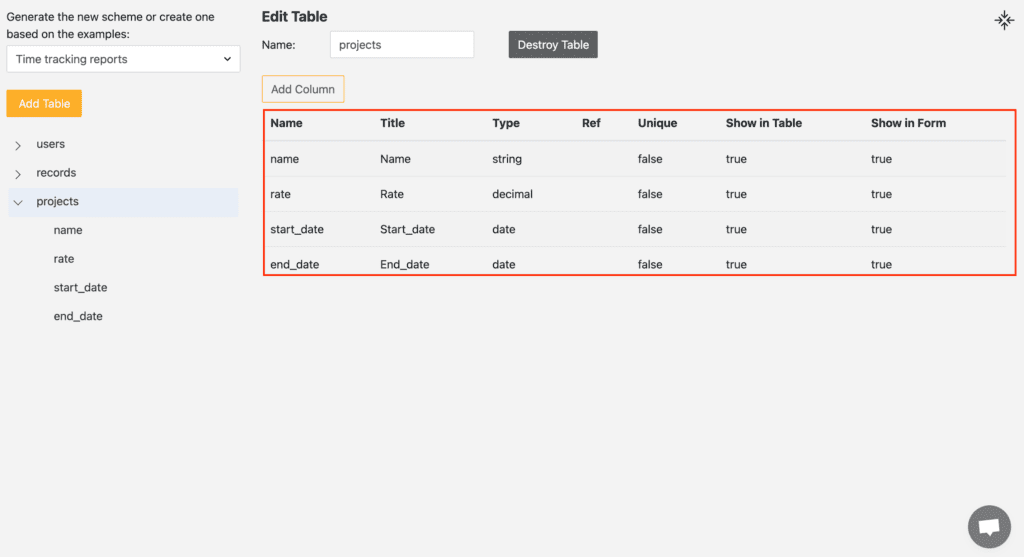
Name – in this column, we will store the name of the project. The column must be created with the following parameters
| Type | String |
| Ref | – |
| Unique | False |
| Show in Table | True |
| Show in Form | True |
Rate – a column with information about the hourly rate at which the project is being executed
| Type | Decimal |
| Ref | – |
| Unique | False |
| Show in Table | True |
| Show in Form | True |
Start_date – the column with information is the start date of the project
| Type | Date |
| Ref | – |
| Unique | False |
| Show in Table | True |
| Show in Form | True |
End_date – a column with the date of the end of the project
| Type | Date |
| Ref | – |
| Unique | False |
| Show in Table | True |
| Show in Form | True |
This completes our database schema. Let’s move on to the last step of creating the CRUD application.
6. Create a CRUD app
So, after you have defined your database schema, you will be redirected to the final step in the development wizard. All you need in this step is to check your tech stack and design – and then push the ‘Create Project‘ button.
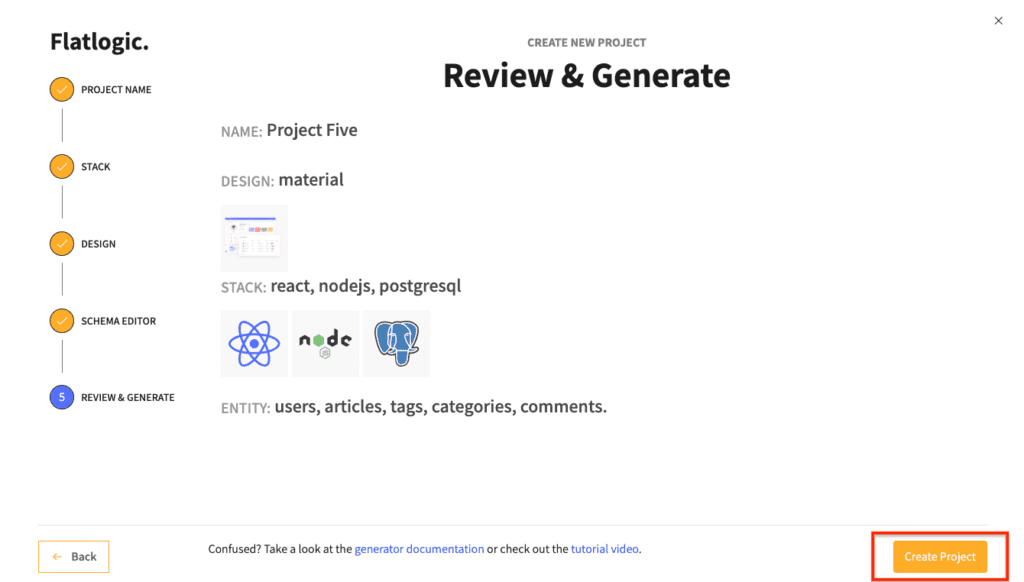
After that, the system will transfer you to the screen with your created projects. At the same time, your application code will already be generated.
By clicking on the project name, you will be taken to the settings page with additional information about the project, where you can familiarize yourself with the following functions.
7. Working with CRUD project/application
Overview of project
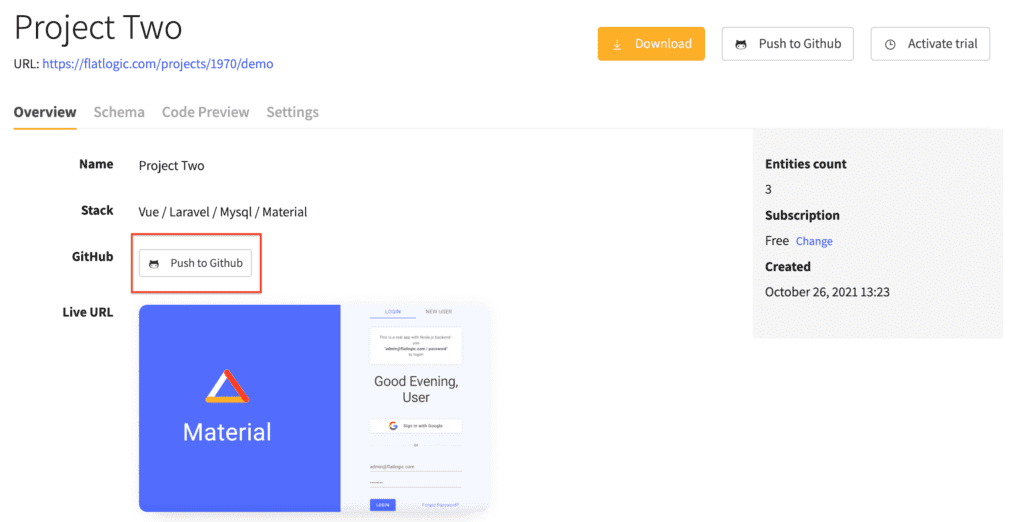
After you click on the project name you will be taken to the overview of the project page, where you will see information about the project, as well as the various functions you can apply to it.
Download the code to customize
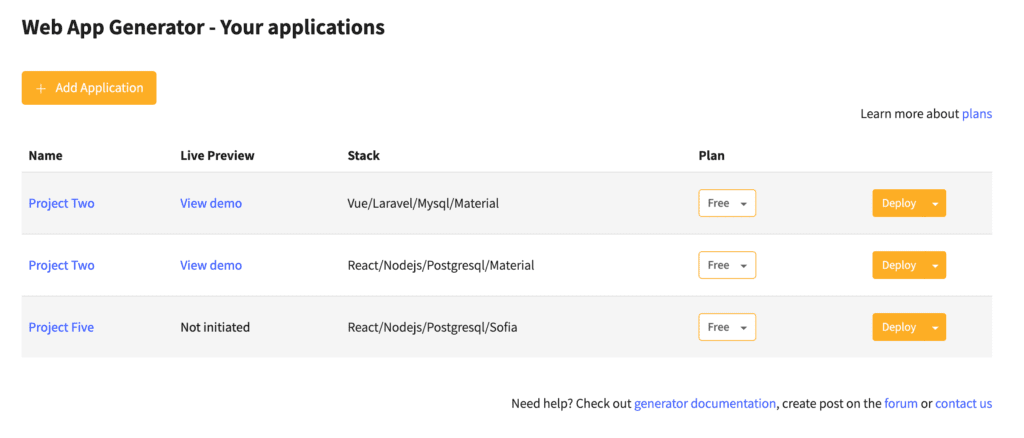
For example, you can download the full source code of a Flatlogic Generator project to continue developing in your favorite IDE. To do this, click on the Download button and get a subscription to one of the paid plans (which can be canceled at any time).
See the live demo
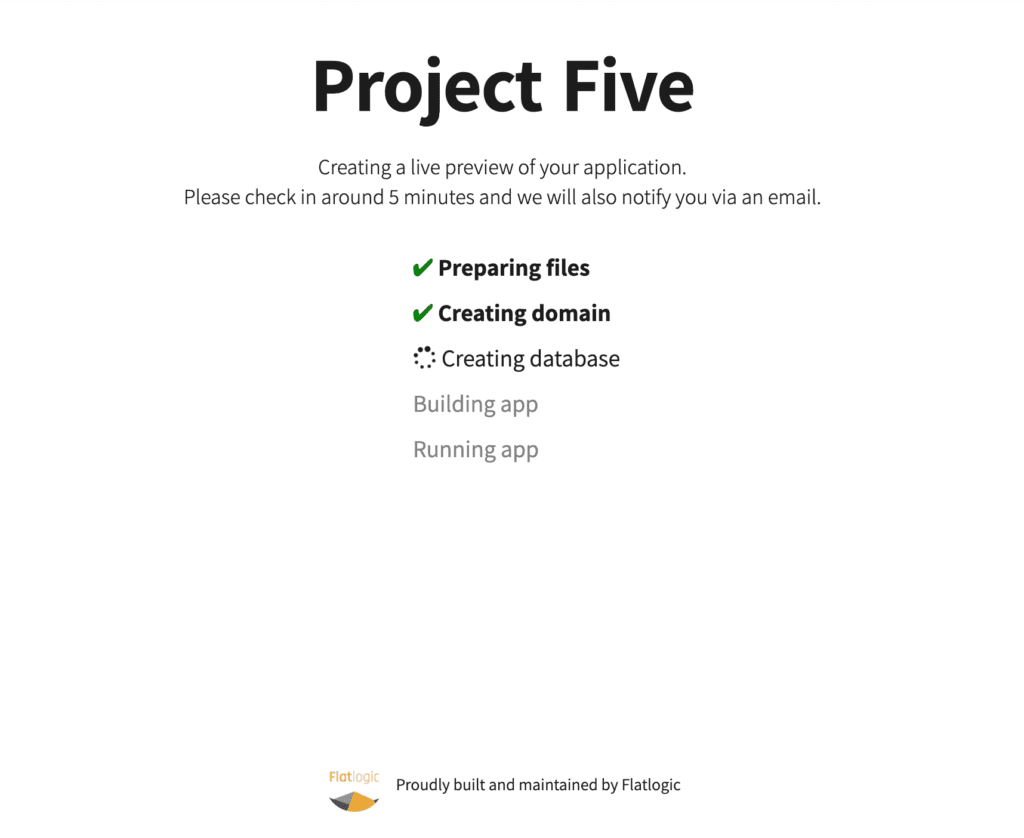
Before downloading the code, you can also watch the live demo of your project. To do this, click on the Deploy button on the overview tab opposite the Live URL line.
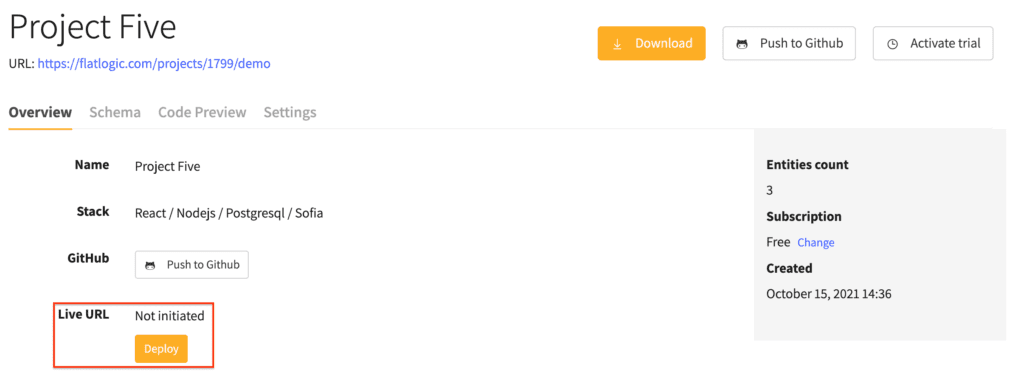
Now, the project begins to build. In a few minutes, you will receive a demo of a real working application.
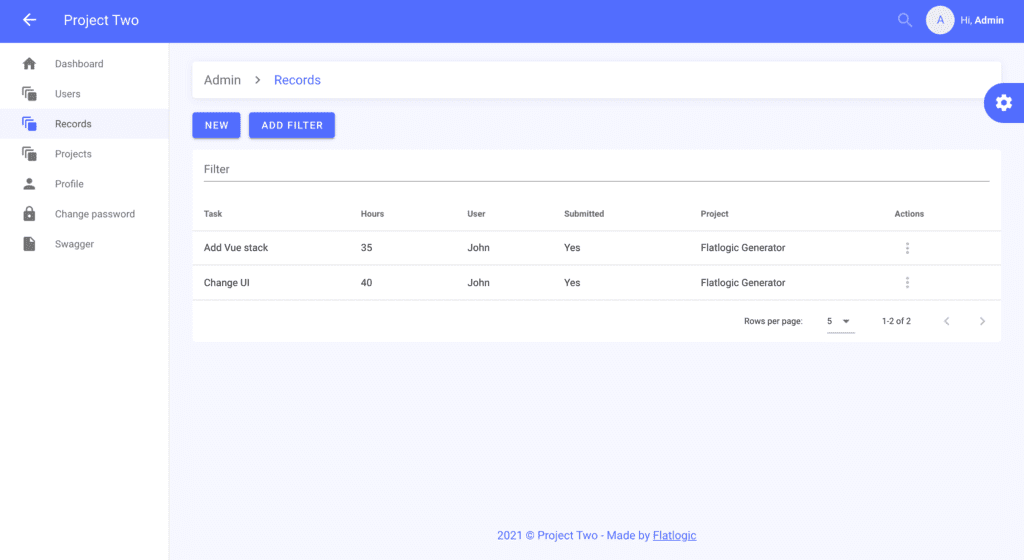
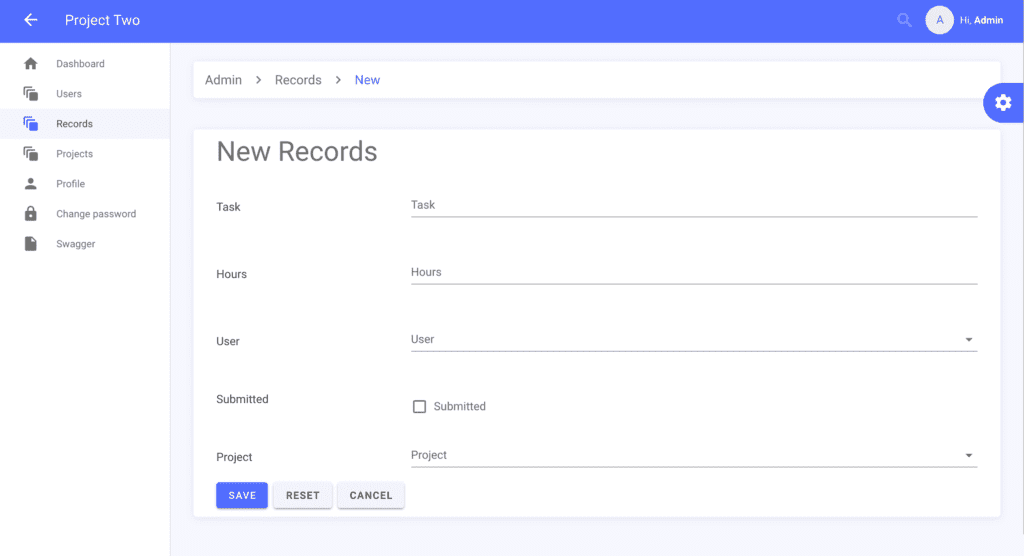
After the application has been created, we can see the result. For example, here are screenshots from the demo of our Time-tracking app, which we created with the Records and Projects entities. In these screenshots, you can see that the application complies with the CRUD concept since we can create new records, modify, delete, and view them.
Creating a new record:
See generated API
Along with generating code, Flatlogic Generator creates an API for the generated application. For example, here is a link to the created API for the time-tracking app we created earlier: API for the Time-tracking app in Swagger.
Push code to the Github repository
You can push the code of the created application into the GitHub repository, which will be created specifically for the generated application. At the same time, editing the project database schema, Flatlogic Generator will push the new code into the previously created repository.
To connect to Github – click the Push to Github button.
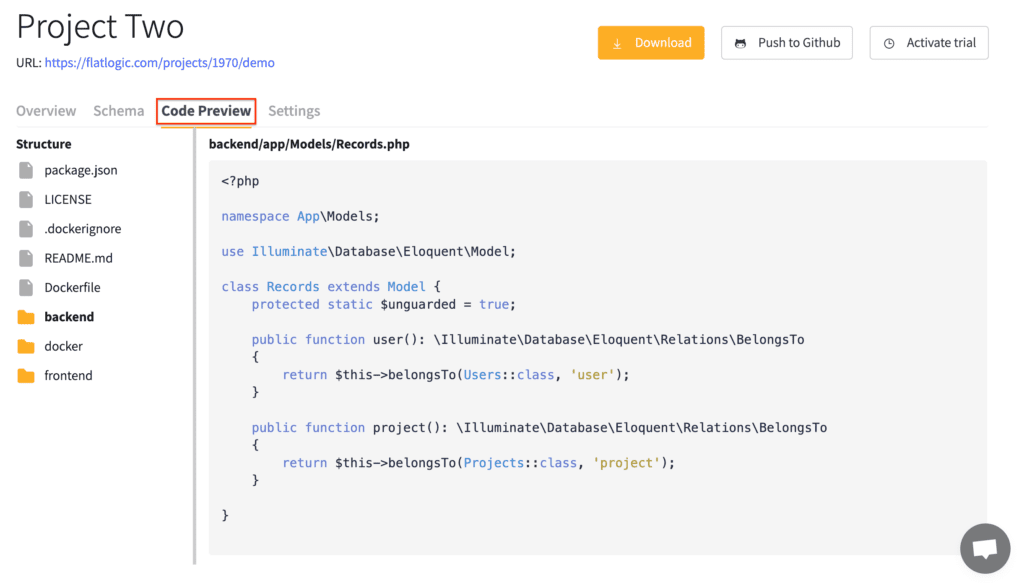
See the code preview
Before subscribing to a project or downloading it, you can see the structure of the project code and the code itself. To do this, click on the Code Preview tab.
Edit the schema of the CRUD application
You can change the database schema of your application an infinite number of times. Click on the Schema tab to go to the schema editor and add/remove/modify entities for your project.

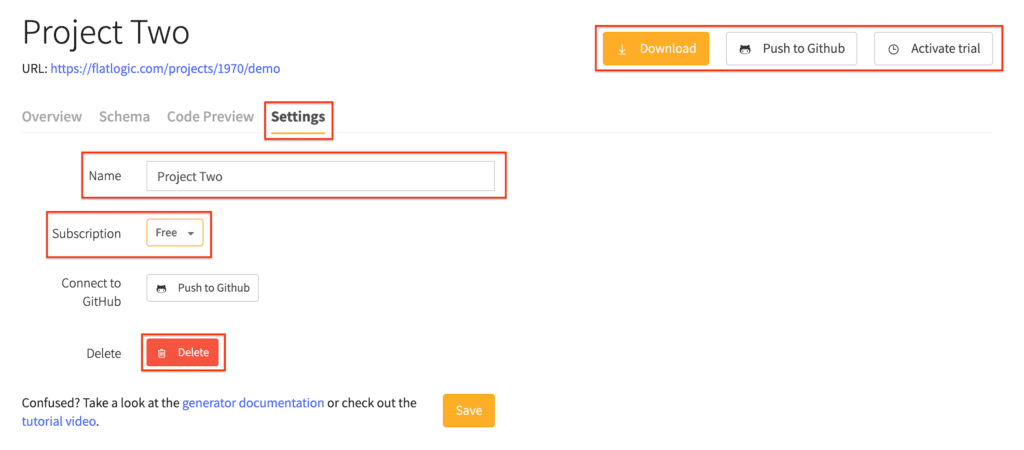
CRUD application settings
In the Settings tab you can do the following:
- Change the name of the project;
- Add a new subscription;
- Download the source code;
- Push the code to GitHub;
- Activate trial;
- Delete Project.
You can also watch our A to Z tutorial on YouTube to understand how to make your CRUD app step by step:
Recap: CRUD Operations with Flatlogic Platform
Thus, we created a CRUD time-tracking application based on the Flatlogic Generator and examined the main functions of this app development platform.
Feel free to try and join Flatlogic Generator! Register your free account and get started today.
If you’d like additional help when building your product, our thriving community forum is a great place to source actionable advice and resources. Or, you can send me your request to [email protected]. All creators are encouraged to ask questions within the community to help empower their journey.
CRUD Operations Explained
We’ve covered what stands behind each letter in CRUD. These four operations are equivalent to the SQL statements of Insert, Select, Update, and Delete, and to the HTTP methods of Put, Get, Delete (Put represents both Create and Update here). Now let’s pay some attention to each of the CRUD operations.
C: Create
The “Create” operation adds new records to the table and the database it’s related to. The fields where the records will be stored can be specified in the command. Alternatively, if the fields and columns are unspecified, the database’s internal mechanisms will govern that. Apart from creating, or inserting records in one field at a time, modern SQL allows for more advanced forms. One of them is the Multirow Insert. It lets us create multiple entries with a single statement. The difference in operating speed for a single entry is negligible but might grow significantly when your server has to process millions of entries. Copying rows from other tables combines the Create/Insert operation with Read/Select. It allows for copying and (if necessary) adjusting entries from other tables without implementing two separate commands.
R: Read
Read or Select operation is often credited as the most popular of CRUD operations. But perhaps “extract” would be the most accurate term for it. This operation Extracts data from one or more fields within the database. It occurs whenever we reference a piece of data on the website or perform an action that requires referencing it. Every interaction with a web platform involves interacting with something stored within the database.
U: Update
The two remaining statements are known under the same names both within the CRUD concept and in SQL. As the name implies, Update changes the data within the affected fields. Compared to Read/Select and Create/Insert, Update typically requires more data manipulation privileges. Furthermore, database fields can and almost always will have internal constraints on the data stored. For example, a field can accept only a certain type of value, or only accept values that aren’t empty or have a fixed selection of acceptable values.
D: Delete
Delete is also known by the same name in both concepts. Normally, conditions are set for deleting entries. Without set conditions, all available records are removed. A Delete-type command must contain those conditions to specify the content was deleting. For example, in a table containing car models, we can delete rows where the column “Color” equals “red” and “Year produced” is between 1992 and 1995. Some database management systems, like the highly popular MySQL, allow us to delete rows of entries from more than one table at a time.
Conclusion
In this article, we learned about the concept of CRUD, explained how to apply CRUD operations to web development, and put it in a REST context. We also looked at two ways to develop a basic CRUD application, the traditional way and the faster way with the Flatlogic Generator.
If you notice any errors in the article or want to supplement it – please contact me. Feedback is always welcome!