TL;DR
- Guide to caching Next.js apps with Upstash serverless Redis to cut latency and costs
- Implements a fetchCache utility: check Redis by key, else fetch, store JSON
- SSR with getServerSideProps for details; list prefetched via getStaticProps
- Adds 1-day TTL (60*60*24) using EX; measures ms latency with Node perf_hooks
Fact Box
- Upstash serverless Redis bills per request; no charges when idle
- Cache expiry set to 60*60*24 seconds (one day) using Redis EX when setting keys
- Pokemon list fetched at build time via getStaticProps with limit=200&offset=200
- getServerSideProps uses Redis cache before calling PokeAPI for Pokemon details
- Performance measured using Node perf_hooks, logging 'Response took X milliseconds'
The modern application we build today is sophisticated. Every time a user loads a webpage, their browser needs to download the bulk of data in order to display that page. A website may consist of millions of data and serve hundreds of API calls. For the data to move smoothly with zero delays between server and client we can follow many strategies. We, developers, want our app to deliver the best user experience possible, to achieve this we can employ a variety of techniques available.
There are a number of ways we can address this situation. It would be the best optimization if we could apply techniques that can reduce the amount of latency to perform read/write operations on the database. One of the most popular ways to optimize our API calls is by implementing Caching mechanism.
What is Caching?
Caching is the process of storing copies of files in a cache, or temporary storage location so that they can be accessed more quickly. Technically, a cache is any temporary storage location for copies of files or data, but the term is often used in reference to Internet technologies.
By Cloudflare.com
The most common example of caching we can see is the browser cache, which stores frequently accessed website resources locally so that it does not have to retrieve them over the network each time they are needed. Caching can boost the performance bottleneck of our web applications. When mostly dealing with heavy network traffic and large API calls optimization this technique can be one of the best options for our performance optimization.
Redis: Caching in Server-side
When we talk about caching in servers, one of the top pioneers of caching built-in databases is Redis. Redis (for REmote DIctionary Server) is an open-source NoSQL in-memory key-value data store. One of the best things about Redis is that we can persist data in a database that can continuously store them unless we delete or flush it manually. It is an in-memory database, its data access operations are faster than any other disk-based database, which eventually makes Redis the best choice for caching.

Redis can also be used as a primary database if needed. With the help of Redis, we can call to access and reaccessed as many times as needed without running the database query again. Depending on the Redis cache setup, this can stay in memory for a few hours, a few minutes, or longer. We even can set an expiration time for our caching which we will implement in our demo application.
Redis is able to handle huge amounts of data in real-time, making use of its in-memory data storage capabilities to help support highly responsive database constructs. Caching with Redis allows for fewer database accesses, which helps to reduce the amount of traffic and instances required even achieving a sub-millisecond of latency.
We will implement Redis in our Next application and see the performance gain we can achieve.
Let’s dive into it.
Initializing our Project
Before we begin I assume you have Node installed on your machine so that you can follow along with the steps involved. We will use Next for our project because it helps us write front-end and back-end logic with no configuration needed. We will create a starter project with the following command:
$ npx create-next-app@latest --typescriptAfter the command, give the project the desired name. After everything is done and the project is made for us we can add the dependencies we need to work on in this demo application.
$ npm i ioredis @chakra-ui/core @emotion/core @emotion/styled emotion-theming
$ npm i --save-dev @types/node @types/ioredis
The command above is all the dependencies we will deal with in this project. We will be making the use of ioredis to communicate with our Redis database and style things up with ChakraUI.
As we are using typescript for our project. We will also need to install the typescript version of the node and ioredis which we did in the second command as our local dev dependencies.
Setting up Redis with Upstash
We definitely need to connect our application with Redis. You can use Redis locally and connect to it from your application or use a Redis cloud instance. For this project demo, we will be using Upstash Redis.
Upstash is a serverless database for Redis, with servers/instances, you pay per hour or a fixed price. With Serverless, you pay per request. This means we are not charged when the database is not in use. Upstash configures and manages the database for you.
Head on to Upstash official website and start with an easy free plan. For our demo purpose, we don’t need to pay. Visit the Upstash console after creating your new account and create a new Redis serverless database with Upstash.
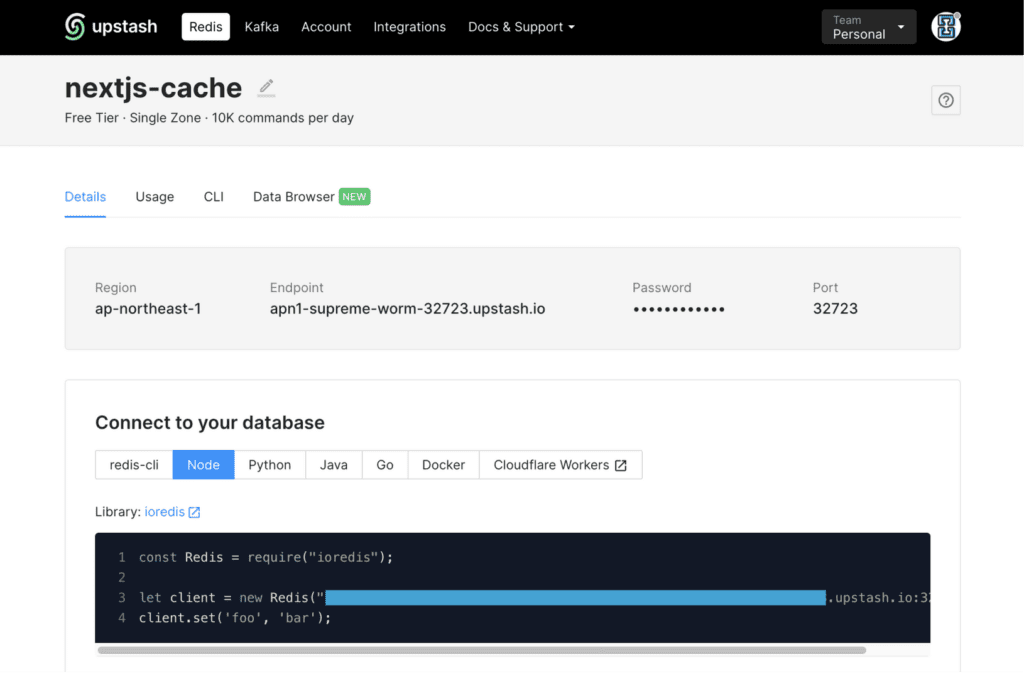
You can find the example of the connection string used ioredis in the Upstash dashboard. Copy the blue overlay URL. We will use this connection string to connect to the serverless Redis instance provided in with free tire by Upstash.
import Redis from "ioredis";
export const redisConnect = new Redis(process.env.REDIS_URL);
In the snippet above we connected our app with the database. We can now use our Redis server instance provided by Upstash inside or our App.
Populating static data
The application we are building might not be an exact use case but, we actually want to see the implementation of caching performance Redis can make to our Application and know how it’s done.
Here we are making a Pokemon application where users can select a list of Pokemon and choose to see the details of Pokemon. We will implement caching to the visited Pokemon. In other words, if users visit the same Pokemon twice they will receive the cached result.
Let’s populate some data inside of our Pokemon options.
export const getStaticProps: GetStaticProps = async () => {
 const res = await fetch(
 'https://pokeapi.co/api/v2/pokemon?limit=200&offset=200'
 );
 const { results }: GetPokemonResults = await res.json();

 return {
 props: {
 pokemons: results,
 },
 };
};
We are making a call to our endpoint to fetch all the names of Pokemon. The GetStaticProps help us to fetch data at build time. The getStaticProps()function gives props needed for the component Home to render the pages that are generated at build time, not at runtime, and are static.
const Home: NextPage<{ pokemons: Pokemons[] }> = ({ pokemons }) => {
 const [selectedPokemon, setSelectedPokemon] = useState<string>('');
 const toast = useToast();
 const router = useRouter();

 const handelSelect = (e: any) => {
 setSelectedPokemon(e.target.value);
 };

 const searchPokemon = () => {
 if (selectedPokemon === '')
 return toast({
 title: 'No pokemon selected',
 description: 'You need to select a pokemon to search.',
 status: 'error',
 duration: 3000,
 isClosable: true,
 });
 router.push(`/details/${selectedPokemon}`);
 };

 return (
 <div className={styles.container}>
 <main className={styles.main}>
 <Box my="10">
 <FormControl>
 <Select
 id="country"
 placeholder={
 selectedPokemon ? selectedPokemon : 'Select a pokemon'
 }
 onChange={handelSelect}
 >
 {pokemons.map((pokemon, index) => {
 return <option key={index}>{pokemon.name}</option>;
 })}
 </Select>
 <Button
 colorScheme="teal"
 size="md"
 ml="3"
 onClick={searchPokemon}
 >
 Search
 </Button>
 </FormControl>
 </Box>
 </main>
 </div>
 );
};
We have successfully populated some static data inside our dropdown to select some Pokemon. Let’s implement a page redirect to a dynamic route when we select a Pokemon name and click the search button.
Adding dynamic page
Creating a dynamic page inside of Next is simple as it has a folder structure provided, which we can leverage to add our dynamic Routes. Let’s create a detailed page for our Pokemon.
const PokemonDetail: NextPage<{ info: PokemonDetailResults }> = ({ info }) => {
 return (
 <div>
 // map our data here
 </div>
 );
};

export const getServerSideProps: GetServerSideProps = async (context) => {
 const { id } = context.query;
 const name = id as string;
 const data = await fetch(`https://pokeapi.co/api/v2/pokemon/${name}`);
 const response: PokemonDetailResults = await data.json();

 return {
 props: {
 info: response,
 },
 };
};
We made the use of getServerSideProps we are making the use of Server-Side-Rendering provided by Next which will help us to pre-render the page on each request using the data returned by getServerSideProps. This comes in handy when we want to fetch data that changes often and have the page updated to show the most current data. After receiving data we are mapping it over to display it on the screen.
Until now we really have not implemented caching mechanism into our project. Each time the user visits the page we are hitting the API endpoint and sending them back the data they requested for. Let’s move ahead and implement caching into our application.
Caching data
To implement caching in the first place we want to read our Redis database. As discussed Redis stores its data as key-value pairs. We will find whether the key is stored in Redis or not and feed the client with the respective data needed. For this to achieve we will create a function that reads Redis for the key client is requesting.
export const fetchCache = async <T>(key: string, fetchData: () => Promise<T>) => {
 const cachedData = await getKey(key);
 if (cachedData)return cachedData
 return setValue(key, fetchData);
}
When we will know the client is requesting data they have not visited yet we will provide them a copy of data from the server and also behind the scene make a copy inside our Redis database. So, that we can serve data fast through Redis in the next request.
We will write a function where it takes in a parameter of key and if the key exists in the database it will return us parsed value to the client.
const getKey = async <T>(key: string): Promise<T | null> => {
 const result = await redisConnect.get(key);
 if (result) return JSON.parse(result);
 return null;
}
We also need a function where it takes in a key and set the new values alongside with the keys inside our database only if we don’t have that key stored inside of Redis.
const setValue = async <T>(key: string, fetchData: () => Promise<T>): Promise<T> => {
 const setValue = await fetchData();
 await redisConnect.set(key, JSON.stringify(setValue));
 return setValue;
}
Until now we have written everything we need to implement Caching. We will just need is to invoke the function in our dynamic pages. Inside of our [id].tsx we will make a minor tweak where we can invoke an API call only if we don’t have the requested key in Redis.
For this to happen we will need to pass a function as a prop to our fetchCache function.
export const getServerSideProps: GetServerSideProps = async (context) => {
 const { id } = context.query;
 const name = id as string;

 const fetchData = async () => {
 const data = await fetch(`https://pokeapi.co/api/v2/pokemon/${name}`);
 const response: PokemonDetailResults = await data.json();
 return response;
 };

 const cachedData = await fetchCache(name, fetchData);

 return {
 props: {
 info: cachedData,
 },
 };
};
We added some tweaks to our code we wrote before. We imported and made the use of fetchCache functions inside of the dynamic page. This function will take in function as a prop and do the checking for key respectively.
Adding expiry
The expiration policy employed by a cache is another factor that helps determine how long a cached item is retained. The expiration policy is usually assigned to the object when it is added to the cache. This can also be customized according to the type of object that’s being cached. A common strategy involves assigning an absolute time of expiration to each object when it is added to the cache. Once that time passes, the item is removed from the cache accordingly.
Let’s also use the caching expiration feature of Redis in our Application. To implement this we just need to add a parameter to our fetchCache function.
const cachedData = await fetchCache(name, fetchData, 60 * 60 * 24);
 return {
 props: {
 info: cachedData,
 },
 };
export const fetchCache = async (key: string, fetchData: () => Promise<unknown>, expiresIn: number) => {
const cachedData = await getKey(key);
if (cachedData) return cachedData
return setValue(key, fetchData, expiresIn);
}const setValue = async <T>(key: string, fetchData: () => Promise<T>, expiresIn: number): Promise<T> => {
const setValue = await fetchData();
await redisConnect.set(key, JSON.stringify(setValue), "EX", expiresIn);
return setValue;
}For each key that is stored in our Redis database, we have added an expiry time of one day. When the set amount of time elapses, Redis will automatically get rid of the object from the cache so that it may be refreshed by calling the API again. This really helps when we want to feed the client with the updated fresh data every time they call an API.
Performance testing
After all of all these efforts we did which is all for our App performance and optimization. Let’s take a look at our application performance.
This might not be a suitable performance testing for small application. But app serving thousands of API calls with big data set can see a big advantage.I will make use of the perf_hooks module to assist in measuring the time for our Next lambda to complete an invocation. This is not really provided by Next instead it’s imported from Node. With these APIs, you can measure the time it takes individual dependencies to load, how long your app takes to initially start, and even how long individual web service API calls take. This allows you to make more informed decisions on the efficiency of specific code blocks or even algorithms.
import { performance } from "perf_hooks";

const startPerfTimer = (): number => {
 return performance.now();
}

const endPerfTimer = (): number => {
 return performance.now();
}

const calculatePerformance = (startTime: number, endTime: number): void => {
 console.log(`Response took ${endTime - startTime} milliseconds`);
}
This may be overkill, to create a function for a line of code but we basically can reuse this function in our application when needed. We will add these function calls to our application and see the results millisecond(ms) of latency, it can impact our app performance overall.
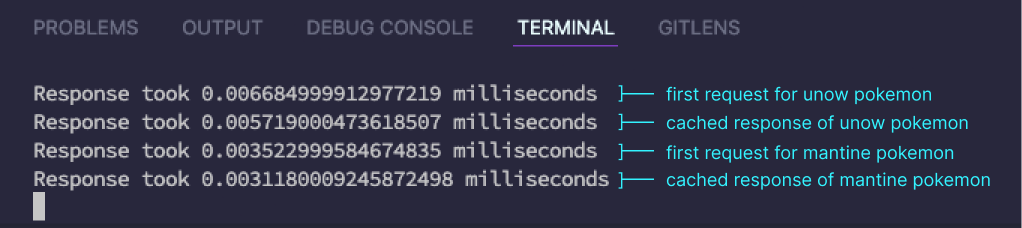
In the above screenshot, we can see the millisecond of improvements in fetching the response. This can be a small improvement in the small application we have built. But, this may be a huge time and performance boost, especially working with large datasets.
Conclusion
Data-heavy applications do need caching operations to improve the response time and even reduce the cost of data volume and bandwidth. With the help of Redis, we can deduct the expensive operation database operations, third-party API calls, and server to server requests by duplicating a copy of the previous requests in our Redis instance.
There might be some cases, we might need to delegate caching to other applications or microservices or any form of key-value storage system that allows us to store and use when we need it. We chose Redis since it is open source and very popular in the industry. Redis’s other cool features include data structures such as strings, hashes, lists, sets, sorted sets with range queries, bitmaps, HyperLogLogs, and many more.
I highly recommend you visit the Redis documentation here to gain a depth understanding of other features provided out of the box. Now we can go forth and use Redis to cache frequently queried data in our applications and gain a considerable performance boost.
Please find the code repository here.
Happy coding!