TL;DR
- Learn to upload files with Axios using multipart/form-data in JavaScript
- Compare multipart/form-data vs x-www-form-urlencoded and their use cases
- Configure Axios headers or form enctype to send single or multiple files
- Implement an Express backend using express-fileupload to read req.body and req.files
Fact Box
- multipart/form-data sends form data in parts with a boundary, enabling file uploads from browser forms
- x-www-form-urlencoded encodes form data as key=value pairs joined by & and percent-encodes reserved characters
- In Axios you can set axios.defaults.headers.post['Content-Type']='multipart/form-data' to use form-data globally
- With express-fileupload, text fields are in req.body and uploaded files in req.files (e.g., req.files.userPicture)
- Setting enctype="multipart/form-data" on an HTML form enables file upload handling by the server
You are looking for a way to send files through a form using Javascript? Axios Multipart Form Data is the answer! Have you ever wondered how to include files in a form? How to send file data using Javascript, or is it even possible? How can you use Axios to send file data? With this article, you will learn all about Axios Multipart Form Data and how to send files through a form with Javascript.
The problem of sending file data through a form is a common dilemma for web developers. It is essential to know how to do this to build dynamic web applications. In research studies, such as this one, it has been proven that having a clear understanding of how to upload files is essential. Mastering Axios Multipart Form Data is a game-changer in developing business software, as it enables the seamless integration of file uploads into web applications, enhancing functionality and user interaction capabilities.
By reading this article, you will have a better understanding of Axios Multipart Form Data and how to send files through a form using Javascript. You will learn how to send files using the Axios.post() method, and how to configure your Axios request. You will also learn how to include multiple files in your form. So, if you are ready to learn more about Axios Multipart Form Data, let’s get started!
What is Axios Multipart Form Data?
Utilizing Axios Multipart Form Data is crucial for business software development, offering a streamlined approach to handling file uploads and ensuring efficient data transfer from client to server, thereby enhancing the overall functionality and user experience of web applications. Axios Multipart Form Data is a way to send files through a form using Javascript. It allows developers to include multiple files in a form, and to send them to the server using the axios.post() method. It is an efficient way to send files from the client to the server and is essential for web developers.
The Multipart Form Data encoding type can be used to include files in the form data before transferring it to the server for it to be processed. There are other types of encoding as follows-
application/ x-www-form-urlencoded: The data is encoded like a string of queries. It separates the key-value pairs (denoted by ‘=’) with signs like ‘&’.text/ plain: Here, the data gets transferred just as the text itself. That means it doesn’t convert it to code for transferring. It is generally used to debug and not to produce anything.multipart/ form-data: It can include files in the form of data as stated above. Here the data is sent in the form of chunks where a character that does not appear in the content is used as a boundary symbol.

However, HTML Training is very beneficial to know more information on this exciting platform and enhance your career growth in this Programming & Frameworks field.
We can include any of these in our HTML form tag through the attribute- “enctype” which is optional.
<form action = "/path/to/api" method = "POST" enctype = "ENCTYPE_HERE"></form> |
It is pretty much simple to use them, and, likely, we all have already encountered it with the HTML tag- <form>. We generally omit the attribute because the default does its job alright.
Multipart Form data and x-www-form-urlencoded
Multipart Form Data and x-www-form-urlencoded are the main two methods for sending the HTML data to the server. The complete set of data is sent as a long string of queries as far as x-www-form-urlencoded is concerned. On the other hand, Multipart Form Data uses data chunks to transfer them. Still, there are some similarities between them which are as follows-
- Both of them are used to send form data as POST requests.
- The multipart form system is mostly used for sending binary data (more specifically to upload files), while the
x-www-form-urlencodedis mostly used for sending text data. - Both of them are required to be supported by the user agents, such as a browser.
- A specific character not occurring in the entire content is used to separate each part by multipart form data. On the other hand, one big string of queries signifies all the name-value pairs as far as
x-www-form-urlencodedis concerned. Here, ‘%’ replaces the reserved and alphanumeric characters. And, ‘%20’ replaces the hex value like space. - The more efficient one out of these two is multipart form data. This is because a character does not need to be replaced with three bytes as the URL encoding requires.
Differences between Fetch and Axios
| Axios | Fetch |
| The request object has a URL in Axios. | The request object does not have any URL in Fetch. |
| There is built-in XSRF in Axios. | There is no built-in XSRF in Fetch. |
| We can install Axios easily as it is a third-party package. | The built-in package in most browsers is Fetch. Therefore there is no need to install it in most cases. |
| The data property is used by Axios. | The body property is used by Fetch. |
| The ‘200’ status and ‘OK’ statusText signify that Axios is right. | The OK property contained in the response object signifies that Fetch is right. |
| The object is contained in the data of Axios. | The body of Fetch is stringified. |
| The transformation of JSON data is automatic in Axios. | There is a process of two steps while handling the JSON data. One is for making the actual request, and the other is for calling the JSON method intentionally. |
| The HTTP requests can be intercepted by Axios. | The HTTP requests can’t be intercepted by Fetch as per the default setting. |
| The requests can be canceled and timed out in Axios. | The requests can’t be canceled and timed out in Axios. |
| Several browsers are supported by Axios. | Only Firefox 39+, Chrome 42+, Safari 10.1+, and Chrome 42+ are supported by Fetch. This is called backward compatibility. |
| There is built-in support for download progress in Axios. | The upload progress is not supported by Fetch. |
Let us proceed with considering each step. From the process of sending the form data and files to Node.js (Express) using Axios to receiving it, we’ll focus on it all.
How to Install Axios?
It has become very typical now to send HTTP requests using Axios instead of fetch(). For installing Axios in the projects of Node, the following code needs to be followed.
$ npm install Axios# OR$ yarn add Axios |
A different method is also there. The files can be directly downloaded to the local machine. And then the library can be easily included as given below-
<script src = "https:// unpkg.com/ axios/ dist/ axios.min.js"></script> |
How to set enctype up with HTML and Axios?
The encoding type needs to be set up for sending the multipart data form. And Axios provides several ways to achieve this. None can be considered better than the other since every one of them is equally efficient when setting up enctype.
The default global type of encoding can be set up using Axios as given below. It will make the type of encoding for all Axios requests to be of form-data type.
axios. defaults. headers. post ['Content-Type'] = 'multipart/form-data'; |
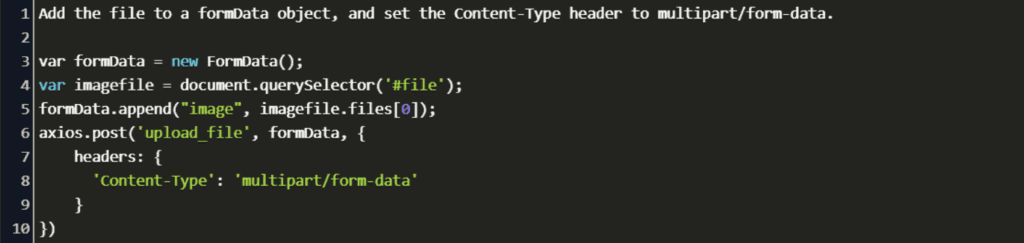
In the second method, we can change the headers to define the kind of encoding for all separate requests. We can do this by using the following code:
Axios.post ("/path/to/api", data, { Headers: { "Content- Type": "multipart/ form-data", },}); |
The last method is probably the simplest of all. What we need to do is simply set the enctype in a particular <form> tag. The encoding type of that form will be adopted by Axios by just typing the given commands:
<form action = "/some-endpoint" method = "HTTP_METHOD" enctype = "multipart/ form data"></form> |
Axios + Express
Let us build a two-input form. One is for submitting the user name and the other is for selecting a profile image:
<form action = "/Update profile" method = "post"> <input type = "text" name = "username" placeholder = "Type the name here" /> <input type = "file" name = "userPicture" /> <button type = "submit"> submit </button></form> |
If we do not use Axios, the default events will unfold. A POST request would be sent to the /update profile endpoint when we click on the “submit” button. However, an event listener can be attached to the button to override the default settings. As the requests of Axios are asynchronous, the headers can be changed and the requests can be customized.
https://www.codegrepper.com/codeimages/update-image-with-axios-form.png
Express Backend
Express JS is the cleanest as well as simplest method for spinning up a REST API. It works as a boilerplate for the server setup and to handle requests.
Although Express is just as perfect software as possible, some middleware expansion just adds more delight to it. Therefore we can install numerous middlewares on its top for expanding its function.
The installation of Express through npm is straightforward. The express-file upload middleware can be used to handle file uploading. We can install it also easily through npm:
$ npm install Express - file upload |
For starting a server and defining an endpoint to update a profile, the following steps are to be followed:
The library is imported-
Const express = require ("express");Var file upload = require ("express-file upload"); |
The app instance is created-
Const app = express(); |
The middleware is registered as well as set up
App.use (file upload());App.use (express.urlencoded({extended: true})); |
The endpoint is requested-
App.post ( " /update profile", (req, res) => { Let username = req.body.username; Let userpicture = req.files.userPicture; Res.send(' The username goes like: ${username} The uploaded image shows like: ${userPicture.name} ');}); |
And finally, the server is started.
The data that the form sends contains the request that the request handler passes. All data is contained in the setup fields like a username. The req object’s files field contains all the files. Therefore we can get them username through the req.body.username and the file that is uploaded through the req.files.user picture.
After the form is submitted through the HTML page, the API receives a request. The given output is produced in the console:
The username goes like this: The_entered_nameThe uploaded image shows like: Uploaded_name_of_file |
All the information about the file kike its name, the type of encoding, and much more is returned if req.files.user picture is logged in.
Concluding Remarks
The Multipart form data has improved the efficiency of uploading data tremendously. We can upload a single object as chunks of the content. This enables us to upload any part of the content independently in the order we want. Also, the failed part can be re-transmitted without affecting the other parts of the documents. Hence, it doesn’t let the processing slow down in any way.