TL;DR
- Step-by-step setup: Docker + Sail, optional WSL on Windows; create via laravel.build or Composer, then run locally.
- Explains Laravel's evolution: 2011 launch, MVC since v2, Artisan added in v3.
- Pros: simple syntax, security, MVC structure, strong community. Cons: compatibility gaps, fewer tools, uneven speed.
- Use cases: APIs, Next.js backends, Blade views; speed up with templates or Flatlogic Platform.
Fact Box
- Laravel beta released on June 9, 2011, by Taylor Otwell.
- Controllers added in September 2011 (Laravel 2), making it a true MVC framework.
- Laravel 3 introduced the Artisan CLI and expanded database management.
- composer create-project laravel/laravel example-app; php artisan serve runs a local dev server.
- First Sail launch builds containers; with the structure in place you can access it at http://localhost.
Are you looking for a comprehensive guide on how to create a Laravel project step by step? Have you been trying to figure out the best way to get up and running with Laravel? Are you looking for advice on how to optimize your workflow and make the most of your development time?
With the demand for web applications growing, there has been an increase in the development of frameworks to help developers quickly and easily create applications. Laravel is one of the most popular frameworks available, offering a wide range of features and tools to help you create the perfect application.
The problem is that for many developers, the process of getting up and running with Laravel can be daunting. This is why it’s so important to have a comprehensive guide that outlines the steps you need to take to create a Laravel project from start to finish. Such guidance is crucial, especially when developing complex business software, as it ensures that developers can leverage Laravel’s features to build scalable, efficient applications that meet enterprise needs effectively.
In this article, we’ll talk about the history of Laravel, how it emerged, and how it won its position. We’ll take a closer look at the peculiarities of working with Laravel, and sum up the reasons to choose it or avoid it. Finally, we’ll dive deeper than usual into the inner mechanism of a simple app, and show you the code so you’ll know how to properly grease the gears. Keep reading!
Laravel Architecture
As mentioned, Laravel follows the Model-View-Controller architecture pattern. In this system, the Model is the part that manages the database and the data logic. The View is the user interface and all its interactive functions. The controller is what differentiates MVC software from earlier practices. It mediates between the Model and the View and makes the two largely independent of each other. It means easier development and maintenance, easier project management, and reusability of components.
Laravel History
Laravel first saw light in 2011, so it’s a little over 10 years old now. By that time Taylor Otwell, the creator of Laravel, had been using CodeIgniter for quite a while. CodeIgniter was a solid backend framework and holds a small market share to this day. However, it had issues with authentication. Whenever you wanted authorization with Google or Facebook that we now take for granted, it required additional software that was hard to find in ready form. Otwell released the beta version of Laravel on June 9, 2011. The early Laravel supported a lot of the things that were missing from most backend frameworks back then. Those included authorization, views, sessions, routing, localization, and more. 
Modern Laravel complies with MVC principles. But back in 2011, it did not support controllers. It became a true MVC framework in September 2011, with the Laravel 2 update. Laravel 3 came with a built-in command-line interface called Artisan. Furthermore, it had a lot more capacity for managing databases. At that point, Laravel was something largely similar to what it is today, serving as a powerful tool in the arsenal of developers creating sophisticated business software, thanks to its robust features and flexibility in handling complex web application requirements.
La ravel’s Pros
Simplicity
Backend frameworks have a reputation for being harder to grasp. While subjective, this opinion has a grain of truth to it. Backend processes happen behind the scenes. They aren’t as easily demonstrable as front-end processes, and thus can not be easily intuited. Laravel’s simple syntax and extensive use of plain PHP are a nice change of pace and a great opportunity for aspiring backend developers.
Security
Laravel is often credited for data security. One of the contributing solutions is the Eloquent ORM. This object-relational mapper is included in the package and adds another level of abstraction to the code. It presents data as objects, making the data exchange safer and more efficient. Furthermore, Laravel can store passwords in encrypted form out of the box. Together with the overall sturdy build, this makes Laravel a safe and reliable technology.
Time and Resource Efficiency
Laravel’s initial lightweight is just one of the reasons why it saves storage space and computing power. Laravel is awesome when it comes to testing separate parts of the software rather than the whole project. Any time you fix a bug, this feature of Laravel will save just a little time. But if you have to fix lots of bugs, that’s a huge asset!
Effective Mapping
Laravel’s mapping is optimized for using relational databases. This makes relational databases easier to connect to Laravel backend, and they run smoother and faster than on some other frameworks.
Built-in CLI
Laravel’s built-in CLI called Artisan is a huge asset in creating command-line applications. Artisan is an advanced CLI that lets you include tasks and migrations without additional tools and resources.
Strict Logic
Laravel complies with the MVC (Model-View-Controller) architecture. This design helps structure the code into intuitive logical areas. MVC solutions are usually less susceptible to bugs and more compliant when it comes to debugging.
Quality Community
Laravel’s community is extensive and helpful. Plenty apart from the extensive FAQs, a lot of forums and dedicated platforms orbit Laravel making it very hard to come across an issue you won’t find a solution to.
Laravel’s Cons
Possible Compatibility Issues in Older Projects
Laravel has grown tremendously since its introduction, but that came at a cost. Newer versions have an array of features that don’t work properly with older versions. This can make older Laravel projects glitchy and slow. In other words, the opposite of what we value the most about Laravel.
Minimum Tools Included
We’ve mentioned what a great CLI Artisan is. However, other parts of Laravel don’t boast the same diversity of tools and components. The downside of choosing a lightweight framework is the likelihood of having to implement additional tools and some glue code to make them work together properly. This is not a frequent issue but it can sometimes negate the light weight of Laravel.
Inconsistent Speed
Laravel doesn’t shine when it comes to speed. Competitors like Yii and Symfony outrun Laravel in most scenarios. Bear in mind, though, that Laravel’s operation on the latest PHP version with JIT compilation hasn’t been extensively tested. So keep your mind open, the latest Laravel might turn out to be much faster.
Getting started with your own Laravel project
When working with backend frameworks, it’s harder to keep track of your progress. That’s one of the reasons why backend frameworks get a reputation for being hard. We don’t think it’s fundamentally harder. We think it just requires a bit more initial training. Let’s start with the basics and progress one step at a time.
Installing pre-requisite software
To fully use Laravel’s arsenal of features, you’ll need to install some useful tools and learn to use them. Let’s start with Docker. Docker is a virtualization solution. It lets us run software in sandbox-like environments called “containers”. Docker runs your code internally, without affecting any other software on your PC or causing any compatibility issues. What runs in Docker, stays in Docker. We suggest getting Docker Desktop. The real reason we need Docker is Sail – Laravel’s built-in command-line interface. It integrates with Docker perfectly. This basic setup will let you run intermediate versions of your project with ease.
Setting up a Subsystem
This step is highly recommended for Windows users. A Linux Subsystem allows for running binary executables. This is the least troublesome way to test-run Laravel code on Windows. Launch your Windows Terminal, preferably in administrator mode, and launch the WSL. The process is simple: just type ‘wsl’ in the PowerShell or another CLI.
Creating the Project
Everything’s set for creating our project. I’ll let myself be vain about it and call it Al’s Laravel project. Except, we want to avoid any possible compatibility issues, so the directory will be spelled ‘als-laravel-project’. To create a project, we use the CLI to go to the directory we need to create the project and print:
curl -s https://laravel.build/als-laravel-project | bash
After a brief compilation, navigate your CLI again to the directory and move to the next step.
Creating the Project via Composer
This is another way to create a Laravel project. It has gained lots of popularity and might be the most obvious method today. First, make sure you’ve installed both PHP and Composer. Then you can enter Artisan CLI and print the following:
composer create-project laravel/laravel example-appcd example-appphp artisan serveThe above will create a local development server for Laravel.
Starting Sail
At this point, we can set up sail with one command. The ‘Sail Up’ command is easy enough to remember. Since we’re setting up our Sail, get it? If this is your first time launching Sail, the CLI will build application containers on your device. It can take a while but will make all subsequent Sail launches and operations faster. With the file structure there, you can access your application at http://localhost. In principle. This is just the structure of the future application and not the application itself. Let’s see what we can do next!
Primary Configuration
Laravel is often credited with the ease of setting things up. Most Laravel projects require little to no initial configuration. However, you can explore the app.php file in the ‘config’ folder. It contains plenty of variables like time zone, Laravel framework service providers, and URL debugging. As we said, most projects don’t require any configuration at this stage. If you’re just learning the ropes, we recommend learning to work on a basic Laravel project first. It will give you some context when you’re deciding how to configure the application.
Environment Configuration
Laravel supports developing, testing, and running your applications in different environments. Those include testing, deployment, production, and more. Adjusting your project for different environments happens by changing underlying parameters like caching directory. Environment variables are found in Laravel’s default.env file (or .env.example, depending on the method of Laravel installation that you’ve chosen).
Laravel for Backend
Laravel can be a great backend solution in many cases. Let’s list some of them!
Single-Page APIs
When building a single-page API, the small scale of the software built and the time spent implies a similarly minimalist approach to choosing the underlying technologies. We’ve mentioned how a Laravel project can be configured but in many cases that’s unnecessary. Laravel’s ease of configuration lets us create simple APIs in no time.
Next.js Applications
Next.js emerged to solve compatibility issues for Node-React applications, and that’s how it usually works. With Laravel, however, there’s another way to use Next.js. Laravel runs well as a backend of the Next.js application’s API. Laravel’s support of notifications and queues is impressive and helps use these features out of the box.
Semi-Full-Stack Framework
You might come across sources that claim Laravel to be a full-stack technology. That’s true to an extent. Laravel offers extensive possibilities for request routing. Also, if you’re interested in Laravel’s full-stack capabilities, take a closer look at Blade. The blade is Laravel’s integrated templating engine. It uses plain PHP which means no additional software will inflate your project. You can use Blade and transmit information to integral view lines. Laravel won’t work as a comprehensive front-end framework but brings along features that will be a great addition to plain JavaScript apps and landings.
Building Laravel Projects with Templates
Laravel is a highly popular framework so, naturally, there’s a huge supply of Laravel templates. One example is Flatlogic’s own Sing App Vue Template with Laravel Backend. Templates are possibly the easiest way to create a Laravel application. Especially because many of those templates come with pre-installed front end. The main challenge here is properly connecting all data endpoints to create a completely functional API.
To better understand how it works, we suggest trying the Sing App’s live demo. It is intuitive enough for most users to quickly understand how to manage a template-based application. Plentiful documentation will help resolve any issues and our support team is always ready to help you out here in case the documentation doesn’t cover it.
Building Laravel Projects with Flatlogic
Flatlogic Platform is our way of bridging the gap between developing your apps and using templates. Applications running on the same technologies typically use the same elements and components. In many cases, the main thing that makes them different on a technical level is the database schema that accommodates different mechanisms of data processing and storage. Flatlogic Platform allows the creation of applications by combining parts and building only the parts that need to be unique. It’s as easy as it sounds, and sometimes even easier. Keep reading to know more!
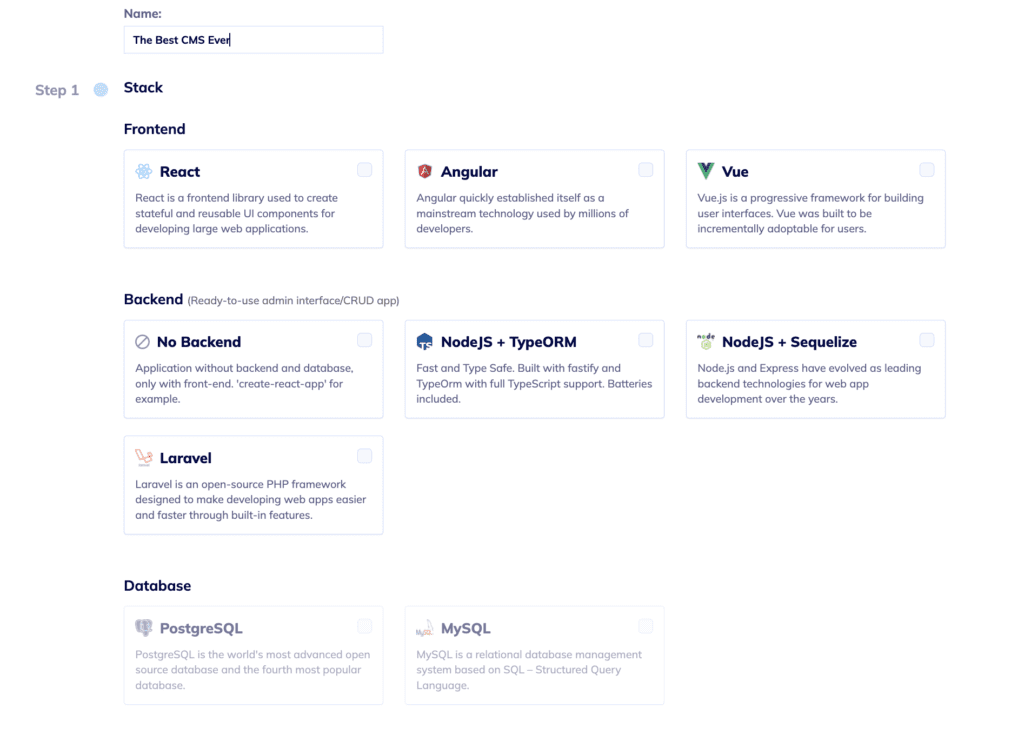
Step 1
The first page we see when creating our project requires a name for the project and the tech stack. The name is pretty straightforward. Just pick one that can be easily associated with the project. The tech stack is the combination of technologies used in the project. The front end, the database, and the backend to tie them together. Any combination will work fine, but given the article’s topic, we’ll choose Laravel as the backend technology.
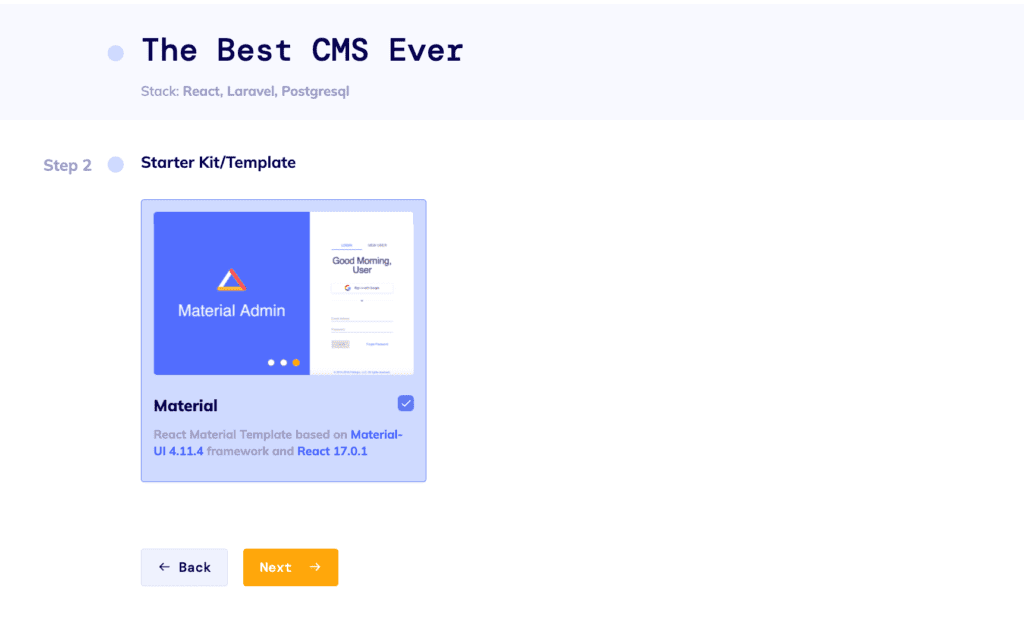
Step 2
Next up, we’ll choose the design for our application. Currently, we’re redeveloping some visual options, so only the Material is available. But don’t worry, the others will soon be back and improved. Material design is Google’s design language used for UI compatibility of new software with Google services. Furthermore, its minimalist, unobtrusive nature works in most cases and for most users.
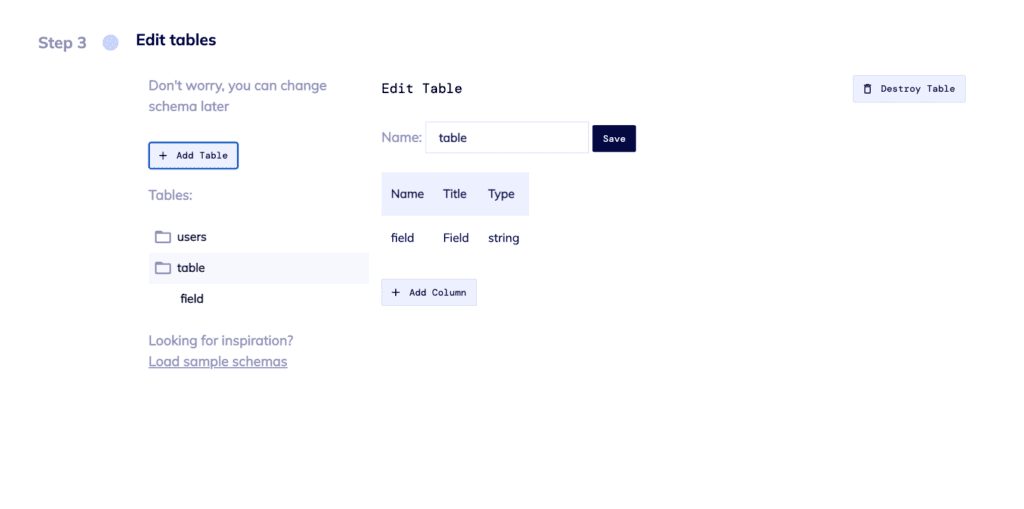
Step 3
The following page is the Database Schema that we mentioned earlier. The schema is the structure of the database that describes the relationships between columns, rows, and fields. This is an important part that largely defines how your application will process data. However, we’ve explored the more popular demands and included pre-built schemas perfect for eCommerce, Blogs, Social Networks, and more.
Step 4
Here we need to check if everything is going according to plan. Check the stack, check the design, check the database schema, decide if you want to connect the Git repository, and hit Finish.
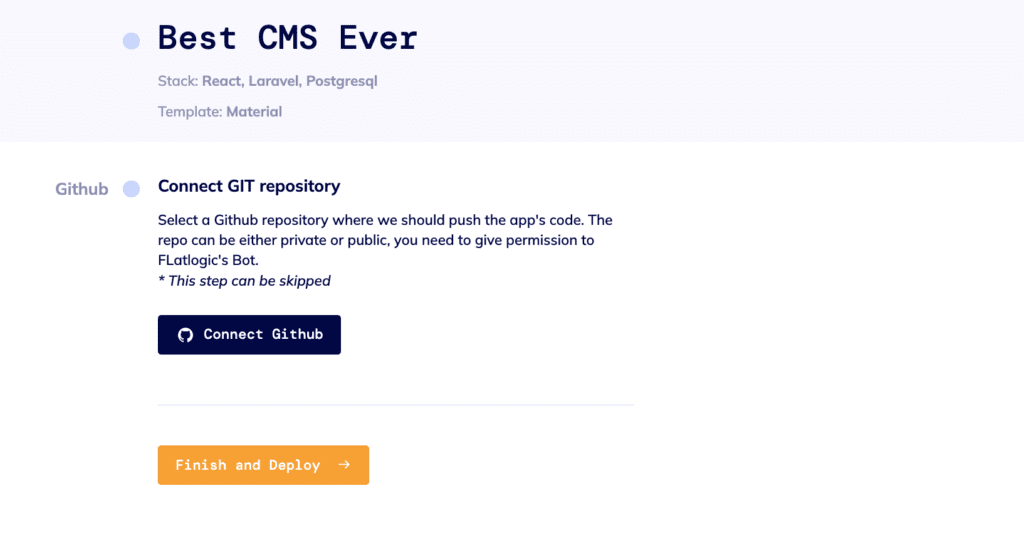
Step 5
The next page offers us a plethora of ways to deploy and run our application. Deploy from scratch, deploy from GitHub… If you’re interested in the inner mechanisms of a Laravel application, you can view the actual code of the app.

Well done, sir or madam! You’ve created your very own Laravel App.
Conclusion
We’ve explained how to install Laravel and create your first project. That’s a solid first step for anyone who wants to learn Laravel development. For everyone else who needs a Laravel-based application but doesn’t have the time or the desire to learn the framework, we’ve offered two other routes. Both Laravel templates and the Flatlogic Platform have a lot going for them. We might be biased but we usually recommend the Platform. It offers greater flexibility by allowing you to create applications with any combination of technologies, designs, and database schemas.
Laravel is a controversial technology. It’s simple and beginner-friendly, but it requires additional research as you master Laravel development. It is one of the best and most versatile technologies including CLIs on the market yet can sometimes lack tools in other departments. We can recommend Laravel to anyone willing to learn backend development. Laravel offers plenty of features that speed up the development of compact, single-page applications, and large-scale business solutions.
Comments