TL;DR
- Step-by-step guide to build a basic React Admin using react-admin and JSONPlaceholder.
- Sets up users and posts with ListGuesser, custom lists, ReferenceField, and edit/create.
- Adds a simple authProvider using localStorage with 401/403 handling.
- Faster path: Flatlogic AI Web App Generator builds a React Admin in under five minutes, in five steps.
Fact Box
- Project bootstraps with 'npx create-react-app my-react-admin-page' and installs react-admin and ra-data-json-server.
- Data provider connects to https://jsonplaceholder.typicode.com using ra-data-json-server. Source
- Posts link to users via ReferenceField with source 'userId' to set a foreign key relationship.
- Auth uses localStorage: saves 'username', clears it and rejects on HTTP 401 or 403.
- Flatlogic AI Web App Generator creates a React Admin in 5 steps, in under five minutes. Source
Introduction
Every web project has two sides: the one seen by users and the admin page that its manager uses to control each aspect of each page of said project. To draw a parallel, the user side of the site is our usual beautiful world, and an Admin Page or Admin Console is like the Upside Down from “Stranger Things”, where it is dark and scary, but all the important stuff happens. Or, to draw another analogy, a React-based Admin Page is like the Enterprise spacecraft engine rooms: all the main characters like Captain Kirk and Spock are on the beautiful and well-lit main deck, which would be rendered useless if all the ship’s engineers left the above-mentioned engine rooms. So, the importance of a well-made Admin Page cannot be underestimated if you need your whole project to run smoothly and correctly. But first off, let’s fully understand what a React Admin Page is and how it operates.
What is React Admin
React Admin Page or React Admin Console is, to put it simply, a framework that contains all the information about the site and its content, including information about your products, users, etc. React Admin page also gives you the ability to control everything about the content on your website or app.
In other words, it is the control tool that you use to manage and improve your web project. Thus, it is a tool of great importance able to make or break your business, especially if your specialty is of an e-commerce nature. Don’t get us wrong, we are not telling you this to scare you, but to merely emphasize the significance of creating a React Admin Page worthy of your business.
Before we give you a quick rundown on how to create your own basic React Admin Page, there is only one little question left standing: why use React as a basis for your Admin Page in the first place? React is, no doubt, one of the best bases for an Admin Page. It is easy to create, improve, use, and, most importantly, easy to maintain. This fact renders the decision on what to use as a basis for not only your Admin Page or Admin Console, but pretty much your whole web project preemptively made for you.
That being said, let’s have a look at how to create your own crud React Admin Page in two ways:
1. By actually sitting down and writing a code, spending so much precious time and effort;
2. Or by seamlessly and effortlessly creating it with the help of Flatlogic’s Full Stack AI Web App Generator. 
More on seamlessness and effortlessness of option number two later, as now we take a look at path number one.
How to Build React Admin
In order to create your own React Admin Page you will require some preliminary preparations that mainly consist of installing npx, which version would be newer than its eighth iteration, and create-react-app.
With the preliminaries out of the way, your next step is to create a new folder that will contain and store your React Admin Page’s codebase. When that is done, you need to use your preinstalled create-react-app with the following line of coding:
npx create-react-app my-react-admin-pageThis line will create a blank React application that will serve as your React Admin Page after we fill it with all the needed innards. Now it is time to install the react-admin package, as well as the data provider that will help us connect to a fake API:
cd my-react-admin-pagenpm install react-admin ra-data-json-servernpm startNow it is time to start working on the above-mentioned React Admin Page innards. Bear in mind that we don’t pay much attention to filling up our frontend with any real data and instead we are going to use an API for testing and prototyping. This will help us by letting us forget about creating custom data providers for now. The first step we are to partake in is replacing the src/app.js element with the next lines of code to set up your React Admin’s default page:
import { Admin } from 'react-admin';import jsonServerProvider from 'ra-data-json-server'; const dataProvider = jsonServerProvider('https://jsonplaceholder.typicode.com'); function App() {return (<Admin dataProvider={dataProvider} />);} export default App;The next step is setting up the Resource component, which allows you to command react-admin to fetch and subsequently display a user resource. The process is quite simple: your data provider will process the fetch command and display the requested user with the help of the ListGuesser, which takes the data the resource was provided with and tries its best to guess upon the format of the initial data grid. This, subsequently, allows us to use the above-mentioned initial data grid in order to generate our initial list code. And to set the Resource component you will need the following lines of coding:
import { Admin, Resource,ListGuesser } from 'react-admin';import jsonServerProvider from 'ra-data-json-server'; const dataProvider = jsonServerProvider('https://jsonplaceholder.typicode.com'); function App() { return ( <Admin dataProvider={dataProvider}> <Resource name="users" list={ListGuesser}/> </Admin> );}export default App;Now, in order to customize the mishmash of columns, you will have to look through the table element in your browser and copy the parts you would like to systemize and customize. After that, copy the selected parts into your console by using the inspect element → console chain of commands. The result will look something like this:
export const UserList = props => ( <List {...props}> <Datagrid rowClick="edit"> <TextField source="id" /> <TextField source="name" /> <TextField source="username" /> <EmailField source="email" /> <TextField source="address.street" /> <TextField source="phone" /> <TextField source="website" /> <TextField source="company.name" /> </Datagrid> </List>);To sort everything nice and tidy you will need to create a components folder in your src and paste the data in need of sorting into the user.js file. What you get as a result should look as follows:
import { List, Datagrid, TextField, EmailField } from 'react-admin'; export const UserList = props => (<List {...props}><Datagrid rowClick="edit"><TextField source="id" /><TextField source="name" /><TextField source="username" /><EmailField source="email" /><TextField source="address.street" /><TextField source="phone" /><TextField source="website" /><TextField source="company.name" /></Datagrid></List>);Now you can get rid of the unnecessary information. For this example, let’s get rid of the Ids and usernames, as well as disable the phone sorting and change the street address and company name field label with the label prop. Now, this part should look like this:
import { List, Datagrid, TextField, EmailField } from 'react-admin'; export const UserList = props => (<List {...props}><Datagrid rowClick="edit"><TextField source="address.street" label="Street Address"/><TextField source="phone" sortable={false}/><TextField source="company.name" label="Company Name"/></Datagrid></List>);At this point, it is time to replace the ListGuesser with the list above in the Resource component. To do that, get back to the App.js and add the following lines:
- import {UserList} from “./components/users”;
- <Resource name=”users” list={UserList} />
And this part of the process is finished. Now you will need to repeat the process to set up your posts. But keep in mind that each post should be connected to its userId to create a reference between a post and the user that created it.
So, let’s get a closer look at this aspect, as the steps of the post set up previous to it are similar to user set up. In order to ensure the correlation between a post and its user-creator, add the following lines:
<p><em>import { Admin, Resource,ListGuesser } from 'react-admin';</em></p><p><em>import jsonServerProvider from 'ra-data-json-server';</em></p><p><em>import {UserList} from "./components/users";</em></p><p><em>const dataProvider = jsonServerProvider('https://jsonplaceholder.typicode.com');</em></p><p><em>D</em></p><p><em>function App() {</em></p><p><em>return (</em></p><p><em><Admin dataProvider={dataProvider}></em></p><p><em><Resource name="users" list={UserList}/></em></p><p><em><Resource name="posts" list={ListsGuesser}/></em></p><p><em></Admin></em></p><p><em>);</em></p><p><em>}</em></p><p><em>export default App;</em></p>To create relationships between the post and the user, you will need to use the ReferenceField component, setting up the foreign key with the source=”userId” prop. After that, you will need to change the list prop for the new posts resource to reference PostList in App.js. To do that, replace the ListGuesser in the post’s resources list prop with the PostList.
The next step in creating your React Admin is to create an edit button to allow content modifications. And the first thing you will need to do here is to add the EditButton component to your Datagrid. The coding for this operation will look like this:
import { List, Datagrid,ReferenceField, TextField, EmailField,EditButton } from 'react-admin'; export const PostList = props => (<List {...props}><Datagrid rowClick="edit"><ReferenceField source="userId" reference="users"><TextField source="name" /></ReferenceField><TextField source="id" /><TextField source="title" /><TextField source="body" /><EditButton/></Datagrid></List>);The second thing you will need to do here is to pass an edit prop to your resource. To do that, use the EditGuesser component and pass it to the posts resource in src/App.js. What you need to get is as follows:
import { Admin, Resource,ListGuesser,EditGuesser } from 'react-admin';import jsonServerProvider from 'ra-data-json-server';import {UserList} from "./components/users";import {PostList} from "./components/posts"; const dataProvider = jsonServerProvider('https://jsonplaceholder.typicode.com'); function App() {return (<Admin dataProvider={dataProvider}><Resource name="users" list={UserList}/><Resource name="posts" list={PostList} edit={EditGuesser}/> </Admin>);} export default App;At this point, the EditGuesser component will generate edits. You will need to take those edits in order and copy them into src/components/posts.js. The whole thing will look like this:
<export constPostEdit = props => (<Edit {...props}><SimpleForm><ReferenceInput source="userId" reference="users"><SelectInput optionText="id"/></ReferenceInput><TextInput source="id"/><TextInput source="title"/><TextInput source="body"/></SimpleForm></Edit>If everything is fine and dandy with this, you will copy and paste the edit code, after which it is time to create the CreatePost component. This component is quite similar to the previous ones with the exception of using two different wrapper components. Here, you will need the Create component.
But that’s not the end of this whole ordeal, as you will need to supply the create prop in the React Admin’s resource as well. In order to do that, you will need to add the PostEdit and PostCreate components into the import. After that, you will need to add them into the posts resource:
<Resource name="posts" list={PostList} edit={PostEdit} create={PostCreate}/>“That surely must be it. My React Admin is ready!” – you might think. But unfortunately, as we told you at the beginning of this article, writing your React Admin from scratch is an extremely long and winding road. After all, it surely needs authentication, so your API will not be accessible to the general public. What you will need to do in order to add it is to create a new directory and a new file, which will be src/providers/authProvider.js. Your coding for this part should look somewhat like this:
export default {login: ({ username }) => {localStorage.setItem('username', username);return Promise.resolve();},logout: () => {localStorage.removeItem('username');return Promise.resolve();},checkError: ({ status }) => {if (status === 401 || status === 403) {localStorage.removeItem('username');return Promise.reject();}return Promise.resolve();},checkAuth: () => {return localStorage.getItem('username')? Promise.resolve(): Promise.reject();},getPermissions: () => Promise.resolve(),};After that the addition of the authProvider={authProvider} prop and the authProvider component in the src/app.js‘s admin component would be required:
import authProvider from "./providers/authProvider";And only now you will have a very crude and extremely basic React Admin that will still require services and backend tinkering and wiring up, but we digress. The main take out of this part of the article should be that this process, also not particularly difficult and somewhat simplified, could be best described as time-consuming.
But what if we told you that you can create a fully functional and stunningly beautiful React Admin Page in under five minutes? Let us introduce you to your new best friend, as we get to the next part of the article!
How to build React Admin easier with Flatlogic’s Full Stack AI Web App Generator
When we said that creating a React Admin in under five minutes is possible, we weren’t joking around. It is more than possible with the help of Flatlogic’s Full Stack Web App Generator, which allows you to create ready-made React Admin Pages in just five easy steps. So, take out your stopwatch, and let’s undertake this pleasant little journey together!
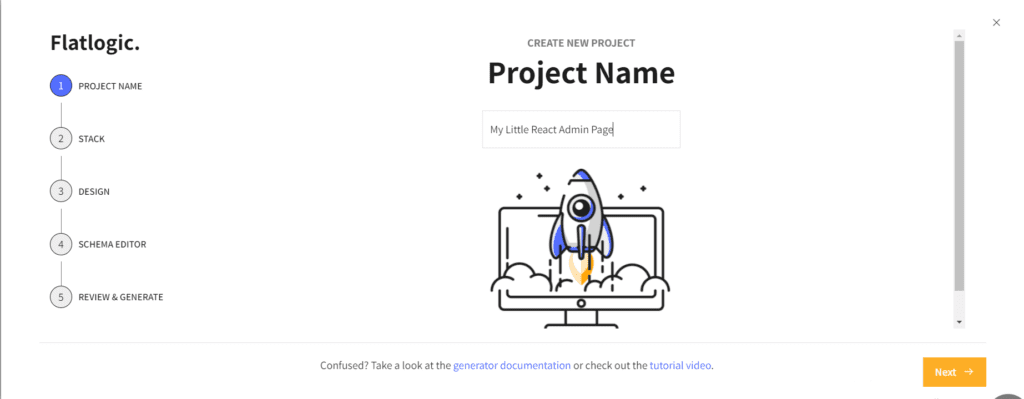
Step №1. Choose a name for your React Admin Page
The process of creating a React Admin Page with the help of Flatlogic’s Full Stack Web AI App Generator is already a thousand times easier than doing it by hand, as one of the steps is not writing or pre-installing anything, but a simple task of choosing a name for you API. After you do it, it’s already time for the second step.
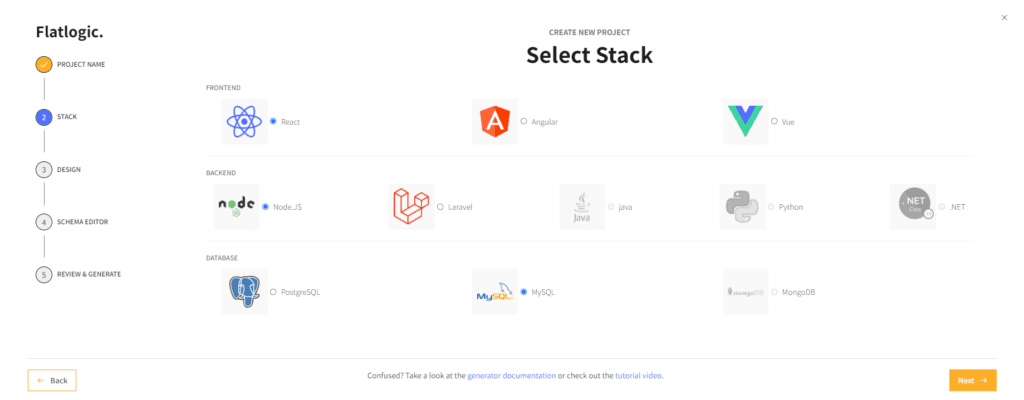
Step №2. Choose your React Admin Page’s Stack
This step is important, but also easy. Just pick the basis for your backend, frontend, and database. For the purposes of this article, we will, of course, choose the React as a frontend option. The rest is all up to you.
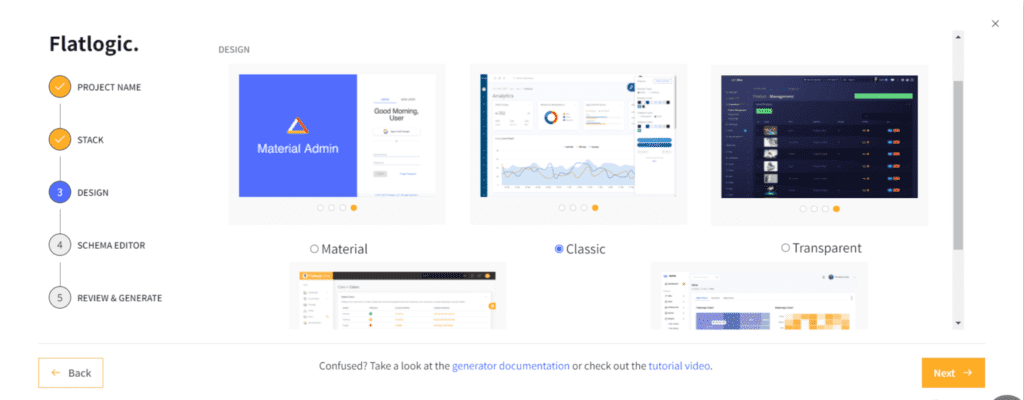
Step №3. Choose design for your React Admin Page
This step is visually pleasing, as you get to choose from a number of stunningly beautiful ready-for-usage designs. For our example, we’ve decided to pick the marvelous “Flatlogic” design.
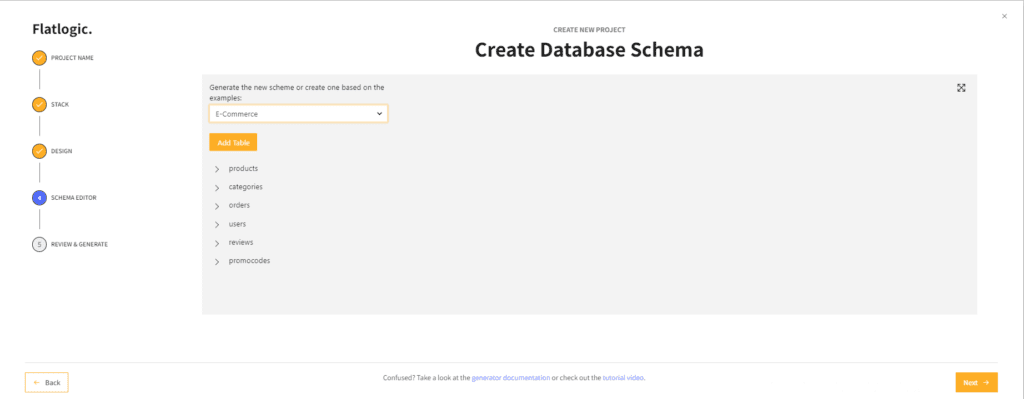
Step №4. Create your React Admin Page’s Database Schema
This step is quite important, as it is the basis for your React Admin Page. But fear not, as it is highly editable and customizable to your project’s needs. For the purpose of this example, we decided that our imaginary project is an E-commerce one and, quite luckily, Flatlogic’s Full Stack Web App Generator has a ready-made database schema just for this purpose. Bear in mind that even though it is ready-made it is still customizable and ready to be tailored to your project’s specialties.
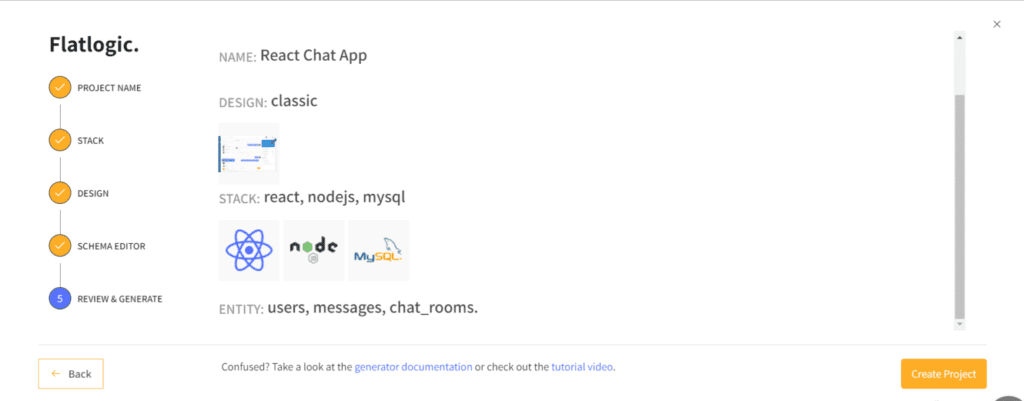
Step №5. Review and generate your React Admin Page
Now we are already at the finish line. All we have to do is just ensure that we’ve chosen everything we wanted and press the majestic “Create Project” button.
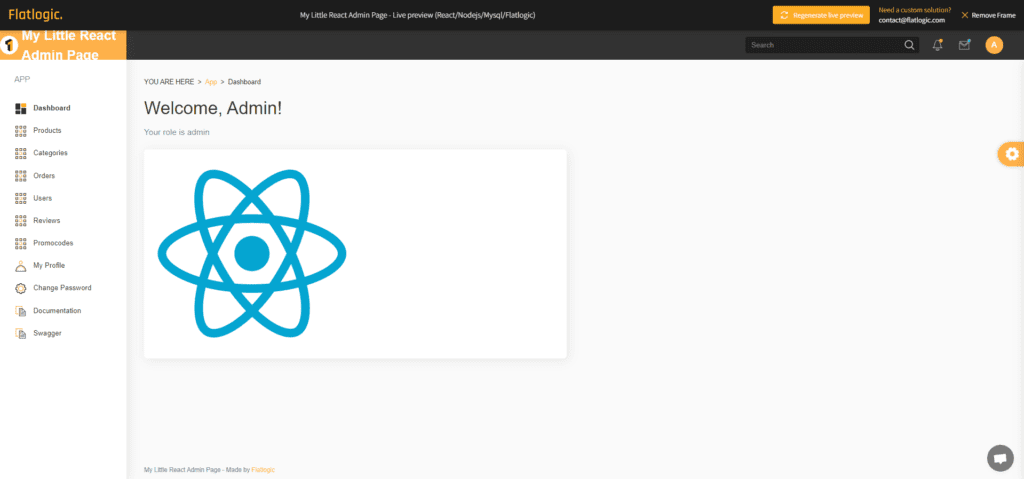
After that, just sit back and let Flatlogic’s Full Stack Web App Generator do what it does best. And after a laughably short time, you have on your hands the done and dusted React Admin Page.
Conclusion
Summarizing, it ought to be said that the main goal of this article was simple: to show you how easy and effortless the process of creating such a pivotal part of a web project is, as an Admin Page/App/Console, can be with the help of Flatlogic’s Full Stack Web App Generator. And we are absolutely sure that this goal can be achieved without any hitches. Now you don’t have to spend the valuable and precious time of you and your colleagues on this important task, but instead, you can do it in a jiffy. Finally, thank you for spending your time on this article that we hope you have found really helpful. Have a nice day and, as always, feel free to read up on more of the articles in our blog!