TL;DR
- Compare hosting by workflow needs, app type, security, pricing, and performance.
- Covers frontend-only, full-stack, and serverless deployments with Git-integrated CI/CD.
- Walkthroughs for Flatlogic, DigitalOcean, Render, Vercel, Heroku, Netlify, GitHub Pages, Surge.
- Quick picks: Netlify/Vercel for static sites; DigitalOcean/Heroku for full-stack; Flatlogic to generate and host full apps fast.
Fact Box
- Flatlogic hosting costs $9/month, limited to apps built on the Flatlogic platform. Source
- Flatlogic builds with Docker; deploy preview typically completes in about 5 minutes and emails when Live URL is ready. Source
- DigitalOcean App Platform: full-stack apps from $5/month; static sites free within limits. Source
- Vercel: Hobby hosting is free; commercial plans start at $20 per seat/month with 1TB bandwidth. Source
- Netlify pricing: Pro plan $19/month; Business plan $99/month. Source
Looking for the best ways to deploy your React App? If you are, you’re in the right place! If you are asking questions like what are the best tools to use? How do I deploy my React App? Deployment can be a daunting task, but with the right knowledge, it doesn’t have to be. In this article, we’ll cover the best ways to deploy your React App so you can get up and running quickly.
Recent studies have shown that deployment is an essential part of the development process, and can be a major source of frustration for developers. It’s important to understand the different options available and how to use them to ensure a smooth deployment process.
In this article, you’ll learn about the various tools and services that are available for React deployment. We’ll also discuss the different deployment strategies, and how to choose the best one for your application. By the end of this article, you’ll have a better understanding of the different options and how to use them to deploy your React App quickly and efficiently.
How to choose React or Web Hosting in 2023
Let’s take common considerations on what aspects to follow when choosing a hosting provider
Workflow
With the amount of configuration, monitoring, and upgrading that occurs over the course of a server’s lifespan, managing a production server may be a lot of effort. This parameter indicates how much real work you will have to do when hosting a web application. Many cloud services have made them successful by automating a lot of application deployment work.
However, this setting does not work in such a way that the more work is automated, the better. Sometimes you may need a lot of flexibility in deployment configuration settings to effectively deploy applications.
Accordingly, if you need to host a simple React or Vue application, then most likely you should choose systems with the greatest automation, and vice versa, if you have a more complex application, then we advise you to choose a solution with more complex customization options.
Application Type
Another factor to examine is the sorts of applications that are supported by hosting providers. Some services are only available in a limited number of languages. Furthermore, certain services are tailored to specific stacks (i.e JAM stack, MERN, LAMP). It’s important to deploy in a way that matches the look and feel of your app.

Security
We will not dwell on this aspect for too long, since it is clear that the more security options a hosting service provider has, the better.
Pricing
This is one of the most important parameters by which you can choose a hosting provider. The pricing of hosting providers often depends on performance and security features. Luckily, most solutions have a transparent pricing system with large explanatory tables, as well as free plans to try and deploy a simple application.
Performance
One of the most important parameters to consider when choosing your future hosting provider is that the user experience of your application’s customers will depend on it.
Application Architecture
Now let’s take a look at the type or architecture of the application you want to host with hosting providers. Depending on the type of application, you can also choose the service you will use to publish your program.
So let’s dig into the application types.
Frontend Only Application
These applications can be either pure static HTML/js or single-page applications written with React/Vue/Angular javascript frameworks. Static servers, which are essential services like Vercel and Netlify provide, or traditional hosts, where you upload files to some web server space that is statically served, are used to build these sites. These services link your deployment to your project’s Github, then run your project’s build command and deliver the output statically whenever you update GitHub.
Full-Stack Applications
These are apps in which you develop a more complicated server (not static) that performs more extensive data processing and then leverages that data with a template engine (ejs, blade, erb, plush, pug) to generate static HTML that is then given to the client. This usually necessitates more sophisticated deployment services, which means either setting up your own server using a VPS from Digital Ocean, Amazon, Microsoft, Google, or other cloud providers, or utilizing a service like Heroku, which automates many of the setup tasks.
Serverless
Serverless options take web development to the next level, removing the need for any backend applications. Instead, all of your APIs are designed as a series of on-demand cloud functions with URLs that your front end may use to contact them. Because you don’t need a persistent backend server, and because static hosting for the frontend is substantially cheaper, a serverless method may be quite cost-effective even at huge volumes. Cloud function platforms are available from AWS, Azure, and Google.
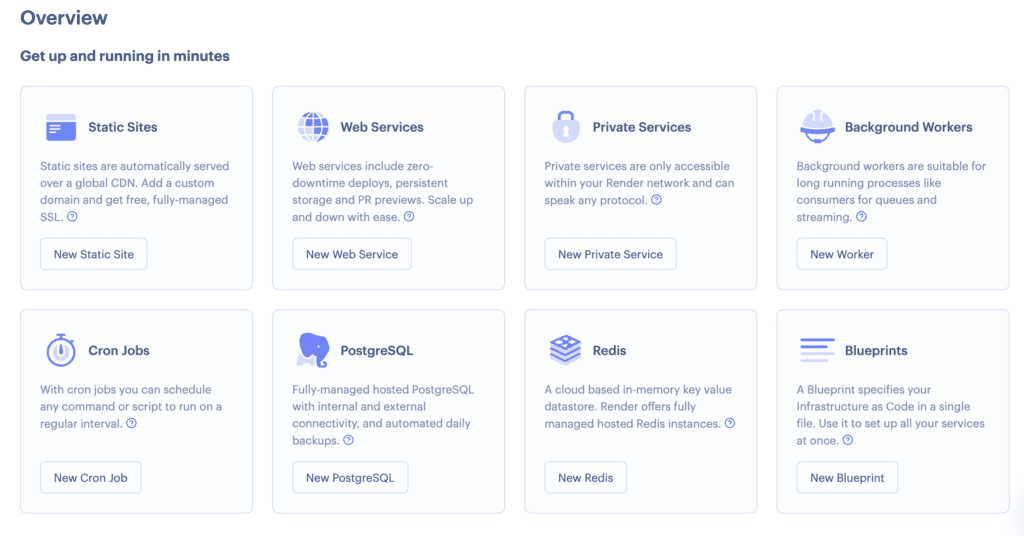
Best react hosting services
Flatlogic
We want to make a disclaimer right away that the article was written by Flatlogic employees, so the first way to host a web application will be related to this platform.
Flatlogic is a new way and one of the fastest options to make a React/Vue/Angular full-stack application and host it. The process of creating and hosting an application literally takes a few minutes. Flatlogic automatically generates a fully working application according to your database schema. The application can be made on the following technologies:
- Angular
- React
- Vue
- Next.js
- Nuxt
- Laravel
- Node.js
- PostgreSQL
Once you select a stack, look at the database schema, and Flatlogic will generate a fully working application for you, with CRUD operations ready and working, as well as an auto-generated REST API.
Using the platform, you can build almost any business application, starting from cms for a blog, and ending with an ERP system. It should also be noted that Flatlogic uses the power of the google cloud to host applications, so security and performance issues should not arise.
Pricing
As for hosting, it costs $9 per month, regardless of the type of application, whether it is a static application or a full-fledged web application with a database. The only limitation is that you will only be able to host Flatlogic applications built on the same platform.
Building static apps with starter kits is free and you can create an infinite number of them. Access to the tool for creating CRUD applications costs $199 for 3 months to one type of stack, while the number of applications can also be unlimited.
Let’s take a closer look at how to make and host an application using the Flatlogic platform.
Creating the CRUD application with Flatlogic
Prerequisites
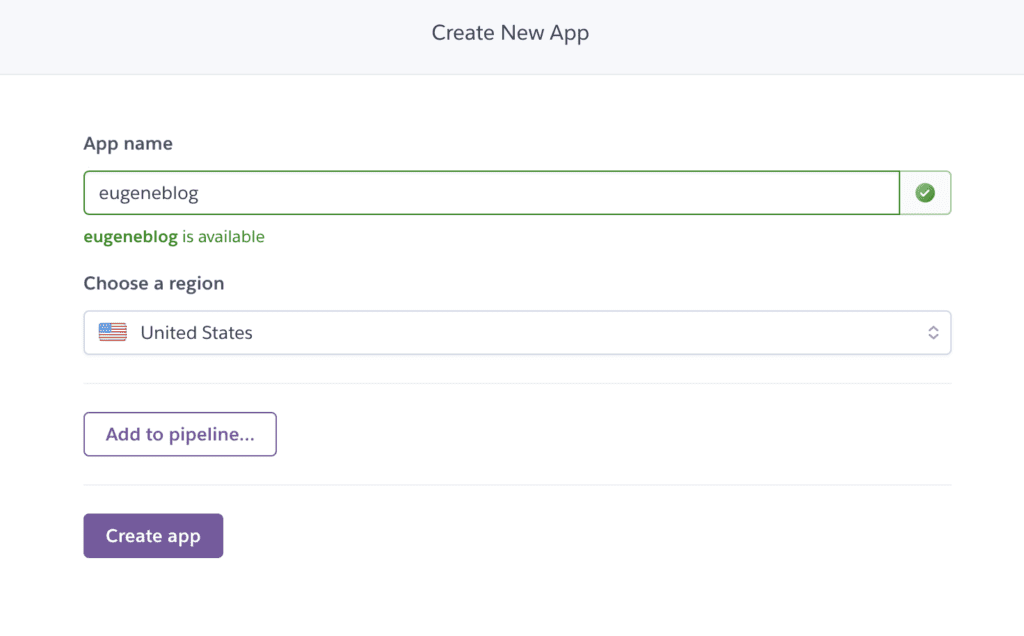
Before creating a project with Flatlogic – you should create an account and confirm it.
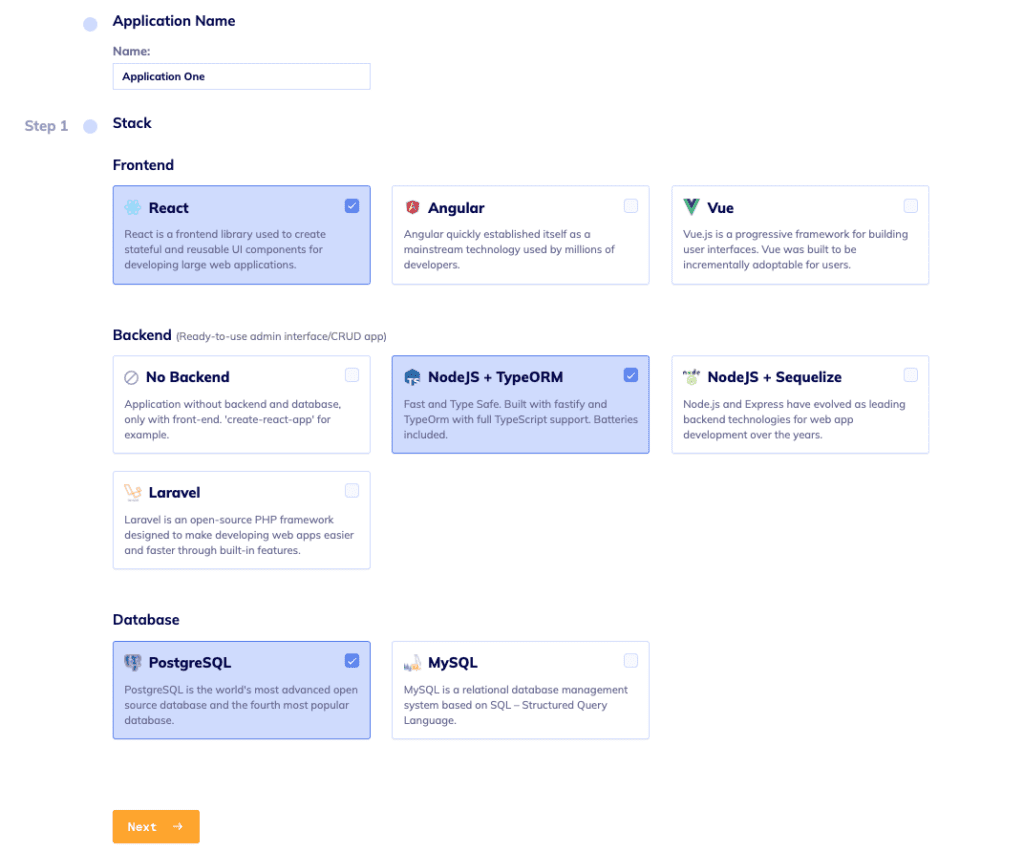
Choosing the Tech Stack
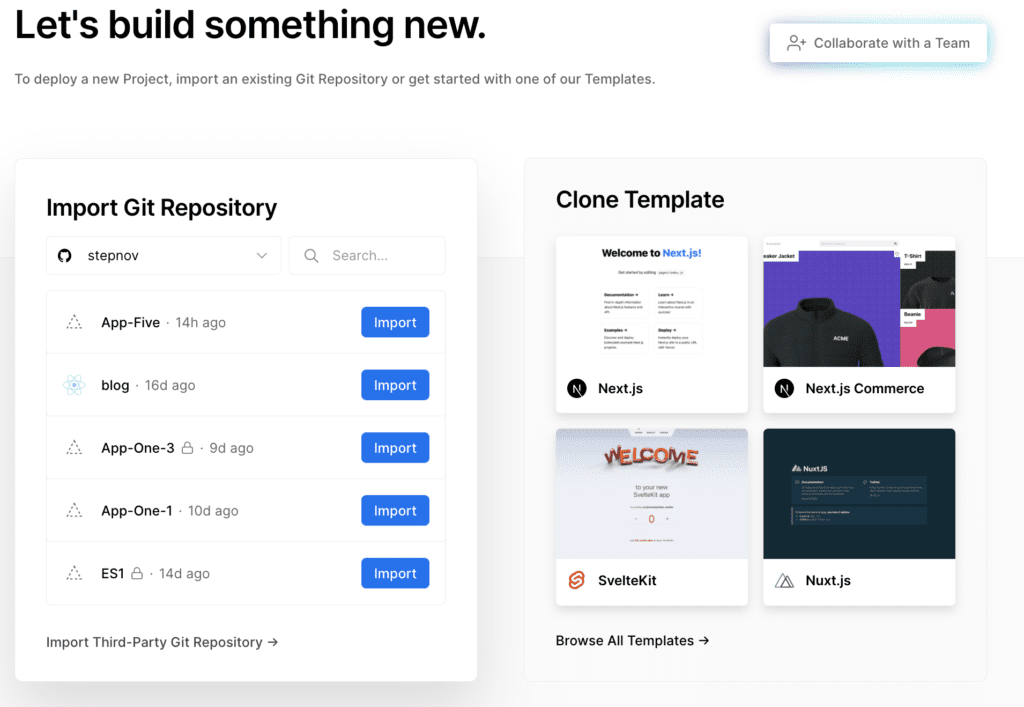
After you logged into the platform – you should click the ‘+ Add application’ button. After you click this button, you need to set the name of your application and choose the stack: Frontend, Backend, and Database.
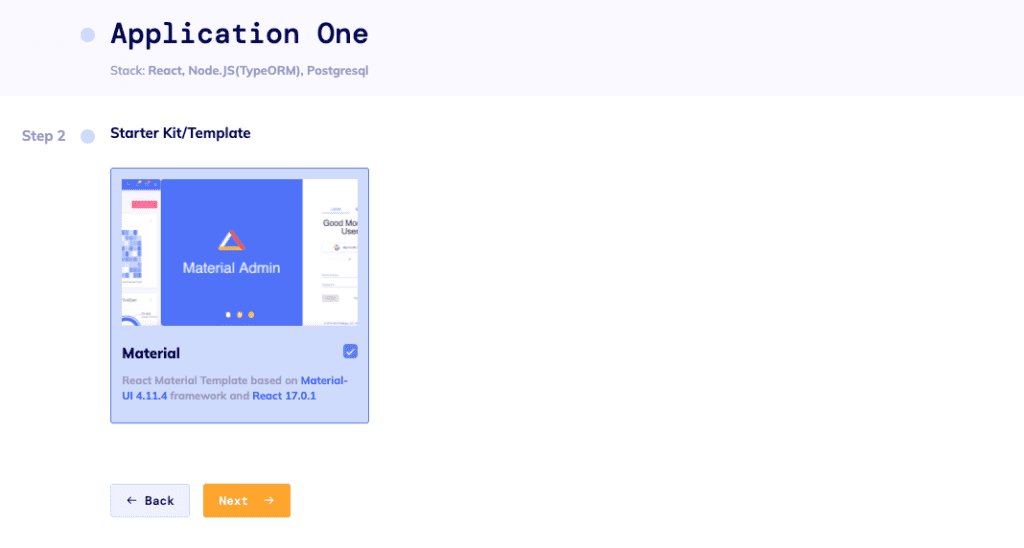
Choosing the Starter Template
In this step, you’re choosing the design of the web app. For now, we decided to concentrate on one template for all stacks – Material. This step basically shows you what your app will look like. Later Flatlogic is planning to add more design systems.
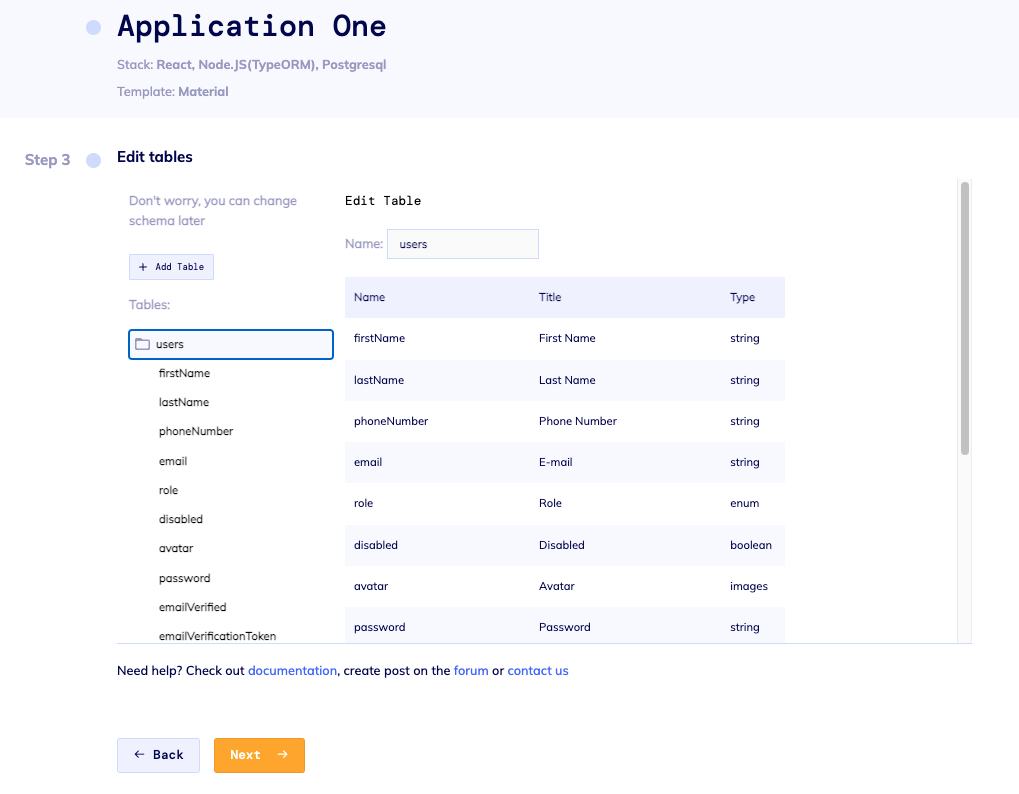
Schema Editor
In this part of creating the application, you will need to create the database schema of your future application using our UI tool. In this step, you determine which tables and columns will be in your database, as well as the relationships between them.
If you are not familiar with database design and it is difficult for you to understand what tables are, we have prepared several ready-made example schemas of real-world apps that you can build your app upon modification:
- E-commerce app;
- Time tracking app;
- Books store;
- Chat (messaging) app;
- Blog.
Final step
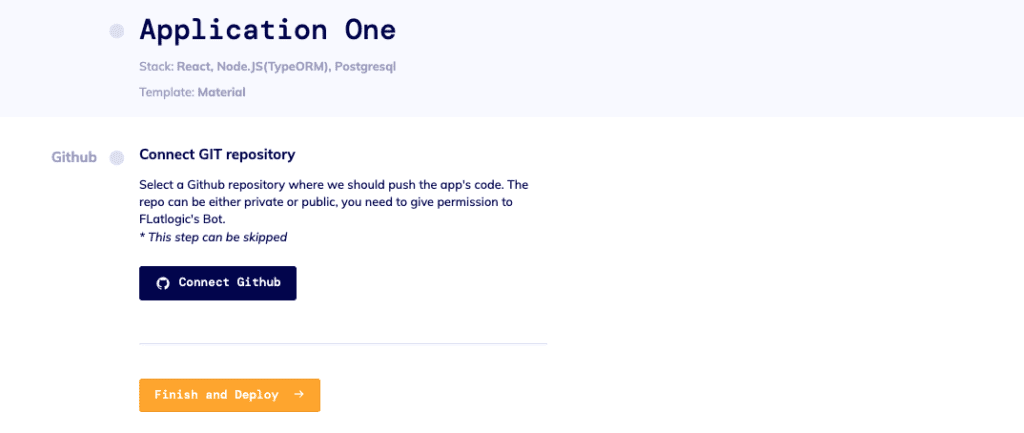
In the final step, you need to link your application to the GitHub account to push generated code to the newly created repository.
If you click on GitHub the ‘Login’ window opens next, where you need to enter login details for your GitHub account or sign in. Next, the ‘Choose a name for your repository’ window opens, where you have to choose a name for your repository and select privacy terms.
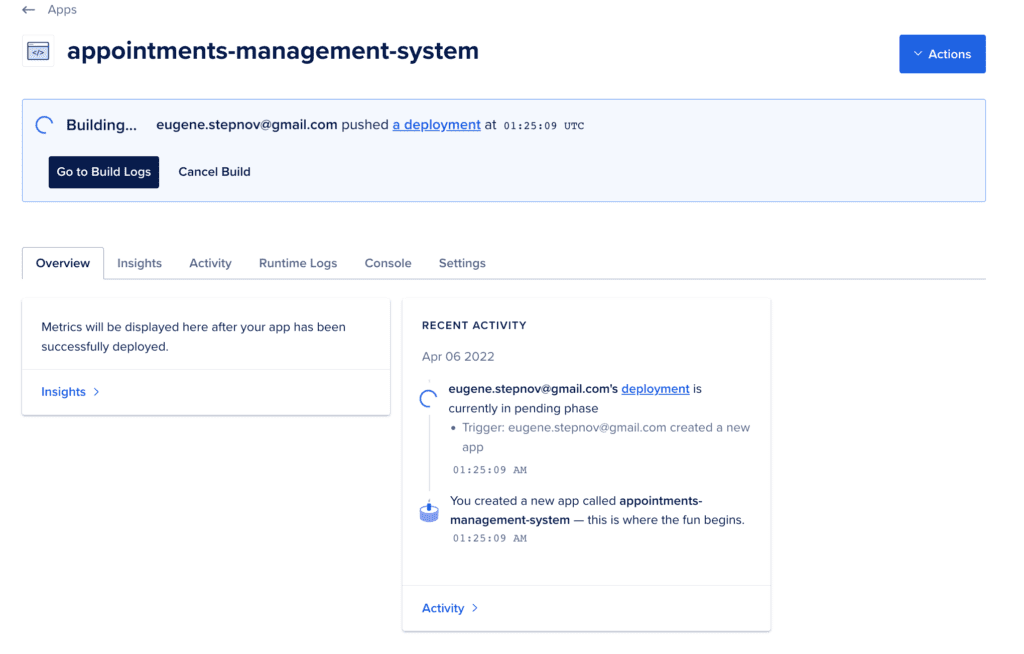
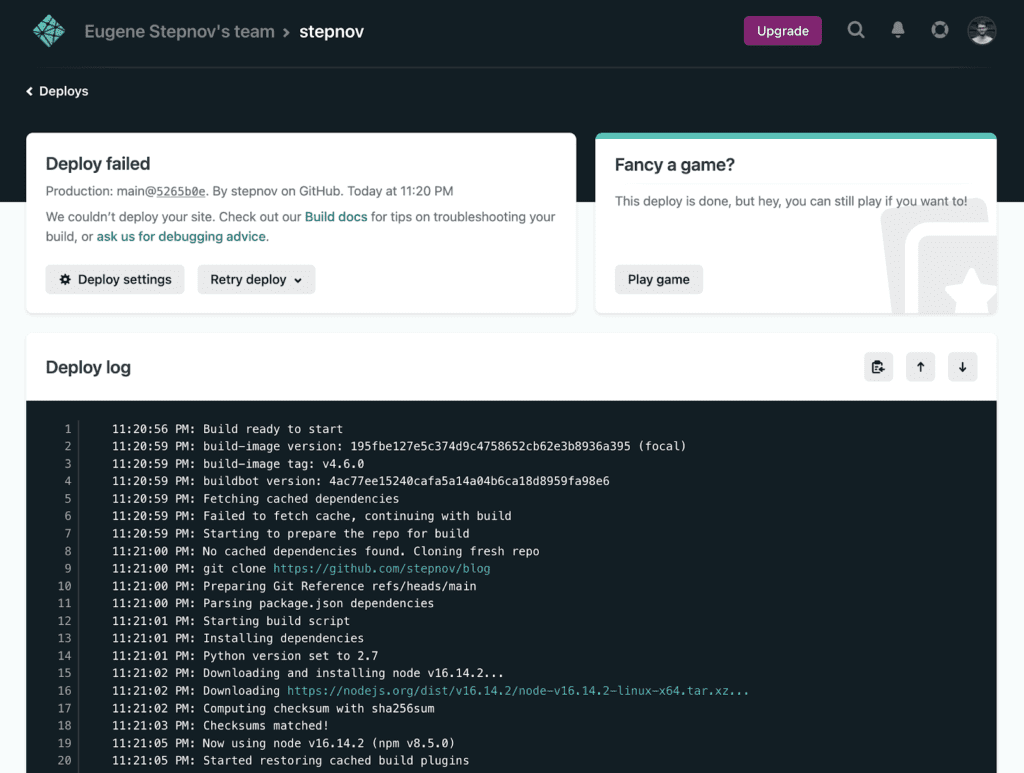
Deploying your created app
After all these steps your application will be created and automatically deployed for a preview.
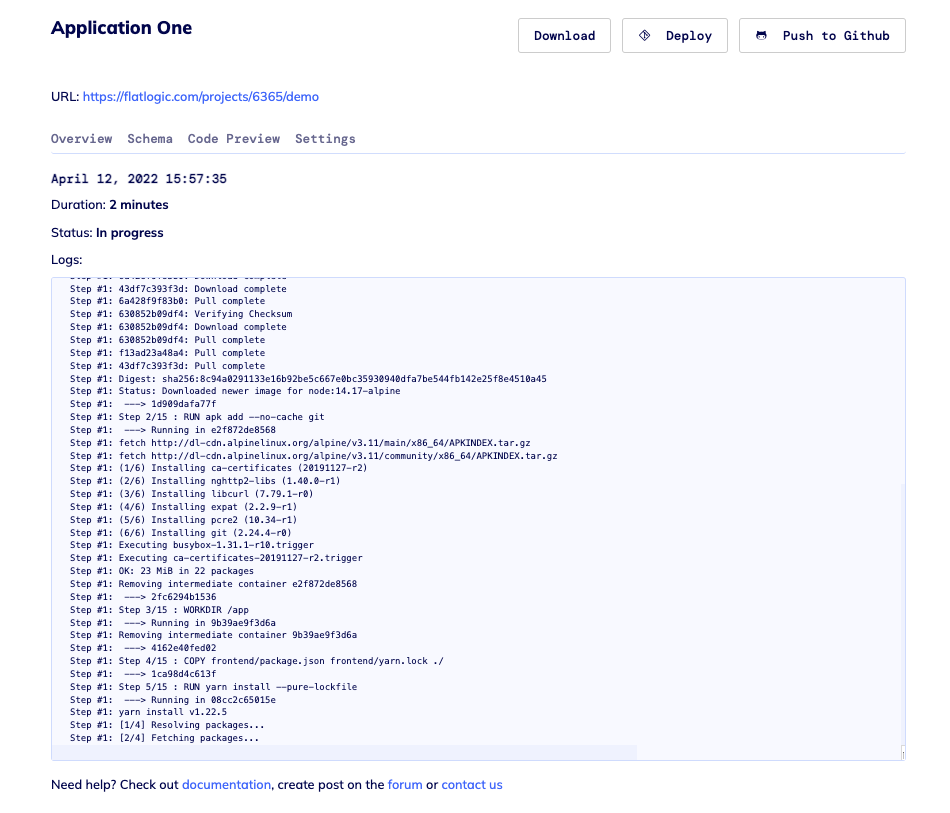
You can also open the settings of one of your applications, which also has a Deploy button on the Review tab.
Afterward, this will open a window where you can review the step-by-step process of creating your application.
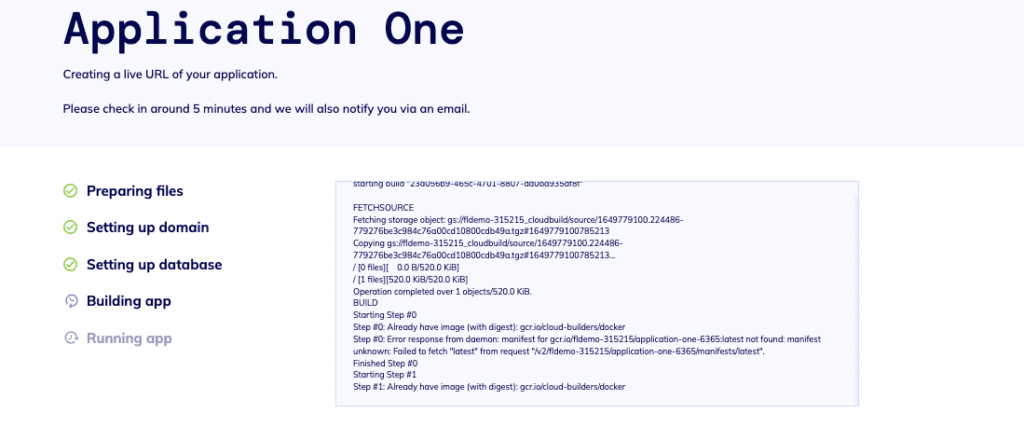
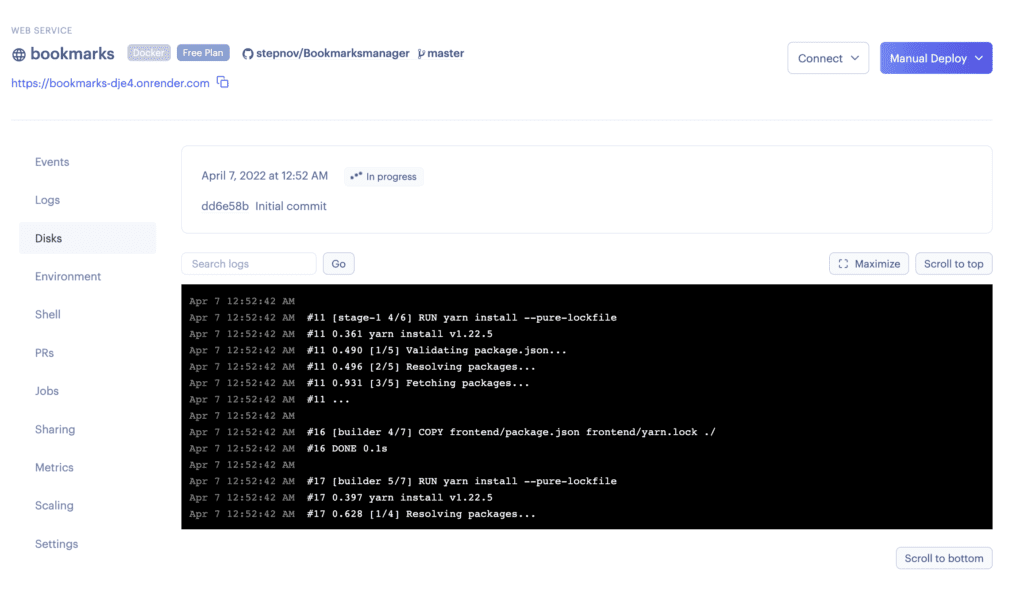
Docker is used to creating the right environment to deploy the backend and frontend, that is why it takes about 5 minutes. We also have a feature to notify you when your Live URL is ready by email.
You can also view the build logs if you click on View Log.
Conclusion
This is the basic process of creating and deploying full-stack applications. Additionally, you can customize the application made on the Flatlogic platform, all the changes will be automatically built and deployed to our platform.
Digital Ocean
The App Platform from DigitalOcean is a Platform as a Service (PaaS) solution that allows you to configure and deploy apps from a single source repository. DigitalOcean will build and deploy your app after you’ve configured it, providing you the benefit of a full web server and deployment pipeline with little effort. This may be a quick and effective method to launch your React applications, and you can utilize App Platform’s free tier if you’re using React to develop a site without a backend.
Pricing
- The price for the full stack application starts from $5 per month if you want to use App Platform by Digital Ocean. Hosting static applications is free for certain limits.
- Managed Kubernetes starts from $10;
- Droplets start from $5 per month.
Features
A distinctive feature of Digital Ocean are the following advantages and features:
- Very good community with many useful tutorials for developers. Digital Ocean invites experts to write guest tutorials, also buys popular sites and blogs on the topic of web application development, and then integrates the texts into its site.
- Marketplace with many applications that can be integrated into your application in one click.
- You can choose the capacity and number of virtual machines yourself. You can also select the regions in which these virtual machines will be located.
- Also, with Digital Ocean, you can easily host a static or dynamic web application using the App Platform product. Where you can connect your repository, and the platform will do all the CI/CD work for you. The platform also includes analytics, monitoring, and alerts.
We will look at how to host and deploy a React application using the free features of the Digital Ocean platform.
Deploying to Digital Ocean App Platform
Following this guide, you’ll deploy a React application to the DigitalOcean App Platform. You’ll link your GitHub repository to DigitalOcean, set up the project for building, and start working on your first project. Each modification will result in a new build and update once the project is online.
You’ll be able to deploy an application using continuous delivery on DigitalOcean by the conclusion of this stage.
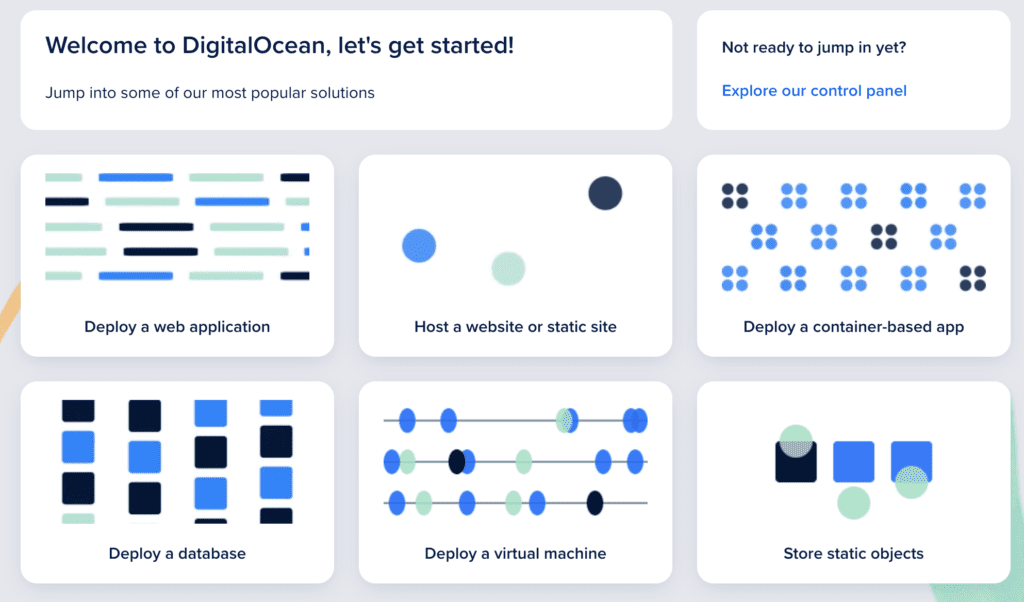
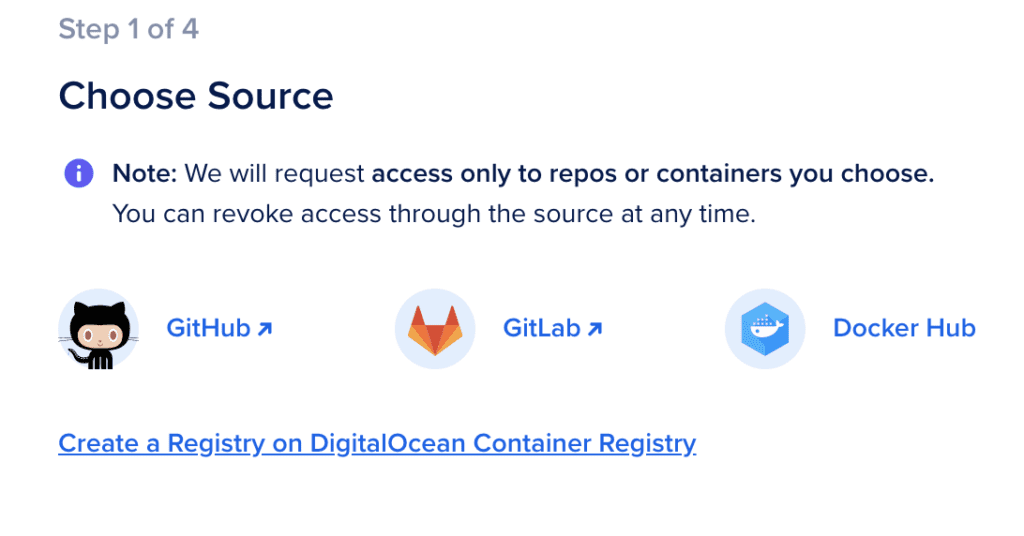
To get started, log in to your DigitalOcean account and click Create, then Apps:
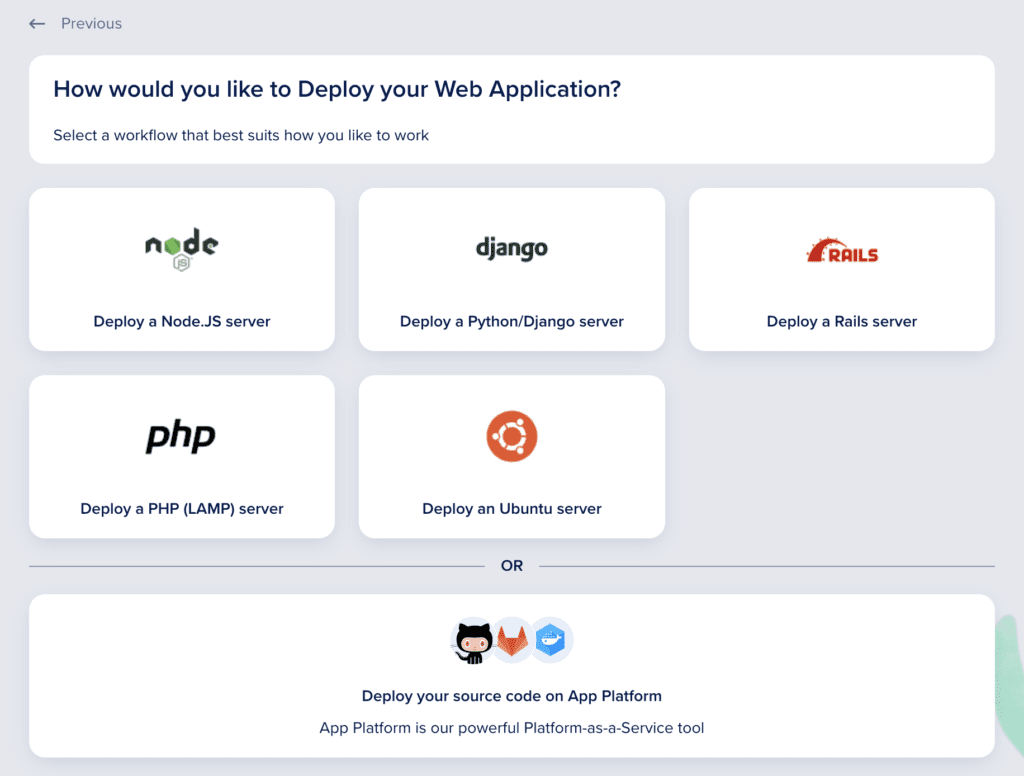
After that, you’ll be asked which type of app and how you wish to deploy it. In our scenario, we’ll use Github source code to deploy.
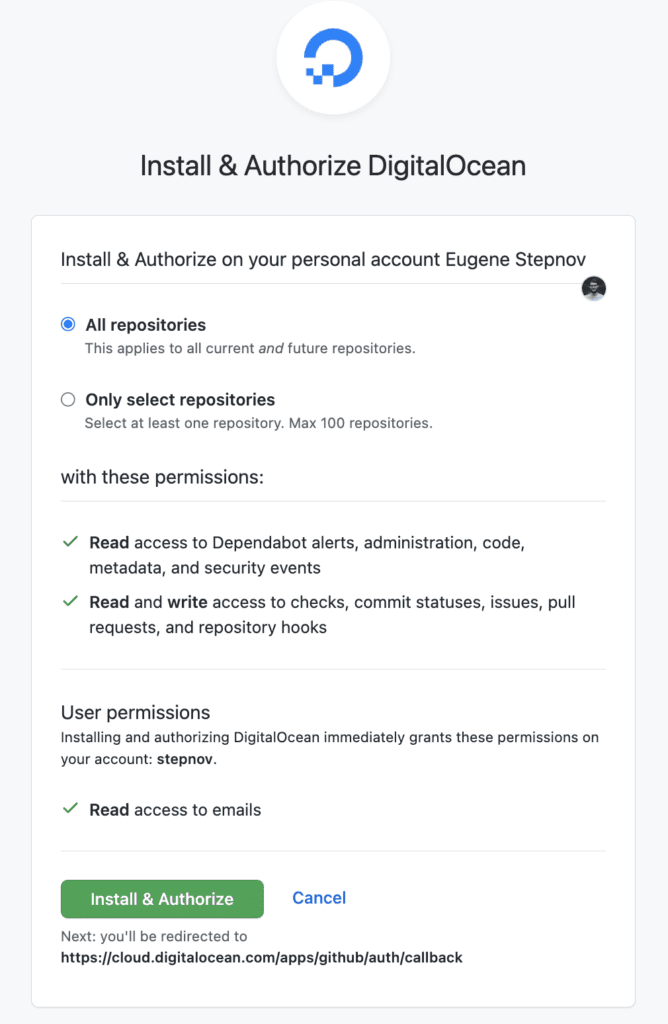
After that, you’ll be asked to link your GitHub repository. If you haven’t already done so, log in with your username and password and grant DigitalOcean permission to access your repositories:
Select the repository you’d want to connect on the GitHub permission page once you’ve linked your accounts. You’re using the digital-ocean-app repository in this example, but you may connect more repositories if you want:
After selecting the repository, you’ll be taken to the DigitalOcean interface. After selecting digital-ocean-app from the list of repositories, click Next. This will establish a direct connection between your App and the GitHub repository.
After you’ve chosen your repository, you’ll need to set up the DigitalOcean App. By selecting Germany in the Region section, the server will be hosted in Europe, and the deployment branch will be the main. Choose the area closest to your physical location for your app.

You’ll be verifying Auto Deploy code modifications in this lesson. Every time you update the code, your app will be rebuilt automatically.
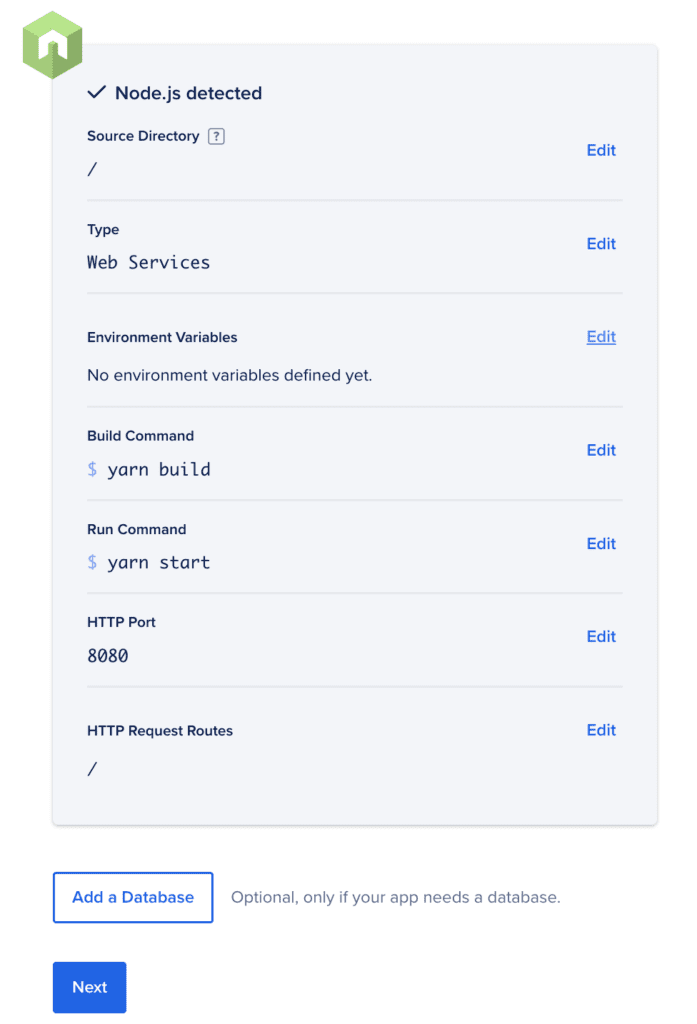
To go to the Configure your app screen, press Next.
Select the sort of program you want to launch next. Select Static Site or Web Services from the Type dropdown option in the Type field because React will create static assets.
You may also use your own unique build script. However, you may use the usual npm run build command in this instance. If you have a separate build script for quality assurance (QA) or production, you may wish to construct a custom build script:
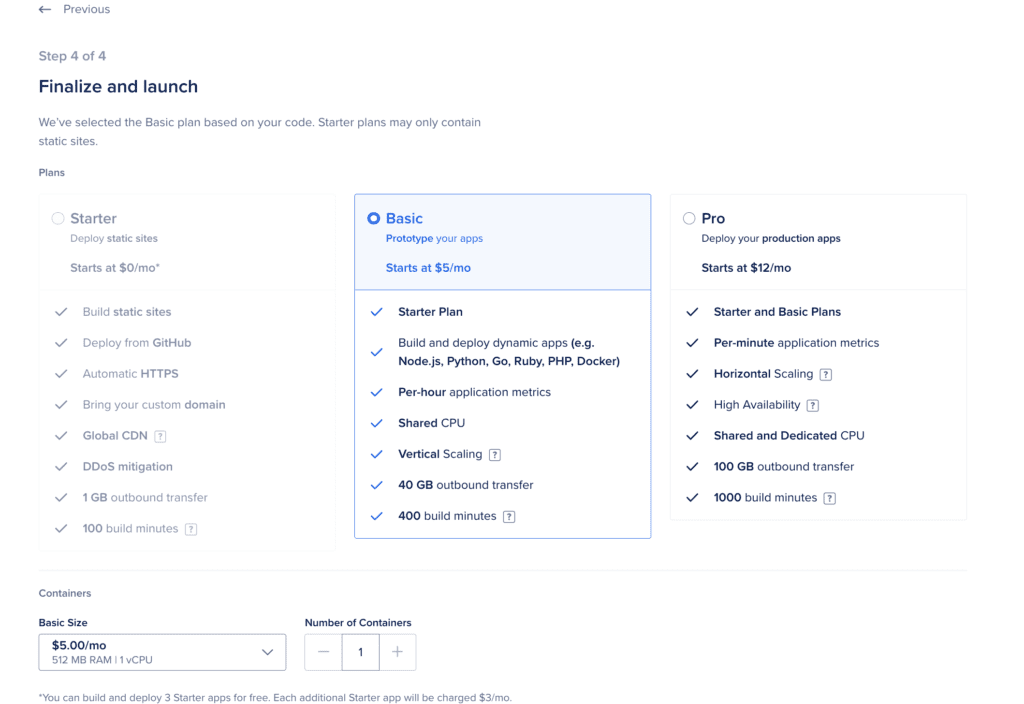
To go to the Finalize and Launch page, press Next.
You may choose your price plan here. Choose the free Starter tier, which is designed for static sites:
When you click the Launch Starter App button, DigitalOcean will begin developing your app.
The app will execute your repo’s npm ci and npm build scripts. This will download all of the dependencies and generate a build directory with all of your JavaScript, HTML files, and other assets built and minified. In your bundle, you could also include a custom script. JSON and change the Commands in your App Platform application’s Components tab.
The construction will take a few minutes to complete, but you will receive a success message and a link to your new site once it is complete. Your connection will be named differently and will have a unique name:

To access your project in the browser, press Live App. It will be identical to the project you tried locally, but it will be available online with a secure URL:
https://appointments-management-system-aou5o.ondigitalocean.app
Now that your project is set up, any changes you make to the connected repository will trigger a new build. If you make a modification to the main branch in this situation, DigitalOcean will execute a fresh deployment for you. There’s no need to log in; the modification will take effect as soon as you push it.
You generated a new DigitalOcean app on the App Platform in this phase. You linked your GitHub account to the app and set it up to build the main branch. After setting the app, you discovered that every time you make a change, the app will deploy a new build.
Render
Render is a cloud service provider that offers both static and dynamic site services. Your React App may be hosted in three easy steps.
Render comes with a free SSL certificate, a global CDN, a custom domain, and auto-deployment with Git integration.
Render offers a free static site hosting plan as well as competitive pricing for other services. Websites hosted at Render show excellent performance which is proven by many testing companies .
While hosting websites on Render is free, other services like databases, cron tasks, Docker containers, and render disks must be paid for.
The company positions itself as the main competitor to Heroku with a more convenient pricing model and advanced functionality. This is a direct message from their website: “We’ve built Render to help developers and businesses avoid the cost and inflexibility traps of legacy Platform-as-a-Service solutions like Heroku.”
Pricing
Almost all services in Render start from free plans. Hosting of static sites, web services, databases, and Redis starts from $0 per month. Cron jobs service starts from $1 per month. Then most of the services start from $7 to $10 per month.
Core Features
Great for static sites – Render is particularly popular for launching single page or static websites, in addition to a variety of other useful features it offers.
Effortless and practical – Render does not tack on any extra charges to its services. It claims to be 80% less expensive than other hosting options. Additionally, any configuration and command can be accessed with a single click, making the entire process speedier than the other platforms covered in this article. Many developers have switched to Render because of this feature.
Deploying with Render
Make sure your project is stored in a GitHub repository before moving on to setting up an account on Render.
Then, on the dashboard, select New Static Site.
If you’re using Render for the first time, you’ll need to connect your GitHub or GitLab account, or wherever your repository is kept.

Once connected, look for and pick your project repository. Following that, you must give your web service a distinct name.
If your application is bootstrapped with Create React App, Render will recognize this and fill the configuration accordingly.
After clicking Create Static Site, your project will be deployed.
That’s all – so in a few steps, you can host a free static or dynamic site on the Render platform. In our opinion, indeed the platform is one of the easiest to use in the market for hosting websites and web applications.
Vercel
Vercel is the new approach in web deployment services that aims to simplify team collaboration while developing React, Vue, Angular, and Next JS applications. Vercel supports importing source code from Github, Bitbucket, and Gitlab. Vercel also provides some starter templates to create a new App and deploy it. It Provides continuous deployment, Serverless functions, HTTPS, and more.
Core Features
In our opinion, the two most interesting features of Vercel are Preview of Pull Request as well as a large templates library for starting a static application. Preview of Pull Requests Allows You to Very Effectively Collaborate with the Team.
The other cool feature is edge functions that allow you to extend your sciatic application with a couple of lines of code without developing a proper backend and database. Ideal for the small apps that solve one small task.
Pricing
Hosting hobby sites will cost you for free. Commercial use of the Vercel platform starts from $20 per month per seat with 1TB of bandwidth.
Deploy React app with Vercel
To deploy your project with Vercel, create a new account.
The dashboard panel will show after a successful login. You can install Vercel from the terminal using either this dashboard or the Vercel CLI; we’ll go through both approaches in depth.
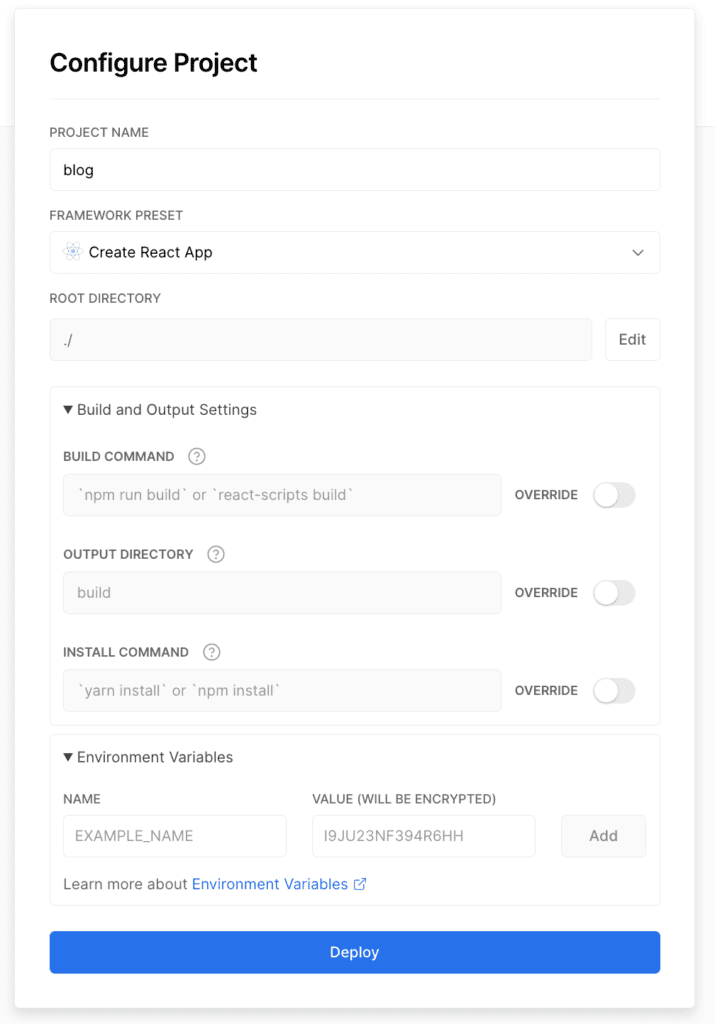
Integrate the Vercel dashboard with GitHub or other services where your application is stored. Select Import Project from your panel. You’ll be asked to select the project you’d want to use. Select the React project, click Import, and then type in a name for the project. Click Continue after leaving it at its default setting. When prompted for the root directory, choose it and click Next.
The following step is crucial. If you use the Create React App to start your React project, Vercel will automatically recognize it and provide an appropriate configuration for you. Click Deploy using the default settings. We keep the setup as is so that Vercel understands how to deploy the website correctly based on the configuration.
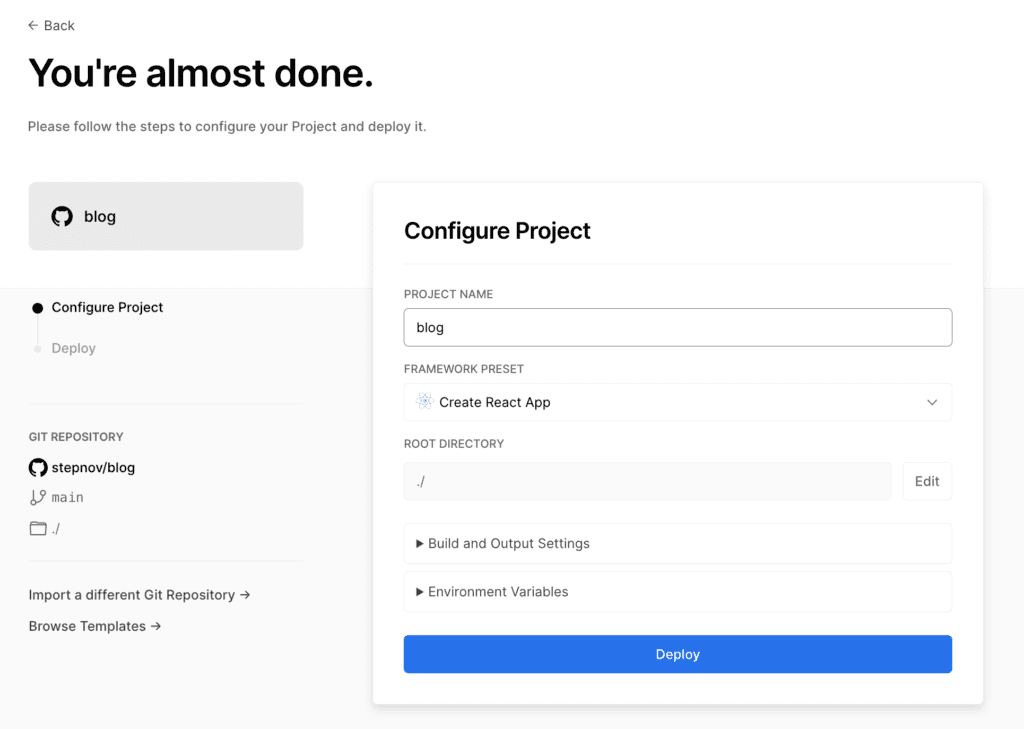
If you didn’t use the Create React App to begin your React app, you’ll be prompted for the setup. Fill in all of the configuration fields using the sample configuration above, then click Deploy.
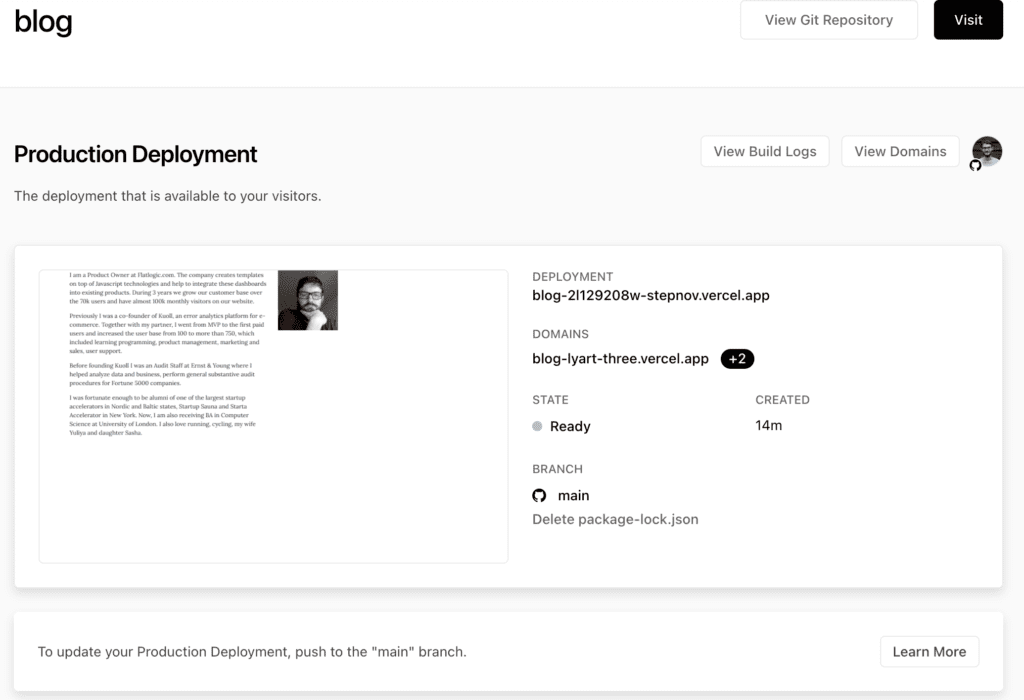
After pressing the Deploy button, your react application will be available publicly. You can also manage the configuration with the help of Vercel Dashboard. For a fee, you will find the features of Vercel Functions and analytics using your application.
Heroku
Heroku is a cloud application platform with a large developer community that has existed since its inception. It supports a variety of programming languages, including Node.js, Ruby, and others. Heroku offers a free SSL certificate, a custom domain, and Git integration.
Core Features
You can set up your code in a couple of clicks using the built-in integration with GitHub. Also, good features are built-in Redis support, as well as the promotion of analytics of using your application.
Pricing
Hobbies Projects can be serviced on Heroku for free. If you want more advanced features such as SSL, analytics, or memory selection, then you will have to pay $25 per month for one dyno.
Deploying using dashboard
You may deploy via Heroku’s dashboard. To get started, make sure your project is saved in a GitHub repository.
Go to your Heroku dashboard, pick New, and then Build a new app to create a new app.
You’ll be presented with a popup asking you to name your project. After you’ve entered your app’s name, click Create app.
Sync your GitHub repository when you’ve finished building an app. On your app’s dashboard, you’ll see something similar to this.
After you’ve successfully connected your GitHub account to Heroku, you may search for and deploy the project repository. From the list of repositories, choose your project.
You’ll have two options for deployment: manual or automated, which means Heroku will automatically publish the new website whenever you upload changes to GitHub. For the sake of this lesson, we’ll utilize manual deployment.
When the build process is complete, go to Manual Deploy and select Deploy Branch, and your application will be deployed.
If you summarize then Heroku gives ample opportunities to hosting web applications, but in turn, you will need some time to explore the platform. Also, some of the customers complain of not completely transparent pricing and a fairly high price for hosting applications.
Netlify
Netlify is one of the most popular hosting services for web applications and static sites. Service is often used to place JamStack applications. The main feature of the platform is the simplicity of its use, namely the fact that the hosting application is performed literally in a few minutes by joining your repository and setting the pair of parameters. React App can be deployed in 3 steps. It also provides a free automatic HTTPS.
Netlify offers serverless functions, Forms, Analytics, CLI, API, and more in addition to deployment. The majority of these functions are available for free, however, there are some restrictions.
Pricing
In terms of pricing, the service is regarded as a low-cost React host because its Pro Plan is $19 per month and its Business Plan costs $99 per month.
If you haven’t previously done so, sign up for a Netlify account.

You may use either the Netlify Dashboard or the Netlify CLI to deploy your app.
Deploying using Netlify drag-and-drop or Github connection
Some of the coolest feathers from Netlify is the ability to simply connect the GitHub / Gitlab or Bitbucket quickly contemplating the application. You can also let’s see in more detail how to do it.
If you want to deploy React app, you need to drag and drop the build folder onto the Netlify Dashboard. Run npm run build or yarn build before deploying the latest build.
If everything was done correctly, you will need to see the next screen.
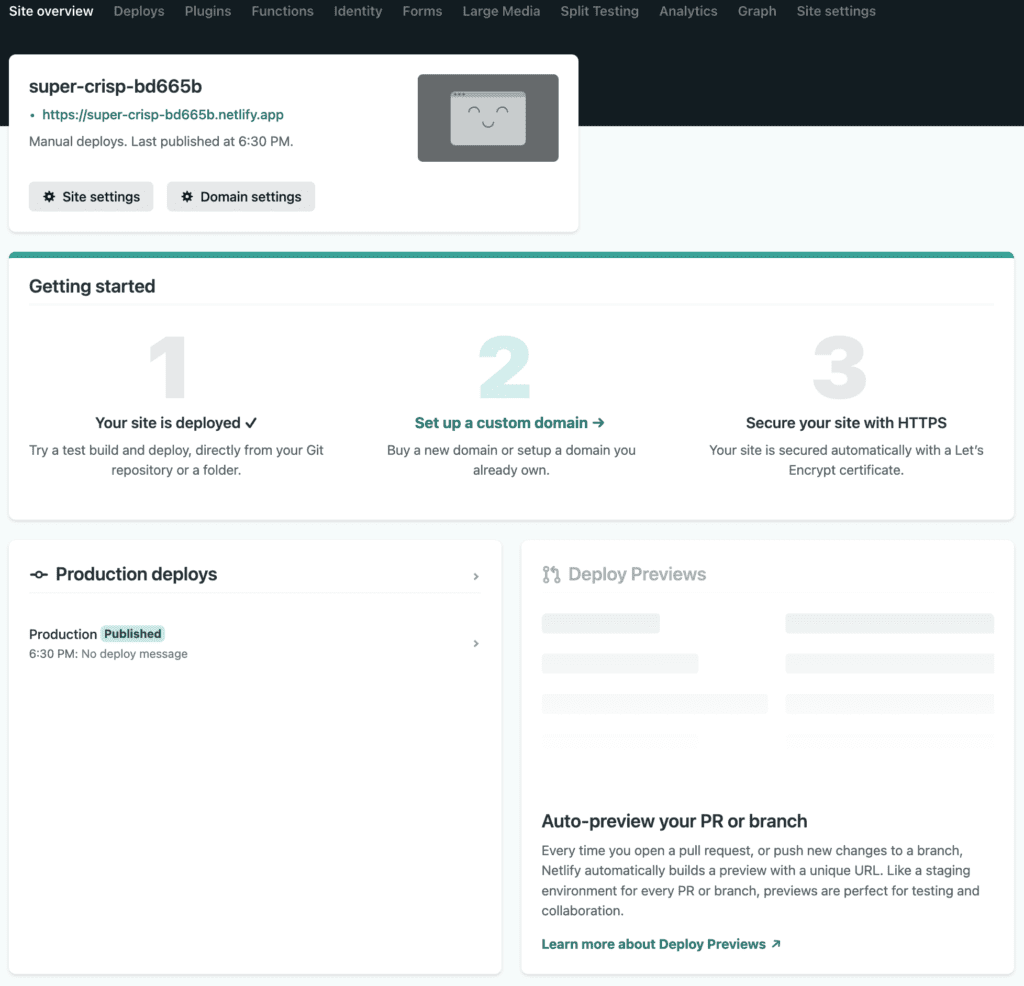
Later you can set up a custom domain, set up HTTPS, or add different plugins and functions to extend your app.
If you want your changes to be automatically settled, then we advise you to select the Github / Gitlab or Bitbucket attachment option.
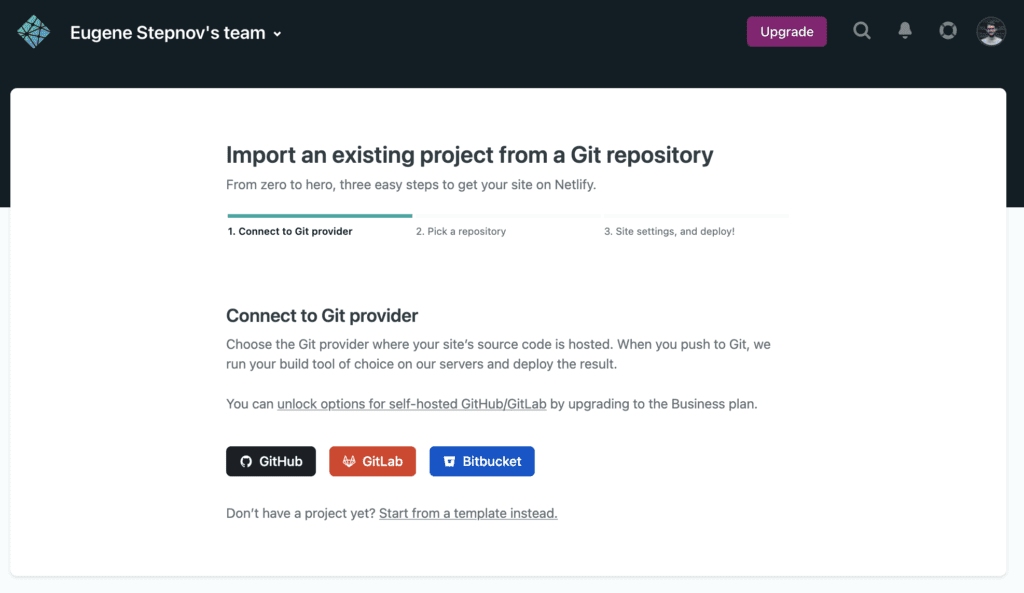
Select the project repository you wish to use for deployment.
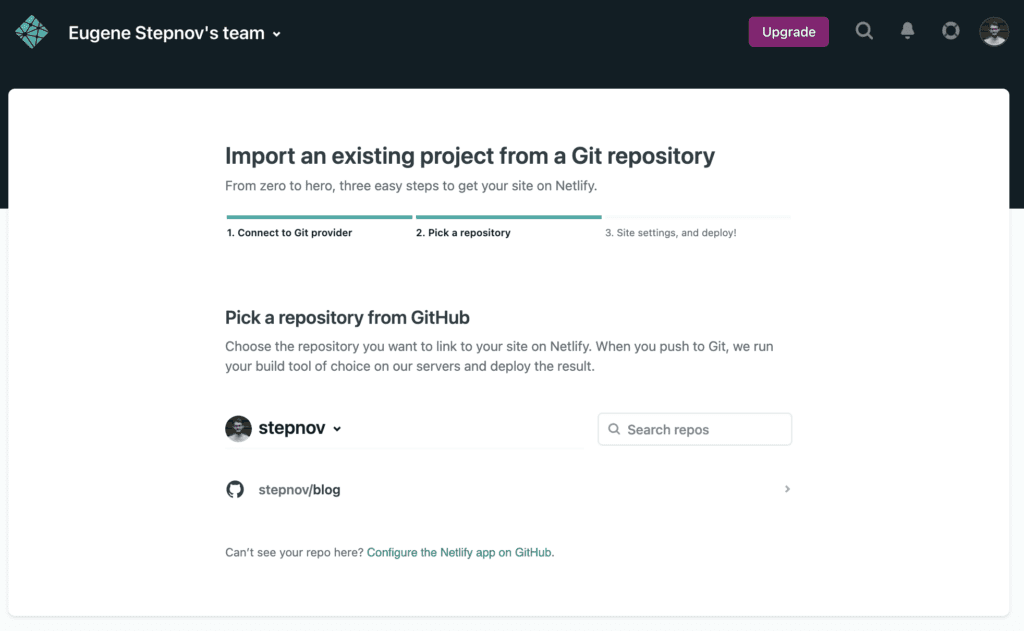
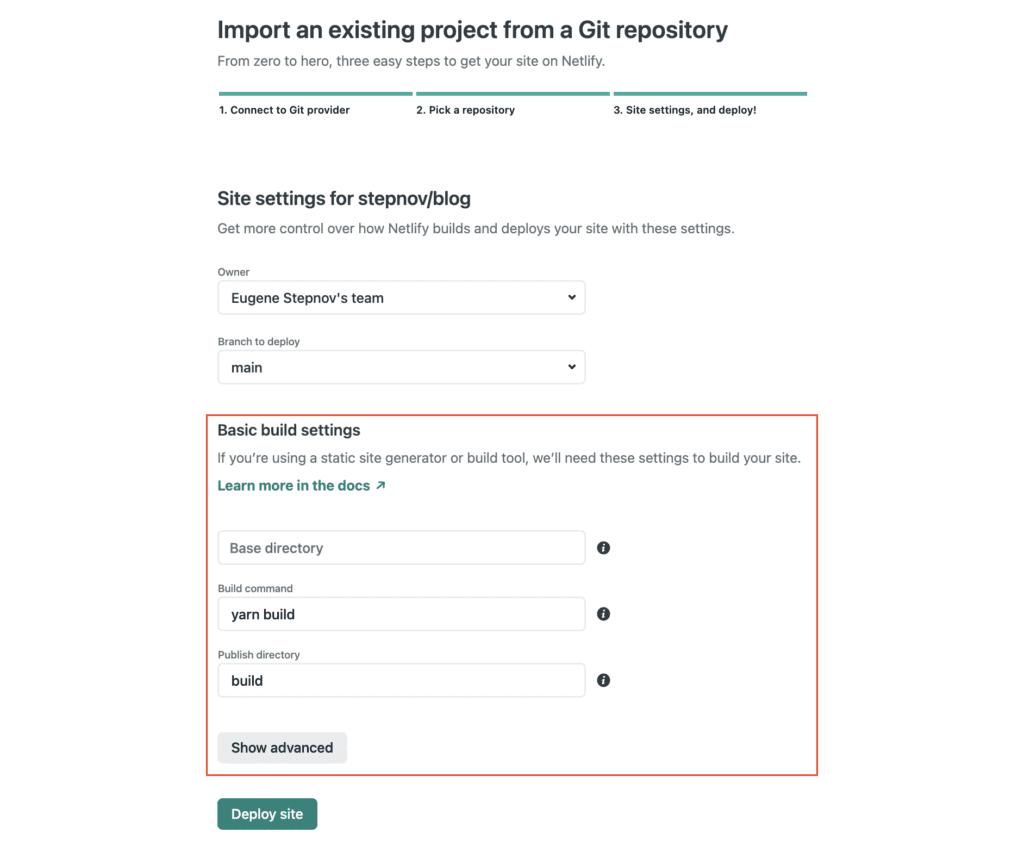
After you’ve chosen a project, the next step is to configure it, which Netlify will do for you if you use Create React App boilerplate to get started. Your app will be deployed after you click the Deploy site button.
If everything went successfully you can see your site live. In case of some Netlify errors, it provides an opportunity to watch build logs.
In conclusion, we can say that Netlify is one of the simplest services for the deployment of simple React Web applications. The platform allows you to simply start your project into a public disorder, as well as expand it with new functionality at the expense of Netlify Functions and plugins.
GitHub Pages
GitHub Pages is one of the most popular and efficient ways for beginners to build websites. GitHub Actions can be used to automate deployments, set up CI/CD, and much more, making it easier to handle than many of the other technologies covered in this lesson.
If we touch the react application, it can be placed on Github Pages directly from the repository. Next, we will look at the main features of Github Pages, as well as how to set up the project on Github Pages.
Core Features and Advantages
- Web, application, and software developers may use GitHub to access a range of services. The React app follows a simple protocol in which users download the app, create a repository, and utilize a command-line interface to distribute their pages.
- Cost. It is entirely free to use GitHub to publish a website. On the other hand, using packages for certain programming languages and customization tools may be more costly.
- Libraries that are open-source. Customers of GitHub have access to an open-source library that may help them create their websites or add features that make them more valuable. Additionally, due to GitHub’s popularity, customers may easily find customized solutions on the internet.
Deploying React app with Github pages
If you haven’t already, create a GitHub account and a repository for your application. When you create a new repository, you’ll obtain both the repository URL and the Git URL. Run the following command in the project root to set up the local directory as a Git repository, commit all the changes, and push it to the remote.
git init
git add .
git commit -m "initial commit"
git remote add origin (repository remote git url here)
git push -u origin master
If you will do all those commands, your project will be pushed to GitHub.
In your project’s package.json, add a homepage field, like this:
"homepage": "https://myusername.github.io/my-app"myusername is your GitHub username and my-app is your repository’s name.
Next, install gh-pages in your project.
npm install --save gh-pagesIn your package.json, add the following scripts:
"scripts": {
+ "predeploy": "npm run build",
+ "deploy": "gh-pages -d build",
 "start": "react-scripts start",
 "build": "react-scripts build",
 "test": "react-scripts test",
 "eject": "react-scripts eject"
}
predeploy and deploy are the only additions to the scripts. predeploy will automatically run before deploy and make sure the latest build of the application is deployed.
Run the following command to deploy the application:
npm run deployThis script will establish a new branch in your project’s GitHub repository called gh-pages. You may need to set a source, which you can do in your repository’s settings under the GitHub Pages option. It should be set to the gh-pages branch.
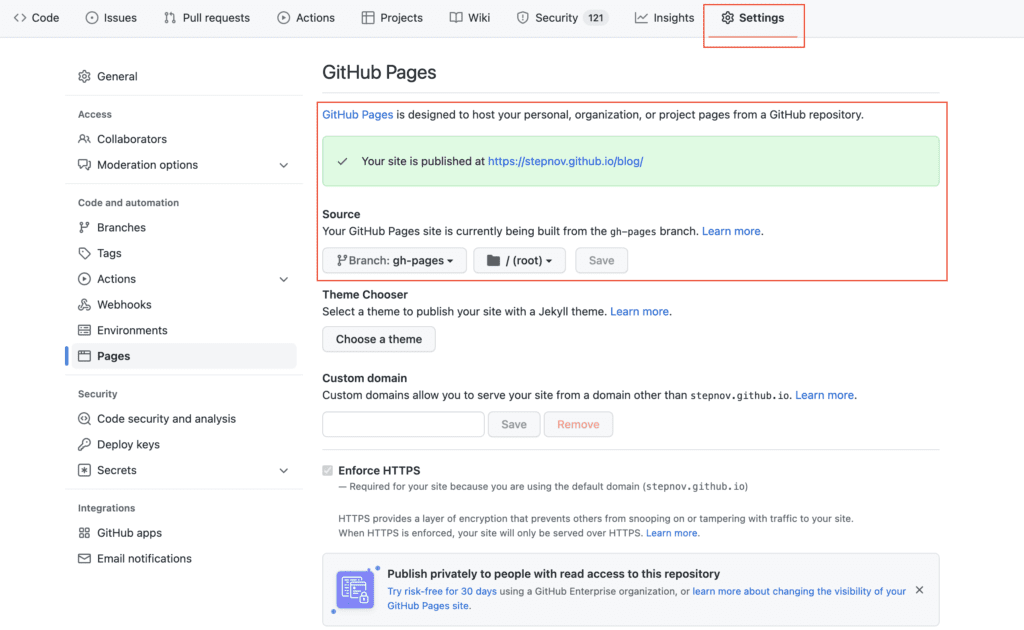
That is basically all. You can check the result by clicking on this link: https://stepnov.github.io/blog/ – this is a simple react blog hosted with Github Pages. In conclusion, we wanted to say that this is maybe the freest simple way to host a basic static web page on the market.
Surge
Surge is another very popular servile for the deployment front of the EAN projects and static sites. The advantages of this service are Almost Zero Configuration and the ability to fully interact with the CLI service. It provides Free SSL, Custom Domain Configuration. Hosting in surge might require some CLI skills.
There are two sorts of plans available. The first is called ‘Surge’ and is completely free. It also provides app developers with infinite publishing options via basic SSL and custom domain. Surge Professional is the second plan, which costs $30 per month.
Core Features
- Surge is one of the easiest systems accessible for the cause, because of its simple command-line interface. The simplicity, on the other hand, comes at the expense of making goods and sites more complicated, dynamic, and configurable.
- Surge may be the fastest platform for deploying React apps. According to consumers, the entire procedure takes less than 5 minutes, which is far faster than similar Amazon items.
- Cloud-based – Like all of its rivals, it is a cloud-based platform. As a result, it provides its consumers with safe, quick, and constantly synchronized services.
- Surge is cost-effective since it provides customers with free plans, making it excellent for novices and small organizations. It’s also handy for people who want to try their hand at web building as a pastime.
Run the following command in the project root directory to deploy the most recent build of the project:
Run the build command
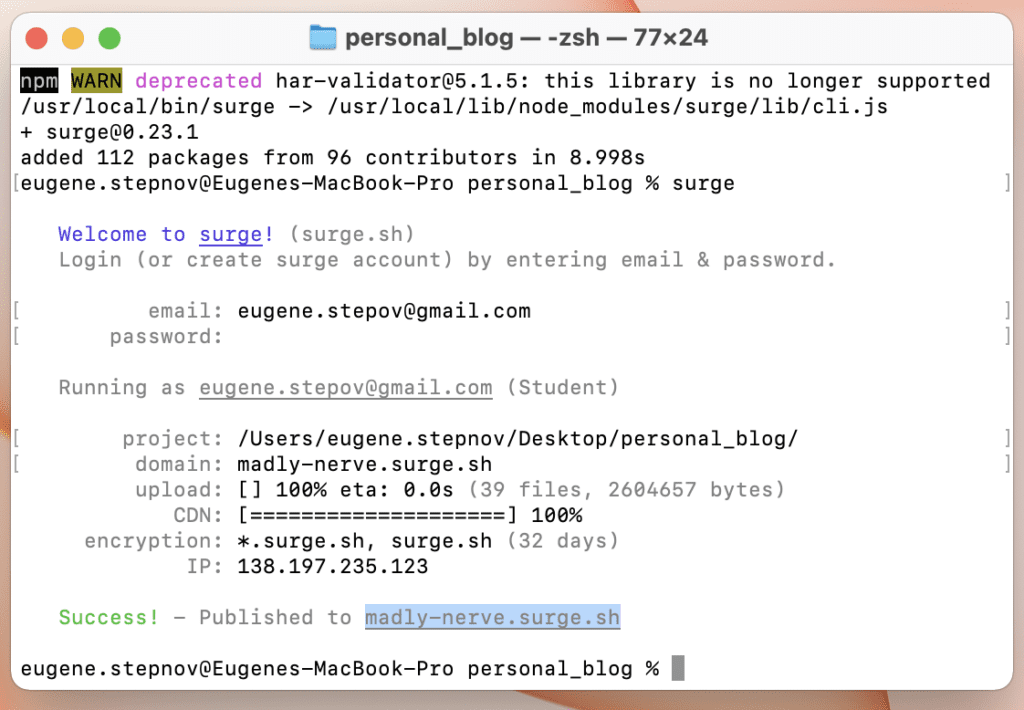
Install Surge CLI globally:
npm install -g surgeRun surge inside the build folder.
cd build
surge
Follow the prompts. First, you’ll be asked for an email and password:
Welcome to surge! (surge.sh)
Login (or create surge account) by entering email & password.
 email: [email protected]
 password:
Before filling in any other prompts, it’s a good idea to confirm your Surge account.
In the terminal, you’ll be asked to confirm your project directory. Hit Enter. You’ll see the domain of your project. Again, hit Enter. This will publish your application.
Conclusion
We reviewed the most popular methods of React Application Hosting. Our article had examples of both very simple products and complex solutions with a multitude of useful features and infrastructure setup capabilities.
Almost all products have a simple integration with Github and all take on the job with Ci / CD from the box.
In our opinion, if you want to save on the development and hosting of the web application, we immodestly recommend our Incrudition – Flatlogic.
For simple static sites, Netlify and Vercel are ideal.
If you want to publicly deploy a full-stack application, then do the Digital Ocean or Heroku.