There are two ways to build your application on the Flatlogic Platform: you can create a simple and clear one-page application, generated by the CLI framework, or the CRUD application with frontend+backend+database.
The first thing you need to do is Sign in to your account at Flatlogic Platform.

And click on Create web app and you will be redirected to the app generation page.

How to create Angular Application (Angular + NodeJS(TypeORM) + PostgreSQL)
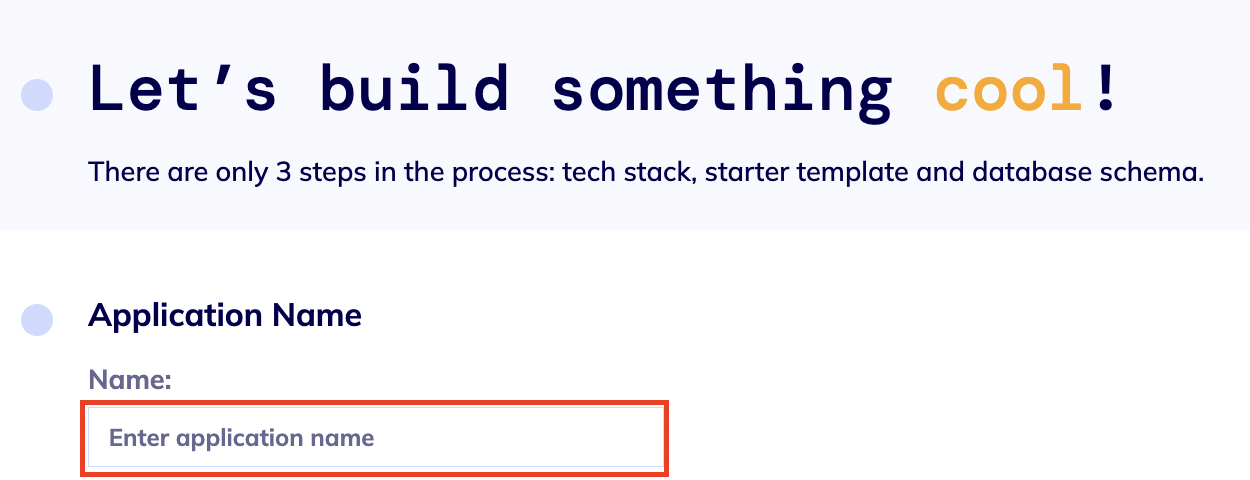
First, what you should do is set the name of your application.
1 Step. Choosing the Tech Stack
In this step, you need to choose the Tech Stack (Frontend, Backend and database system) of your application.
Firstly you need to choose the frontend, for our guide we choose Angular as the front.

Next, select NodeJS + TypeORM as the backend.

And the last important part of this step is to select the database.

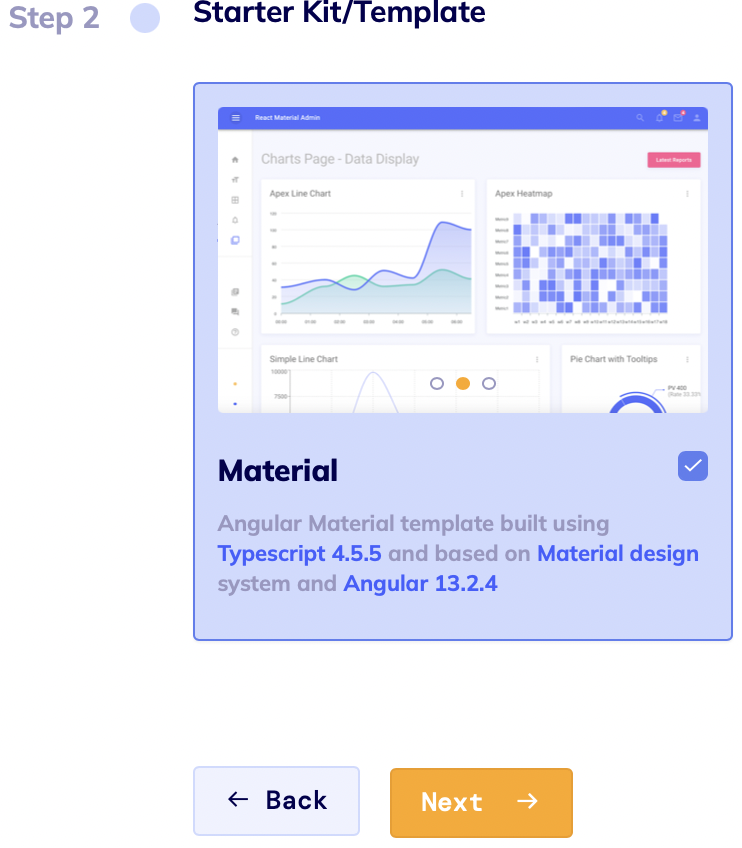
2 Step. Choosing the Starter Template
Next, you proceed to the step of selecting the starter template of the application.
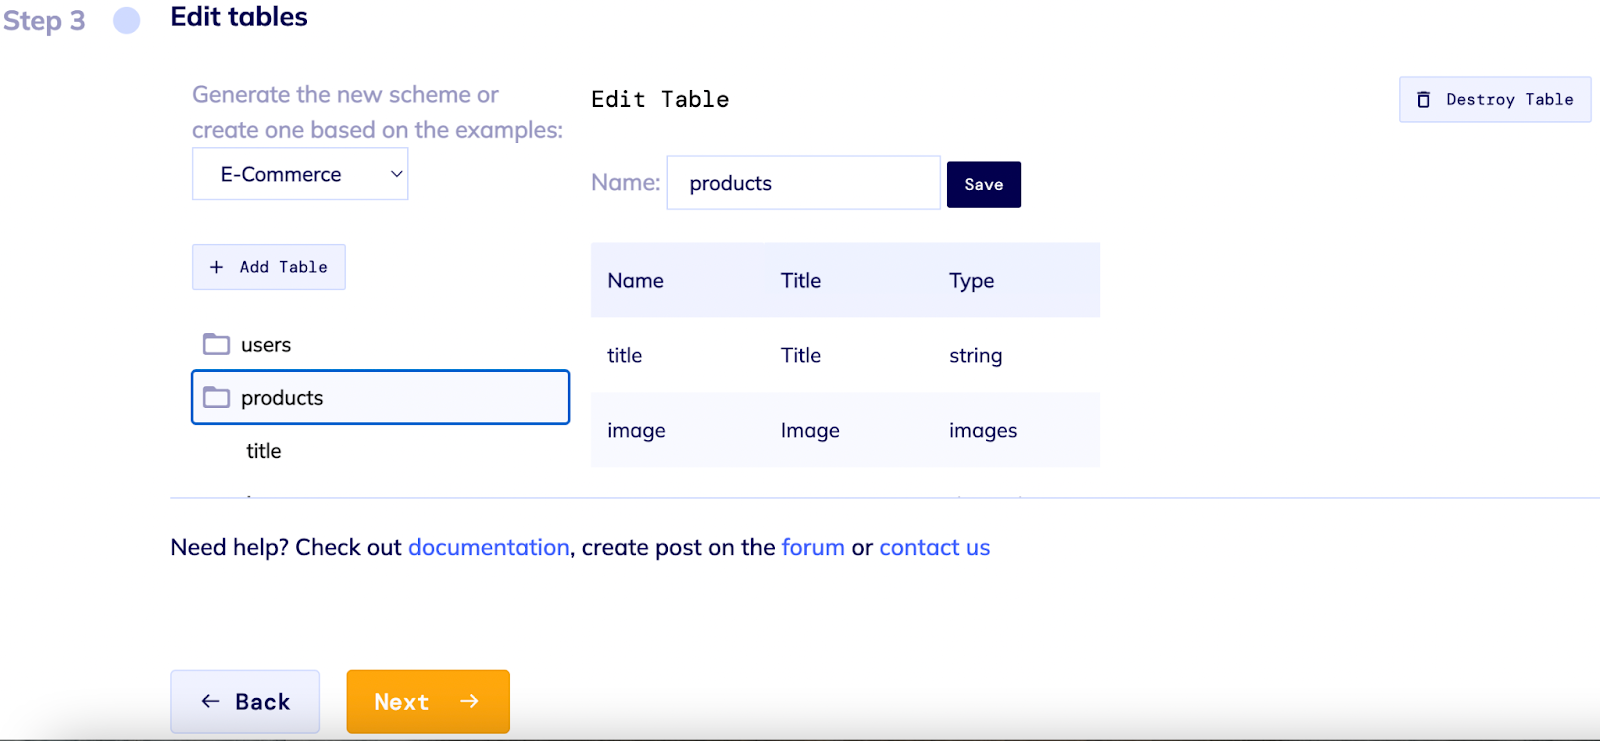
3 Step. Schema Editor
In this part you will need to know which application you want to build, that is, CRM or E-commerce, also in this part you build a database schema i.e. tables and relationships between them.
If you are not familiar with database design and it is difficult for you to understand what tables are, we have prepared several ready-made example schemas of real-world apps that you can build your app upon modification:
E-commerce app;
Time tracking app;
Books store;
Chat (messaging) app;
Blog.
Next, you can connect your GIT repository for further work with it, or skip this step and 'Deploy' your Project.
If you click on GitHub the ‘Login’ window opens next, where you need to enter login details for your GitHub account or sign in. Next, the ‘Choose a name for your repository’ window opens, where you have to choose a name for your repository and select privacy terms.

Afterwards, you will be redirected to the settings of your application, where you can make deployment of your application and make some changes if you want to.
Deployment of an Application
Next, you will be redirected to your app's settings on the Overview tab, where your application will be built. Also at the top, you have the Deploy button, using which you can launch the building process of your application if you have done any changes to your project.

Also in the Settings tab, you have two options to make the deployment of your Deploy From Scratch and Deploy From Git (if you’re already connected GitHub repository).

Deploy From Scratch
So if you click on Deploy or also on Deploy From Scratch from the Settings tab your application will be generated in a few minutes, you will get a CRUD application with a fully functional CMS, which you can further modify as you like.

Versioning
You can find versions on the Code Preview tab of all the required items in the file ‘./package.json’ for the backend and frontend.

Also on the Overview tab you can see the option to update to the latest template version for frontend and backed.

Connecting and working with Git
Firstly, if you’re not connected already to the GitHub repository, you can connect to it from the settings by just clicking on Push to Github.

The ‘Login’ window opens next, where you need to enter login details for your GitHub account or sign in.
Next, the ‘Choose a name for your repository’ window opens, where you have to choose a name for your repository and select privacy terms.

After this step, the Flatlogic Bot creates a GitHub repository for you and uploads your code there. Afterwards, you can work with the platform or with your GitHub repository.
Also, you can make changes to your code in your GitHub repository. But make sure you’re working on the right bench.
GitHub is connected to Flatlogic hosting, all deployments go directly from there. There are two branches: master & generated. Master - is for you to make changes directly in the source code. Generated is for Flatlogic Bot to make changes to the generated code. You can initiate Flatlogic Bot commit by pressing on push to GitHub button after making changes to the app. After this, you need to create a pull request and merge generated branch into master. It is better not to work with the Generated branch and leave it to Flatlogic Bot.
Master Branch
All customizations you wanted to add you should do at the Master branch on GitHub. To open your application with the changes you made on GitHub, you should go to your Project Settings on flatlogic.com and click on ‘Deploy from Git’ and your application will be rebuilt.

Generated Branch
After every change, you have made to your project on the Applications Settings tab you can initiate a push to GitHub. Flatlogic bot will push changes to the Generated Branch.
Next, you can create a pull request and merge the changes in both branches with a click on ‘Compare & pull request’.


Deploy From Git
If you click on Deploy from Git, your application will be generated from your GitHub repository, pulling up all of the changes that you made on it.

Why use Flatlogic Platform
Flatlogic Platform will be a good choice if you are starting a web application based on a relational DB and need both rapid development features and flexibility. Here is the list of obvious advantages:
Choice of frontend (React, Vue, Angular) and backend (Node.js, Laravel) framework
Create your DB schema online with all possible field and connection types
Connect your Github account and push code for initial and updated apps
Schema updates are implemented via migrations, allowing you to keep your production data in place and keep extending the DB structure
Have no limits for editing the generated code manually. The platform allows you to regenerate the app once your schema has changed and merge it with your manual changes anytime
Automatically deploy the app to the server from Git, all DB migrations are also applied automatically
The app architecture is clean and well defines: REST interfaces with JSON data transfer, ORM model-based DB operations
File and image upload functionality supported out of the box
For your local or proprietary server deploys use both Docker and non-Docker modes
Swagger annotations are auto-generated based on your DB schema
Get fully functional tables and forms out of the box with all major functions such as pagination, sorting, search, autocompletes, calendars