TL;DR
- Defines web apps and how they run via browsers using web/app servers and a database.
- Compares web, native, and hybrid apps, noting install and hardware access trade-offs.
- Presents a 4-stage build path: Idea, UI/UX, Development, Launch.
- Details stack choices, testing, hosting, and deployment best practices.
- Shows Flatlogic Platform to build CRUD/SPA apps in 3 steps, minutes.
Fact Box
- Web apps are accessed via a browser and do not require installation on a device.
- A typical web app uses a web server, an application server, and a database.
- This guide outlines 4 stages: Idea, UI/UX Design, Development, and Launch.
- Flatlogic Platform lets you build a web app in 3 steps in a few minutes. Source
- Flatlogic Platform can generate CRUD and single-page (SPA) applications. Source
A web application (web app) is an application program that is stored on a remote server and made available over the Internet through a browser interface. Web services by definition are web applications, though many, but not all, websites use web applications.
Web applications can be developed for a variety of reasons and can be used by anyone, whether an organization or an individual, for a multitude of reasons. Web applications, encompassing tools like web-based email, online calculators, and e-commerce shops, are integral components of business software, offering versatile solutions that enhance operational efficiency and customer engagement for organizations and individuals alike.
How web apps work
Web apps are not necessary to be uploaded as they are accessed via the network. Users can get access to a web app using a web browser such as Google Chrome, Safari, or Mozilla Firefox.
The web app requires the use of a web and an app server and a database. The web servers manage the requests coming from the client and the application server performs the tasks. The database is used to store any necessary information.
Web apps usually have brief development cycles and can be created by small development teams. The majority of web apps are written in JavaScript, HTML5, or CSS (Cascading Style Sheets). These languages are commonly used in client-side programming to create the front-end of an application. Server-side programming is for creating scripts to be used in the web application. The server-side programming typically uses languages such as Python, Java, and Ruby.
Benefits
There are many different use-cases for web apps, and many potential benefits come with it. Some general benefits of web apps are:
- Providing multi-user access to the same version of an application.
- No need to install web apps.
- Access web apps from different platforms, such as a desktop computer, laptop, or mobile phone.
- Access it through multiple browsers.

Web Apps vs. other apps types
When it comes to mobile computing, web apps are occasionally compared to native apps, applications developed for a platform or device and which are installed on that device. These two concepts are not mutually exclusive. Native apps are defined as apps that are downloaded and developed specifically for the type of device on which they are downloaded. Native apps typically use hardware that is device-specific, such as GPS or a camera in a native mobile app.
Programs combining these two approaches are called hybrid versions. Hybrid apps operate similarly to web apps but are installed on a device as a native app. Hybrid apps are also capable of using device-specific resources using internal APIs. While native apps installed on a device may sometimes work offline, hybrids don’t have that functionality. Hybrid apps tend to have similar navigation elements to web apps because they are web-based.
How to make a web app
The development of a new product always starts with the transformation of an idea into a workable product. Here are 4 the main stages of the development of the web app process:
- Idea;
- Design UI & UX;
- Development;
- Launch.
Idea
In the process of going through the idea stage of the product development life cycle, user orientation, focusing, enthusiasm and flexibility can help create the foundation not for the right product, but for creating the right product.
- Source an idea. At this step, you do not need to generate any solid ideas that are ready to be implemented. Focus instead on brainstorming ideas that prioritize solving clients’ problems, generating raw and untested ideas that can later be shortlisted. The problem-solving approach to brainstorming starts with the assumption that if you have a problem, others may also have one. When you can identify and define this problem and what users are struggling with, you can brainstorm products to help solve it.
- Research of target market and competitors. For any product, the most important starting point is the research of the target market and competitors. Teams need an exact and real understanding of the market, their problem, the scale of the problem ( the number of people facing it), and what competitors are offering alternative ways to solve the problem. During the market research process, an understanding of the user and the competition will help determine the technical focus of the web application.
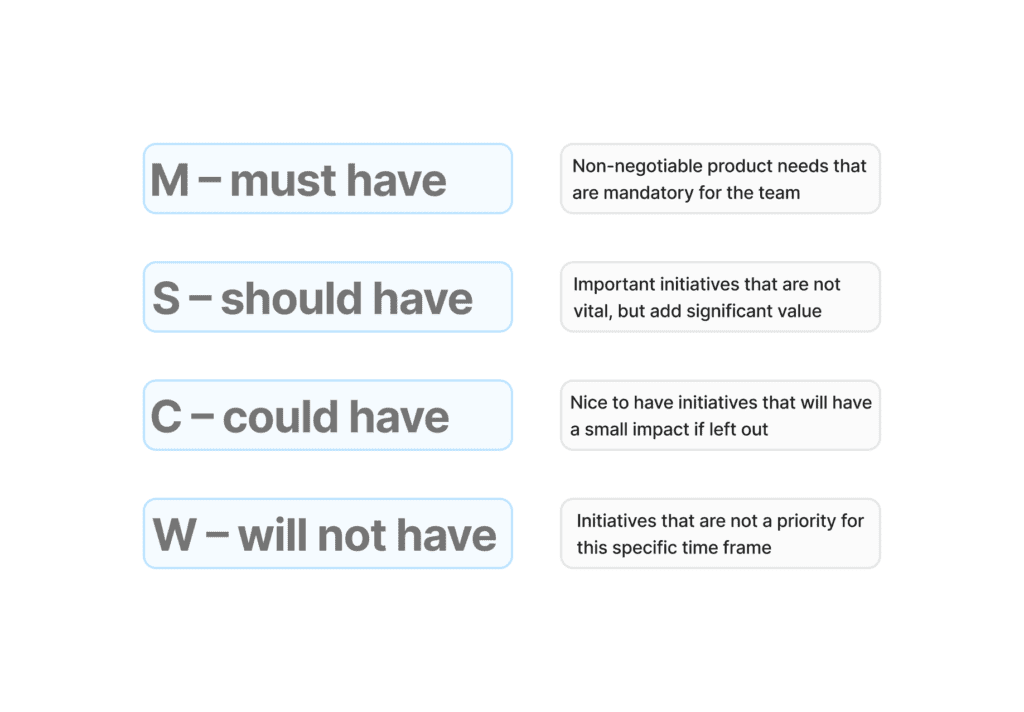
- Plan the main functionalities and features of the web app. In today’s fast-paced environment, it is important to be fast, but it is also important to develop a good product. To prioritize the main features and functionality of the web app, list all the features ( major, minor and minor) that will be needed to develop the product with the MSCW model approach.
UI & UX Design
Designing a web app begins with understanding user interface (UI) and user experience (UX) – including how they are connected and how each affects design choices during this stage of web app development. UI (user interface) is about the appearance of a web application, with design issues such as fonts, colors, layout, and general design. Designing the UI focuses on building a user interface that is both aesthetically pleasing to the user. UX (user experience) handles and manages the way a user interacts with an app using a detailed understanding of what a user desires and feels.
- Map the user’s journey. Mapping the user journey is a visualization of the user flow over time through a web app. Doing so helps to understand the user’s motivations, needs, and problems over time. By mapping the user journey every step of the way, it’s easier to understand the motivations, needs, and challenges that users face, and how the best UX design can resolve these roadblocks.
- UI wireframe. Wireframes are digital, simplified visual concepts of a future application. They show the architecture, its hierarchy, and the relations between the elements that compose the product. Look at the wireframe as a ‘draft’ or ‘blueprint’ of the app, both the frontend and backend of what the mobile app will look like and how it will work. You can create a wireframe using next tools:
- Figma,
- InVision Studio,
- Mockplus RP
- Adobe XD, Sketch, etc.
- Building a clickable prototype. Adding extra interactivity to the generated set of wireframes, the resulting prototype design can look and perform similar to a full-scale web app. Using interactivity and UX enhancements that simulate the user experience, allowing this prototype can be viewed and tried out, allowing valuable user experience feedback on functionality, design as well as usability before full development is carried out.
- Visual design. Visual design is an important method of experience design that is focused on the aesthetics of a website or application. UI designers at this stage create layouts that show how the app will look by selecting UI elements, including fonts, color schemes, icons, shapes, buttons, sizes, and proportions of screen elements, illustrations, and more. It also includes where relevant, motion design elements like animation and on-screen transitions. For inspiration and to keep up with the latest visual trends in the design industry.
Development
The next stage is the development stage, where important technical choices are made about the frameworks and technologies that will support the application, as well as the coding of the web application proper. Choose your technology stack: frontend: HTML, CSS, and JavaScript; backend: framework, server-side languages, web server, database, and operating system.
- Database Schema. The database is the code repository of your web or mobile application. Also, the database is in charge of storing, collecting, processing, and managing the data as well as allowing secure access to it. Choosing a database is relatively easy since the market is almost entirely captured by the two MySQL, and other options include MongoDB and PostgreSQL. The most important consideration in selecting a database is security and the impossibility of data leakage. When selecting a database, attention should be paid to the following factor – the database must be secure. After you decide which database to use, the architecture you create usually follows an MVC (Model-View-Controller) architecture.
- Front-end. The front-end is the client-side development that provides the web app to the user in a browser. Modern front-end development is based on HTML, CSS(spacebar counters f.ex.), and JavaScript, with multiple frameworks which provide the basic templates and components. All you need to start with is setting up a development environment:
- choose a code editor, e.g. VS Code;
- Framework for compilation and packaging, e.g. Webpack;
- Frontend framework, e.g. React, Vue, etc;
- and Set up a packaging tool to communicate with the backend – which will most likely run on a different port on localhost. This is usually done using an HTTP proxy Node.
- Backend. Backend development is about the actual logic, database, and server of the web app. The backend, meanwhile, has many options, beginning with the choice of one of them: multi-page apps, and SPA (single-page apps). Since the backend is quite vast, there are quite a few frameworks that can help with development. Framework options are partly determined by the choice of technology stack or by the languages. Here are some popular ones such as NodeJS, Laravel, Ruby on Rails, etc.
- API integration of frontend with backend. The API integration process helps to connect the frontend and backend to enable data exchange.
- Testing the web app. Testing makes sure that the application works as intended and that it can cope with unexpected situations. Testing starts during development – with the unit, component, and integration tests – and continues through the development process to the UI, where testing includes feedback from the user.
Launch
Choosing where to host your web app and introducing it to real users.
- Hosting. Hosting allows a web app to be accessed through the cloud, providing instant access to the web app from any location in the world. Here are popular hosting providers such as Google Cloud Platform (GCP), Amazon Web Services (AWS), and Microsoft Azure. What to consider when choosing a hosting service?
- Price. Jumping on the cheapest offer is not a good idea, especially if you rely on your website being profitable. Carefully consider the options each hosting service offers and then compare prices.
- Area of Focus/Specialties. Research a company’s specialization or area of expertise before you buy and choose one that understands your particular needs as a customer. Reviews and references can be found online, and many will tell you about the strengths and weaknesses of a particular company.
- Technical data/Limitations. Have a close and honest look at your website and determine what you need it for. If you hope to host a blog, an e-commerce site, rich content, and videos, you should not choose the cheapest hosting package you can find.
- Add-ons/Features. When you are hosting a website, this area of consideration boils down to the following question: “What makes this hosting company special? What extra incentives do they provide to make hosting your site with them even more attractive?”. When you see a hosting provider that offers exactly what you need or care about, that might be a good indicator that you should take a closer look at that company.
- Tech Support. Before you choose a hosting provider, research their customer support reputation. Consider the different ways you can contact them if you need support – email, toll-free phone, chat, and so on. Are they open 24/7? Do they outsource support?
- Customer Reviews.
- Scalability. The last important thing to consider when choosing a hosting provider (and plan) is whether it fits into your plans for the future. This means that what you consider to be appropriate hosting now may not fit your needs in two years when you start selling your products online and get good traffic to your website.
- Deployment. The final step includes the migration of the web app from the source control system to the hosting provider’s cloud. There are many tools available like many other development steps to help with this, as well, such as GitHub, GitLab, Jenkins, and Bitbucket.
Creating a web app with Flatlogic Platform
Want to build your web application? Flatlogic Platform will help you to create the web application in just 3 steps and a few minutes. Flatlogic Platform will speed up and simplify the process of creating your web app. Using the platform you can build CRUD applications and SPA. Here is a video example of how to create and work with an application using the Flatlogic Platform.
Creating the CRUD web app
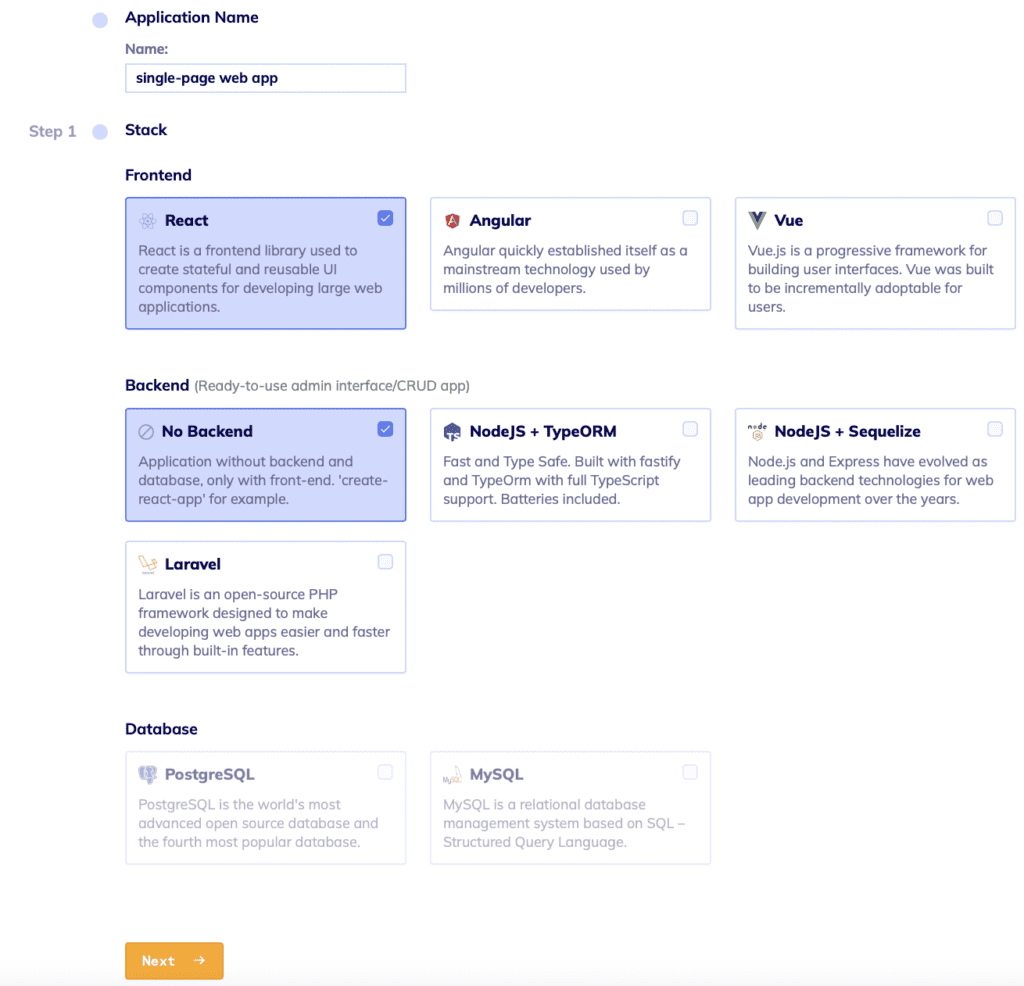
1 Step. Choosing the Tech Stack
In this step, you’re setting the name of your application and choosing the stack: Frontend, Backend, and Database.
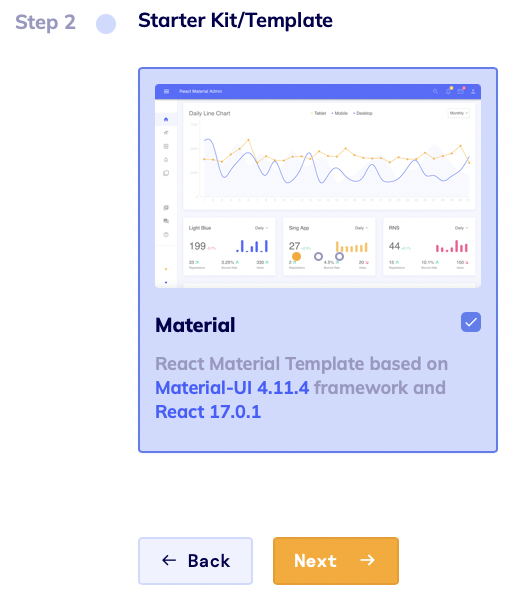
2 Step. Choosing the Starter Template
In this step, you’re choosing the design of the web app.
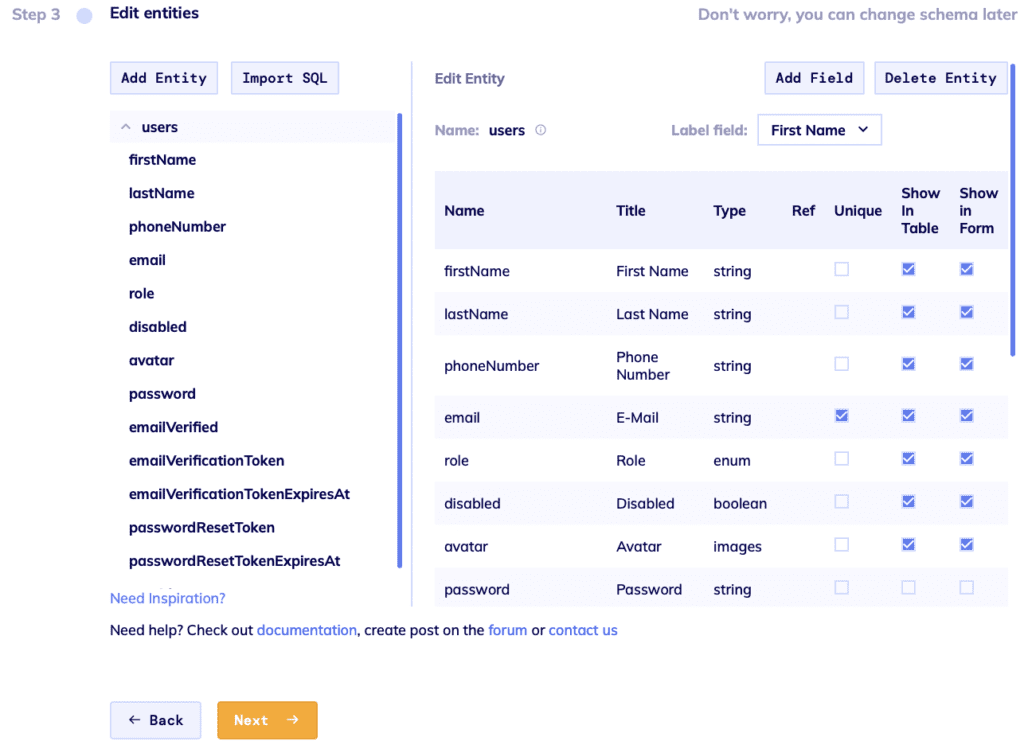
3 Step. Schema Editor
In this step, you can create your database schema from scratch, import an existing one or choose one of the suggested ones.
To import your existing database use the Import SQL button and select your .sql file. Then your database will open in the Schema Editor, where you can further edit your data (add/edit/delete entities).
If you are not familiar with database design and it is difficult for you to understand what tables are, we have prepared several ready-made example schemas of real-world apps that you can build your app upon modification:
- E-commerce app;
- Time tracking app;
- Books store;
- Chat (messaging) app;
- Blog.
Finally, you can deploy your application and in a few minutes, you will get a fully functional CMS for your Web Application.
After your app is deployed you will easily and quickly get a single-page web app, which you can further modify as you like.
Conclusion
In this part you will need to know which application you want to build, that is, CRM or E-commerce, also in this part you build a database scheme i.e. tables and relationships between them.
By clicking on the ready-made Users tab, you will see in front of you all the columns created in the table with their properties.
When working with tables, you have 2 options – add a new table or delete it (all, except the default Users table). Now let’s take a look at each of these steps separately.
When working with columns, you have 3 options – add or remove a column, or change the properties of the column
Let’s take a closer look at each option separately:
- adding the table: to add a table, you need to press the ‘+ Add Table’ button (see screenshot below). After clicking the button, a new table will be added and you will be prompted to select a name for this table. Please follow SQL table naming standards. Please choose the name in lower case for better code generation. You can add an unlimited number of tables in the paid plan and in the free plan. For example, users, categories, tags, tags1, tags2, etc.
- deleting the table: deleting a table is very simple – you just need to select the table you want to delete and click the ‘Destroy Table’ button. The table and all columns referring to it will be deleted immediately. Please note that the ‘Users’ table can not be deleted.
- adding column: to create a column, you need to click on the table in which you want to create a column and then click on the ‘+ Add Column’ button. Then the Edit column window with the following parameters will open on the right side:
- Name – here you specify the name of the column that you will see in your database. Please, use a camel case, numbers and “_” for column names. Note, the column name cannot start with a number. For example, Name, Title, Type, Name1, etc.
- Title is the title of the column that you will see in your live application. Here you can use capital letters and any names, as this does not affect the generation and operation of the application.
- Type – in this menu you can select the data type of the column.
The following types are offered to choose from:
- String – when you select this type, you have a unique Multiline option that adds multiple lines;
- Boolean – when choosing this type, you need to set the value to True or False;
- Date Time;
- Decimal;
- Integer;
- Enumeration:
- Enumerated column type: to select this data type, we need to select the column to which we want to assign it, and in the right ‘Edit Column’ window select ‘Type’ – ‘Enumeration’, then we will have the ‘Options’ field in which we will need to list the options for selection, as well as ‘Widget’ type for selecting options – select or radio button.
- Date;
- Images;
- Relation (one):
- Relation to one column: to make a relation to one column you have to select it in the list of columns in the table, go to the ‘Type’ property and choose ‘Relation (one)’ option. After that, you will have a new property Entity – the link to the table this column will be connected to.
- Relation (many):
- Relation to multiple columns: to make a relation to many columns you have to select it in the list of columns in the table, go to the ‘Type’ property and choose ‘Relation (many)’ options. After that, you will have a new property Ref – the link to the table this column will be connected to.
- editing column: to change a created column, click on it, and on the right side of the modal window, you will see the ‘Edit Column’ menu, where you will see the properties that you can change. In editing a column, it is possible to change only name, title, show in form and show in table. Please, use a camel case, numbers and “_” for column names.
Note: The column name cannot start with a number. Also, there cannot be the same-named columns in one table.
- deleting column: Deleting a column is done by selecting the column you want to delete and pressing the ‘Destroy’ button. The column should be deleted immediately. You cannot delete the last column in the table.